Establishing and Managing a Hourly or Per Passenger Rate Matrix
The Hourly or Per Passenger Rate Matrix is a quick and easy way to establish a specific Rate table for an Account, and to apply that schedule repeatedly with multiple Accounts; or for application in the Online Reservation System/version 3(ORES V3).
A Hourly or Per Passenger Rate Matrix is established using the Vehicle Types in the company’s Limo Anywhere.
Establishing an Hourly or Per Passenger Rate Matrix
- Click on the ‘My Office‘ icon on the tool bar.
- Select the ‘Company Resources‘ tab.
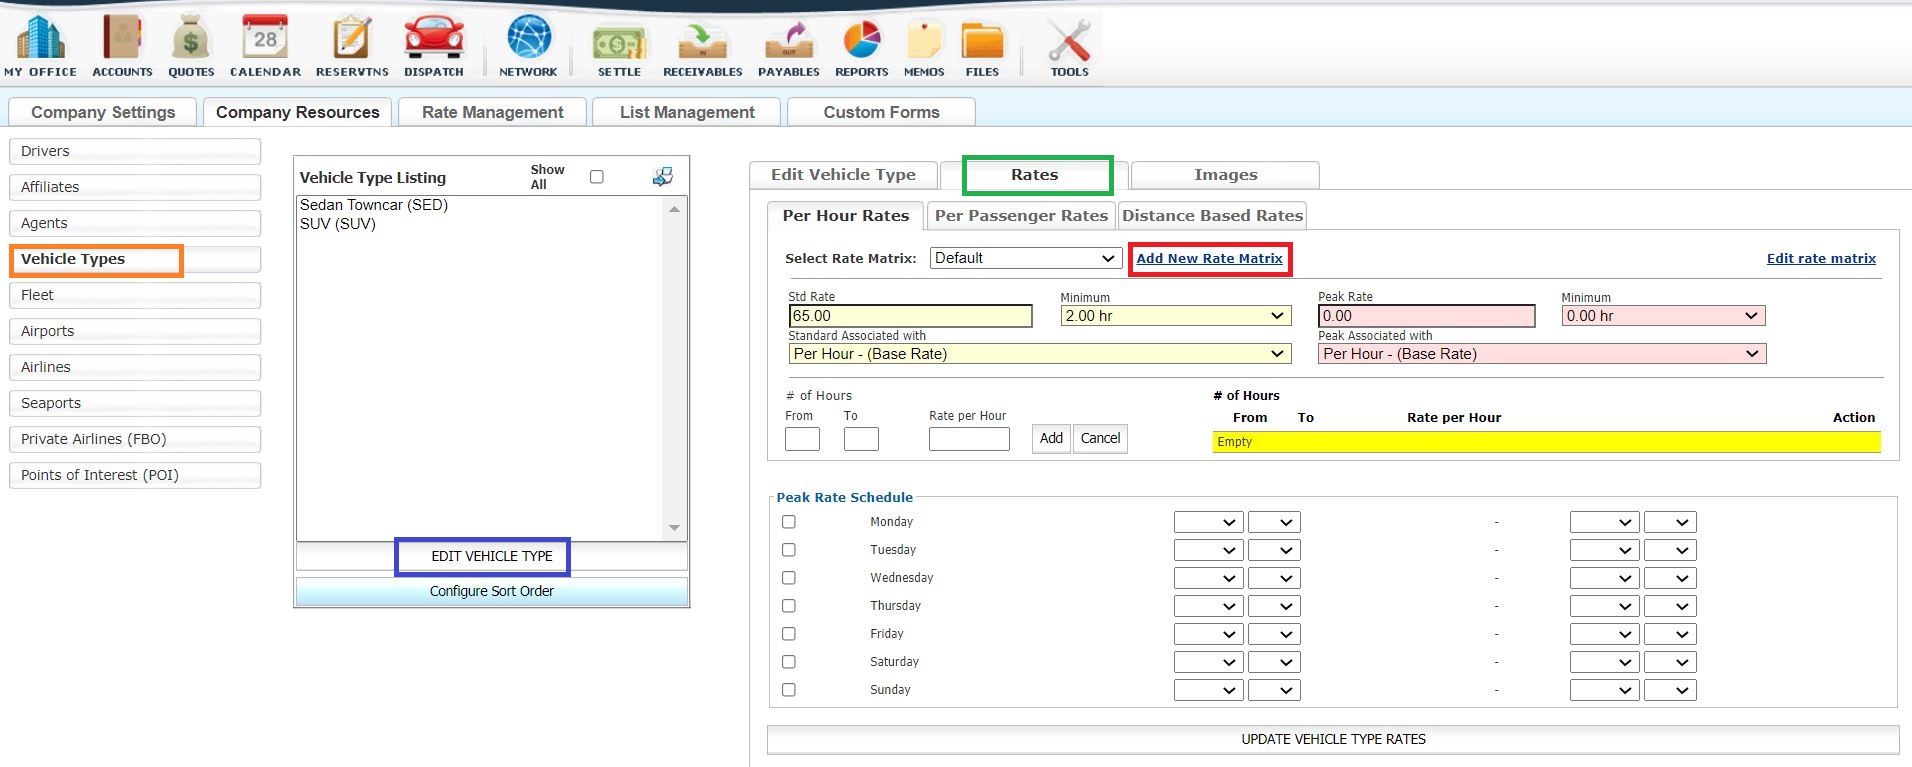
- Click on the ‘Vehicle Types‘ button (highlighted orange).

- In the Vehicle Type Listing chose the Vehicle Type to which the Hourly or Per Passenger Matrix is to be added.
- Click ‘Edit Vehicle Type‘ (highlighted blue).
- The Vehicle Type will display in the Edit Vehicle Type section.
- Select the Rates tab (highlighted green).
NOTE: Previously entered Par Hour or Per Passenger rates are now the default. Think of these as the normal or regular rates. - Select either the Per Hour Rates or Per Passenger Rates tab.
NOTE: A Vehicle Type would have either Per Hour or Per Passenger rates as default which is set under the ‘Edit Vehicle Type’ tab in the setting “Calculate Rates Based On:” where either Hours or Passengers are selected from the drop down list. Even though the default setting was Hours a Rate Matrix could still be created and applied for Per Passenger. - Click ‘Add New Rate Matrix‘ link (highlighted red).
- The ‘Create New Rate Matrix‘ pop up will open.
- In the Copy Rate From do not select an existing Rate Matrix from the drop down list.
- Enter New Rate Matrix Name. Each Rate Matrix should have a unique name.
- Do not click the Default check box.
NOTE: there can only be one Default Rate Matrix. These are the basic Fixed Rates that any customer would get. Using a limited or discounted rate matrix as the default could effect almost every customer. - Click ‘Create Matrix‘ to continue, or ‘Cancel‘ to erase the fields and start over. The Rate Matrix will open so rates can be added as indicated by the title appearing in the Select Rate Matrix field:
- Select the Per Hour or Per Passenger tab.
- In the Per Hour tab there are two ways to create rates.
- Standard/ Peak Time
- Enter the rate per hour for Std Rate.
- Select the Minimum Hours for the Standard rate from the drop down list.
- Enter the rate per hour for Peak Rate.
- Select the Minimum Hours for the Peak rate from the drop down list.
- For the Standard and Peak Rate select from the drop down list the Rate it will be associated with. This will determine where the rate will appear in a the rate construction area of a reservation. The default selection is Per Hour (Base Rate).
- Select the days and enter the hours for which the Peak Rate will apply in Peak Rate Schedule.
- Click ‘Update Vehicle Type Rate‘ to retain entry.
# of Hours Method
This method creates an escalating or de-escalating rate based on the Trip Duration.
- Enter a number of hours in the ‘From field’. For the first time segment the From will start at the minimum number of hours allowed.
- Enter the number of hours in the ‘To field’.
- Enter the Rate per Hour for trips whose duration falls within the From and To fields.
- Click ‘Add‘.
- Repeat this process until the maximum number of hours is reached. Rates added will appear in the # of Hours rate list on the right.
- Click ‘Update Vehicle Type Rate‘ to retain entry.
Per Passenger Rates
For Per Passenger Rates, select the ‘Per Passenger‘ tab, and follow the procedures above except:
- Any reference to ‘Hours’ or ‘# of Hours’ is replaced by ‘Passengers’ or ‘# of Passengers’.
- The ‘Standard Rate Associated with’ and ‘Peak Rate Associated With’ should be changed to ‘Per Pass – Base Rate’ by selection from the drop down list.
Editing a Rate Matrix
- To change and existing Rate Matrix click the link ‘Edit Rate Matrix’.
- The Edit Rate Matrix pop up will open.
- To change the name of the selected Rate Matrix click ‘Edit’.
- To delete a Rate Matrix click ‘Delete’.
Note: Deleting a Rate Matrix is an irreversible action so proceed with caution. Deleting a Rate Matrix will also automatically make those rates unavailable for any account the Rate Matrix was applied to. - To change the parameters click the linked Rate Matrix Name. The Rate Matrix will open and any changes can be made following the same instructions used to build the Rate Matrix.
For information on the Fixed Rate Matrix see the Knowledge Base article Establishing and Managing a Fixed Rate Matrix.
For information on applying a Rate Matrix to an Account see the Knowledge Base article Utilizing a Rate Matrix with an Account
