Everything You Need to Know About the ORES Version 4
The Limo Anywhere Online Reservations System (ORES) was built to be your partner in growing your business. The ORES is a 24/7 reservation agent for your company that never takes breaks, providing a seamless way for customers to book or change reservations, open and manage accounts, and see detailed user and spend information through your company’s website.
ORES Version 4 has been redesigned from the ground up, built using tomorrow’s technology to help your business today.
Here are some of the features included in the initial deployment:
- Cleaner, simpler interface designed to improve the conversion ratio for bookings
- Responsive design to work on both desktops and mobile devices
- Distance based pricing, combined pricing options, and integrated route mapping to simplify your rate management headaches
- Integrated POI lookup and address validation
- Rate grouping for customizing rate titles displayed to the client
- Integrated round trip booking
- Customer Dashboard with advanced financial widgets
- Real time tracking of driver location and trip status updates
- Quick, simple integration with your website
- Multiple options for sorting/displaying rate results
- Integrated child seats and stops
- Improved booking contact functionality
- Improved promo code functionality
Please see the below articles for an overview of how to set up and use ORES Version 4 today!
- Setting for Service Types
- ORES 4 Performance Settings
- Linking the ORES V4 to Your Website
- Websites not Produced/Hosted by Limo Anywhere
- Limo Anywhere CMS Websites
- Design Settings
- Google Analytics
Setting up the ORES V4 in Limo Anywhere
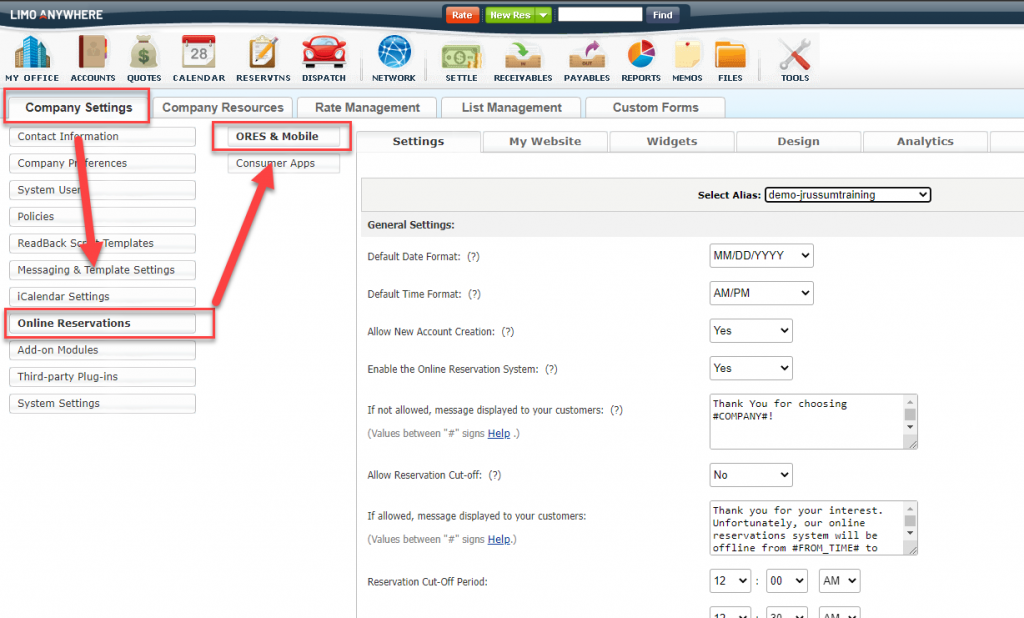
The Settings for ORES V4 can be found under the
- My Office icon
- Company Settings tab
- Online Reservations button
- ORES & Mobile button (as illustrated in the screenshot below)

NOTE: For companies using the Alias module to operate more than one company through a single Limo Anywhere system a separate ORES can be designated for each alias.
If you do have the Alias module, make sure to select which Alias you are wanting to make changes to on each tab. Each Alias can have their own Settings, My Website, Widgets, Design, Analytics, and Rules. Also under the My Website tab you will have a different code and URL link for each Alias.
Service Types
Go to:
- My Office
- System Settings
- Service Types
This is where you select which Service Types you are going to offer your customers on your website.
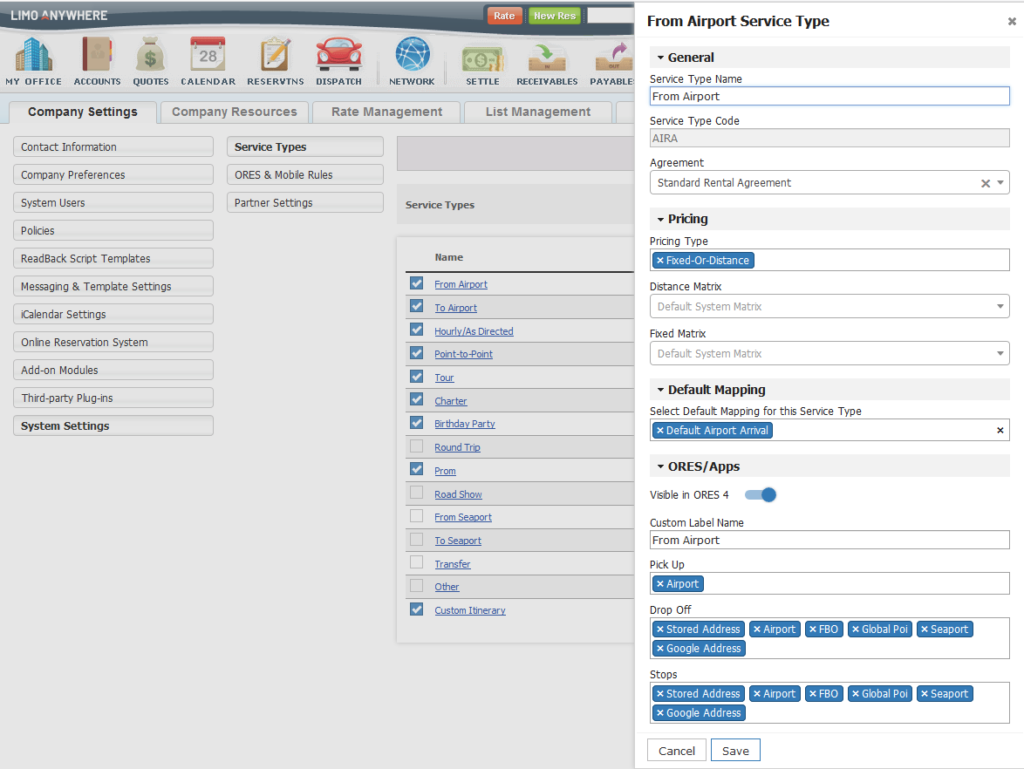
- Click on a ‘Service Type‘. (i.e. From Airport)
- Rental Agreement: Select the agreement to be applied to each active Service Type. The drop down arrow will display all active Rental Agreements for your company, See this article for complete instructions on Rental Agreements. Managing Rental Agreements
- Pricing Type: Select the Pricing Type to be used on the active Service Type.
- Fixed-uses Fixed Rates and Zones as set up in
1. My Office
2. Rate Management
3. Fixed Rates & Zones Setup.
See this article for complete instructions on Fixed Rates & Zones. Fixed Rates & Zones Set Up - Hourly-uses Hourly Rates for Vehicle Types as set up in
1.My Office
2. Company Resources
3. Vehicle Types
4. Rates
5. Per Hour Rates.
See this article for complete instructions on Hourly Rates. Setting Up Vehicle Type Hourly Rates - Passenger-uses Per Passenger Rates for Vehicle Types as set up in
1. My Office
2. Company Resources
3. Vehicle Types
4. Rates
5. Per Passenger Rates.
See this article for complete instructions on Per Passenger Rates. Setting Up Vehicle Type Per Passenger Rates. - Distance-uses Distance Based Rates for Vehicle Types as set up in
1.My Office
2. Company Resources
3. Vehicle Types
4. Rates
5. Distance Based Rates.
See this article for complete instructions on Distance Based Rates. Setting Up Distance Based Pricing. - Fixed-Or-Distance-uses Fixed Rates and Zones and if it does not find a Fixed rate, then it will display the Distance Based rate. This is helpful to use if you want ORES 4 to always display a rate if you do not have a particular Fixed rate and zone set up in your system.
- Fixed-uses Fixed Rates and Zones as set up in
- Matrix: Select the rate matrix you want to apply to this Service Type. Each pricing type will have a different set of matrices. For example: You have a standard hourly rate and a separate prom rate. You would select your hourly rate matrix for the Service Type: ‘Hourly/As Directed‘. You could create a separate hourly rate matrix for your prom rates and select that matrix for the Service Type: ‘Prom‘.
- Visible in ORES 4: Toggle this switch on to have this Service Type available in your Online Reservation System.
- Custom Label Name: Enter the title that you want to appear for this Service Type in the Custom Label field. This is how it will appear in your website to your customers. For example you may want ‘From Airport’ Service type to be labeled ‘Airport Pick Up’ .
- Pick Up, Drop Off, and Stops: These determine the various address verification databases to be utilized to verify the address input by the customer. For example: you may want to only show airports in Pick-up for ‘From Airport’ Service Type so in Pick-Up you would only have Airport selected and the rest of the options not selected.

Note: There is not ‘Update button’ at the bottom of the page to save your settings. Settings are automatically saved in the ORES 4 Settings function.
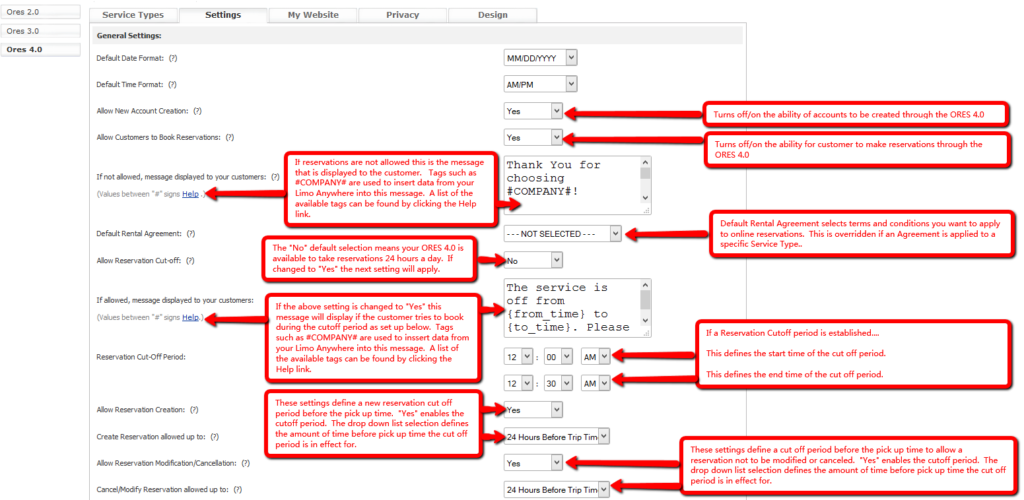
Settings Tab
The settings control how customers can use, and how information is displayed to them in the ORES 4. They are divided into four sections. For each option there is a (?) icon for an explanation of each setting.
- General
- Rates & Display Settings
- Billing Settings
- Post Submission Settings

Airport PU Options:
ORES 4 allows you to easily set fee for Meet and Greet Options and lets your customer select those options on Step 3 of the booking process.
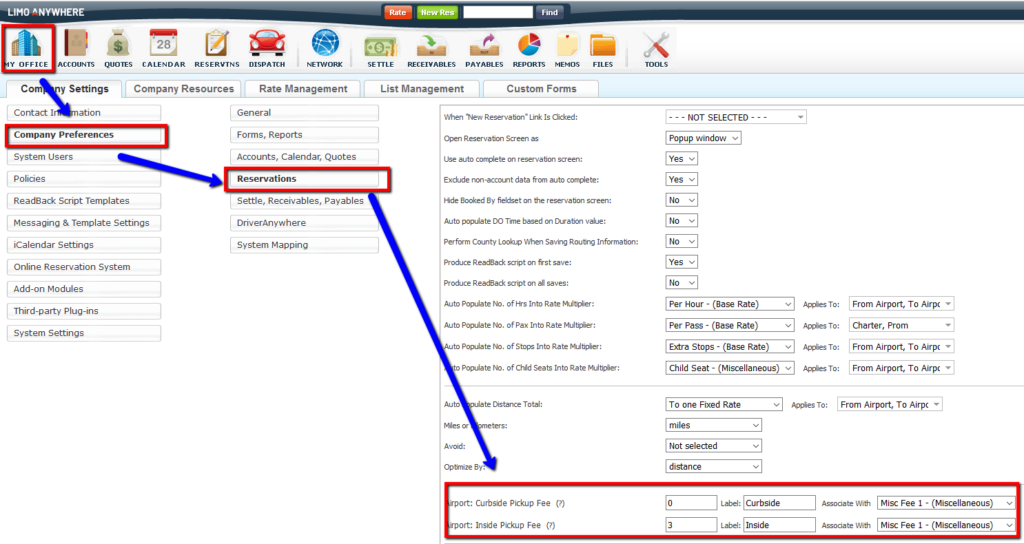
Go to:
- My Office
- Company Preferences
- Reservations
to set up fee for ‘Curbside’ and/or ‘Inside’ Pick up. Put in the amount you want to charge for each “Pick-up” fee and associate the charge with a rate.
Note: We recommend creating a separate rate to map the fee so it does not overwrite another fee you may have set up. For information on setting up rate please go here.
Also you can label the Curbside/Inside option by putting in what you would like to display to the customer in the ‘Label:’ boxes respectively.

Once you have those options set, you must go to
- My Office
- Online Reservations
- ORES & Mobile
- Settings tab
and set ‘Show Airport PU Options:‘ to ‘Yes‘.

This will allow them to select either ‘Curbside’ or ‘Inside’ Pick-up on Step 3 after they put in Airline and Flight #.

IMPORTANT: The Meet Option was only designed to easily price on ORES 4 and allow your customers to easily select the option when booking. This option will NOT show in Driver Anywhere or on any forms (Confirmations, Trip Sheets, etc.). You must select the appropriate Airport Pickup Instruction in the routing of the reservation.
My Website
The My Website tab controls linking the ORES 4 to your website. There are two methods for linking the ORES 4 to your website.
The Preferred Method embeds the ORES 4 on your website, so the user never leaves your website during the booking process. This is accomplished by copying and pasting the code into the source of a “Reservations” page on your website.
- The provided code will then be pasted into the source of the Reservations page. Any account login or quick res features on the Home page would need to be removed; and any links to the old ORES changed to point to the new Reservations page. A competent web person should be able to accomplish this in 15 to 30 minutes depending on how your website was built.
- Limo Anywhere CMS Websites(Hosted by Limo Anywhere)-after you have activated the ORES 4 module send an email to web@limoanywhere.com. Make the subject of the email CMS/ORES 4.0 – <your Limo Anywhere Company ID>, and request integration of the ORES 4 into your website. We expect a large volume of requests, and the requests will ONLY be fulfilled in the order they are received at web@limoanywhere.com.
Widgets
There are 2 widgets you can embed onto your website for easier access and usability for your customers: Quick Res and Account Login. Read more about them here: ORES 4 Widgets
Design
One of the new features of the ORES V4 is the colors can be customized to match your website.
The color elements that can be changed are the….
- Accent Color
- Background Color
Google Analytics
This allows you to track your visitors using Google Analytics. Enable the integration by checking the Enable box.
UA Code:
Enter the Universal Analytics code provided to you by Google. It will look something like UA-63389436-1.
Note: When entering the UA Code, please copy and paste everything after ‘UA-‘ and click ‘Update‘.
Google Tag Manager:
Enter the Tag Manager code provided to you by Google. It will look like GTM-XXXX, where “XXXX” – is your container ID.
Note: When entering the Tag Manager Code, please copy and paste everything after ‘GTM-‘ and click ‘Update‘.
For assistance with Google Tag Manager please click here.
Rules:
For each Alias you can set up Rules for which Agreement is shown on each ORES. If you want to Auto Accept New Reservations and if you allow reservations, modifications, and cancellations to be submitted and how much time before Pick-Up.
Rental Agreement: Default rental agreement for consumer mobile application and Online Reservation system if the selected service type does not have an assigned rental agreement.
Allow reservations to be submitted: The amount of time before trip pick up time that a reservation can be submitted.
Auto Accept New Reservations: The amount of time before trip pick up time that a reservation can be submitted.
Allow reservations modifications to be submitted: The amount of time before trip pick up time that a reservation can be modified.
Allow reservations cancellations to be submitted: The amount of time before trip pick up time that a reservation can be cancelled.
NOTE: If you have the Alias module, you can click ‘Use the setting for all aliases’ if you want these settings to apply to every alias.
