Enabling Distance Based Pricing
To turn on distance based pricing, go to:
- Click on ‘My Office’ icon.
- Click on ‘Company Settings’ button.
- Click on ‘Company Preferences’ button.
- Click on ‘Reservations’ button.
- Click on ‘Auto Populate Distance Total’ setting.

To One Fixed Rate
If you would like to only display the price without the breakdown of distance, then you would select ‘To One Fixed Rate’.

Example of how the rate displays on reservation if set to ‘To one Fixed Rate’:
![]()
To Set of Multiplier Rates
If you would like to display the prices per mile/km and the breakdown of distance, then you would select ‘To set of Multiplier Rates’.

Example of how the rates display on reservation if set to ‘To set of Multiplier Rates’:

Once you select the option, the rest of the associated settings will become available.
You must now choose the Service Type(s) you would like to use distance based pricing on in the ‘Applies To:’ drop down box.
The rest of the settings that become available are:
- ‘Miles or Kilometers:’- Specifies the distance unit used when a route is being calculated.
- ‘Avoid:’- Specifies the road types to minimize or avoid when a route is being calculated.
- ‘Optimize By:’- Specifies parameter for optimizing the route by:
- ‘Distance:’- The route is calculated to minimize distance; traffic information is not used.
- ‘Time:’- The route is calculated to minimize time; traffic information is not used.
- ‘Time with Traffic:’- The route is calculated to minimize time and uses current traffic information.
Configuring Distance Based Pricing
- Click on ‘My Office’ icon.
- Click on ‘Company Resources’ button.
- Click on ‘Vehicle Types’ button.
- Choose a vehicle type and click the ‘Edit’ button.
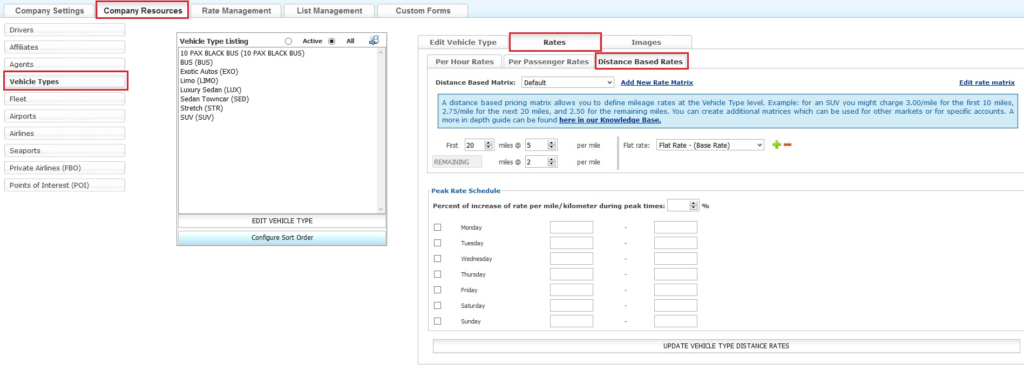
- Click on ‘Distance Based Rates’ tab.

To One Fixed Rate
This example is ‘To one Fixed Rate’ and will be configuring them into first 10 miles/km, next 10 miles/km, and all remaining miles/km. Since we want to charge different for a set of mile/km, click on the + sign 2 times to add 2 additional rate lines to the configuration.

Now you can fill out the configuration starting with line one. Set the number of miles/km, then a rate for the First X number of miles/km since you are setting it to one fixed rate. The first line you would map to a fixed rate (In this example it is Flat Rate).

To Set of Multiplier Rates
This example is using a set of multiplier rates and will be breaking them down into 3 rates (first 10 mile/km, next 10 miles/km, and all remaining miles/km.) Since we want a breakdown of 3 rates, click on the + sign 2 times to add 2 additional rate lines to the configuration.

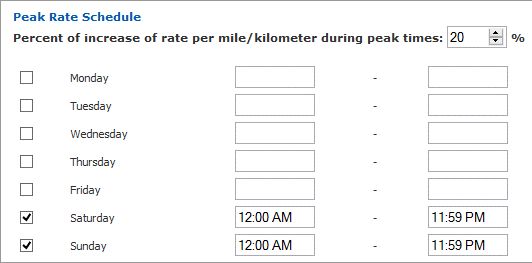
Below the configuration is a ‘Peak Rate schedule’. You can increase the rate(s) by a percentage if the PU is within a specified time. For example, if you wanted to charge 20% more on the weekend, you would set it up like this:

Setting Minimum Pricing
There are 2 ways you can set minimum pricing in distance based rates, so you can set a minimum price for low distance trips.
- You can set a minimum for all Vehicle Types
- You can set a minimum for each Vehicle Type
To set the minimum price for All Vehicle Types
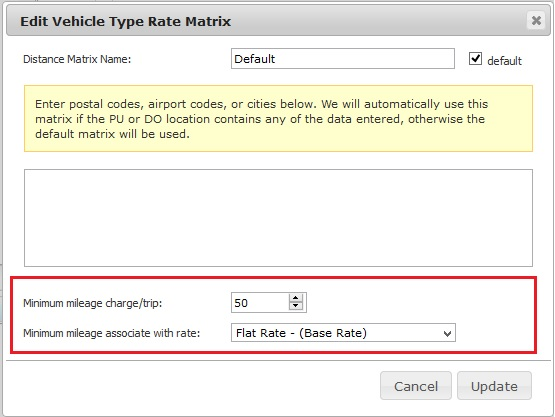
Click ‘Edit Rate Matrix’ and edit the matrix you want to set minimum pricing on. Set the minimum charge per trip and associate it with a rate.

You can only set one minimum charge per matrix, and that minimum charge is for all Vehicle Types.
To set the minimum price for each Vehicle Type
If you want to set a different minimum price for each Vehicle Type, then you would configure the distance rates to charge the first mile/km at your minimum price and then set your mileage based rates after the initial mile/km. Below is an example of how it would be set up if charged a minimum price of 50 for first 10 miles/km and then charge per mile/km.

Using this configuration, allows you to charge a different minimum charge for different Vehicle Types since you can set the price for the initial mile/km.
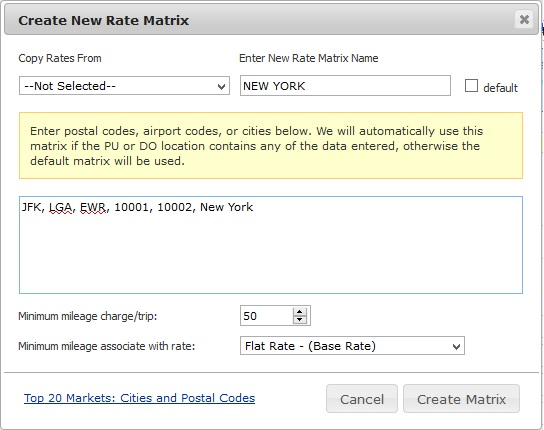
Rate Matrices

Account Level Pricing

Tips
- If Service Type and Vehicle Type are selected on the reservation, the calculation will be done when you add a piece of routing to the routing table (enter routing and click Pick-up or Drop-off) You will notice a little “verifying address” icon in the middle of the screen while it attempts to validate the address and get its geolocation.
- You can still apply distance based rates manually if Service Type and/or Vehicle Type is selected after the routing information is entered. Click on Apply Rate table and choose ‘DIST’ block to see distance based pricing breakdown.
- If you change the Vehicle Type after pricing has already been applied, you must manually select distance based rates for new vehicle type using above method. When you do this, the previously populated rates will be automatically removed and the new rates entered into their associated fields.
- You can work out distance based pricing several different ways for different markets. You would need to find the correct rates and set of miles with those rates that meet your needs.
