Establishing and Managing Drivers
Add a Driver
- Click on the ‘My Office icon‘ in the toolbar.
- Select the ‘Company Resources‘ tab.
- Select the ‘Drivers‘ button.
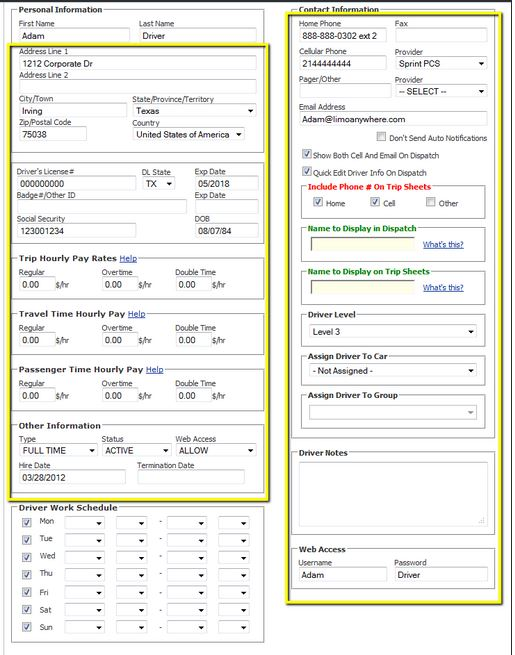
- Enter the Driver’s ‘First Name‘ and ‘Last Name‘.
- (OPTIONAL STEP) Enter the ‘Primary Address‘, ‘Apt/Ste‘, ‘City‘, ‘State/Prov‘, and ‘Zip/Post‘ .
- (OPTIONAL STEP) Enter the ‘Driver’s License #‘, ‘DL State‘, ‘Exp Date‘, ‘Badge #/Other ID‘, ‘Exp Date‘, ‘Social Security‘, and ‘DOB‘.
- (OPTIONAL STEP) Enter the ‘Trip Hourly Pay Rates‘, ‘Travel Time Hourly Pay‘, and ‘Passenger Time Hourly Pay‘.
- (OPTIONAL STEP) Enter the ‘Type‘, leave ‘Status‘ set to ACTIVE, set the ‘Web Access‘, enter the ‘Hire Date‘, and skip the ‘Termination Date‘.
- Set the ‘Driver Work Schedule‘.
- (OPTIONAL STEP) Enter ‘Home Phone‘, ‘Fax‘, ‘Cellular Phone‘ and ‘Provider‘, ‘Pager/Other‘ and ‘Provider‘, and ‘Email Address‘.
- (OPTIONAL STEP) Uncheck ‘Show Both Cell and Email on Dispatch‘ and ‘Quick Edit Driver Info On Dispatch‘ IF THEY ARE NOT NEEDED.
- (OPTIONAL STEP) Check off the boxes labeled ‘Home‘, ‘Cell‘, and ‘Other‘ if you would like to include phone # on trip sheets.
- (OPTIONAL STEP) Fill out ‘Name to Display in Dispatch‘, ‘Name to Display on Trip Sheets‘, ‘Driver Level‘, ‘Assign Driver to Car‘, ‘Assign Driver to Group‘, ‘Driver Notes‘ and ‘Username/Password‘.
- Click the ‘ADD NEW DRIVER‘ button.
Note: In the screenshot below all optional steps are enclosed in the yellow box/s.

Editing a Driver
- Click on the ‘My Office icon‘ in the toolbar.
- Select the ‘Company Resources‘ tab.
- Select the ‘Drivers‘ button.
- Select a driver from the ‘Drivers list‘.
- Click the ‘Edit Driver‘ button.
- Make the changes to the needed.
- Click the ‘UPDATE DRIVER‘ button.
Adding A Driver Portrait
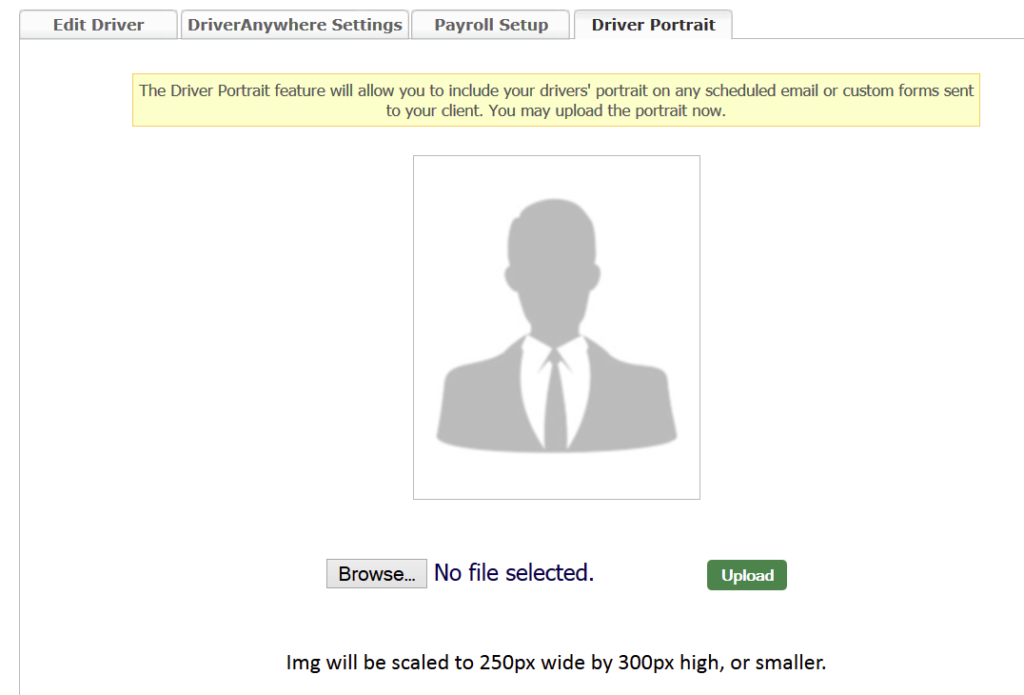
You can now add a Driver Portrait to your system. There are tags to populate the Driver Portrait into Scheduled Email Module templates or Custom Forms.
- Select the Driver Portrait tab in the Driver Profile.
- Select ‘Browse‘ and find the file on the computer.
- Click ‘Open‘ to load the file.
- Click ‘Upload‘ to complete the process.

Files in format jpeg, gif, and png can be uploaded. The picture will automatically be scaled to 250px wide by 300px high, or smaller.
For information on set up DriverAnywhere please see the Knowledge Base article ‘DriverAnywhere Quick Set Up Guide‘.
For information on setting up your driver’s pay please see the Knowledge Base article ‘Setting Up Driver Payroll – Hourly Pay Schedules‘ or ‘Setting Up Driver Payroll – Percentage Pay Schedules‘.
