DriverAnywhere Quick Set Up Guide
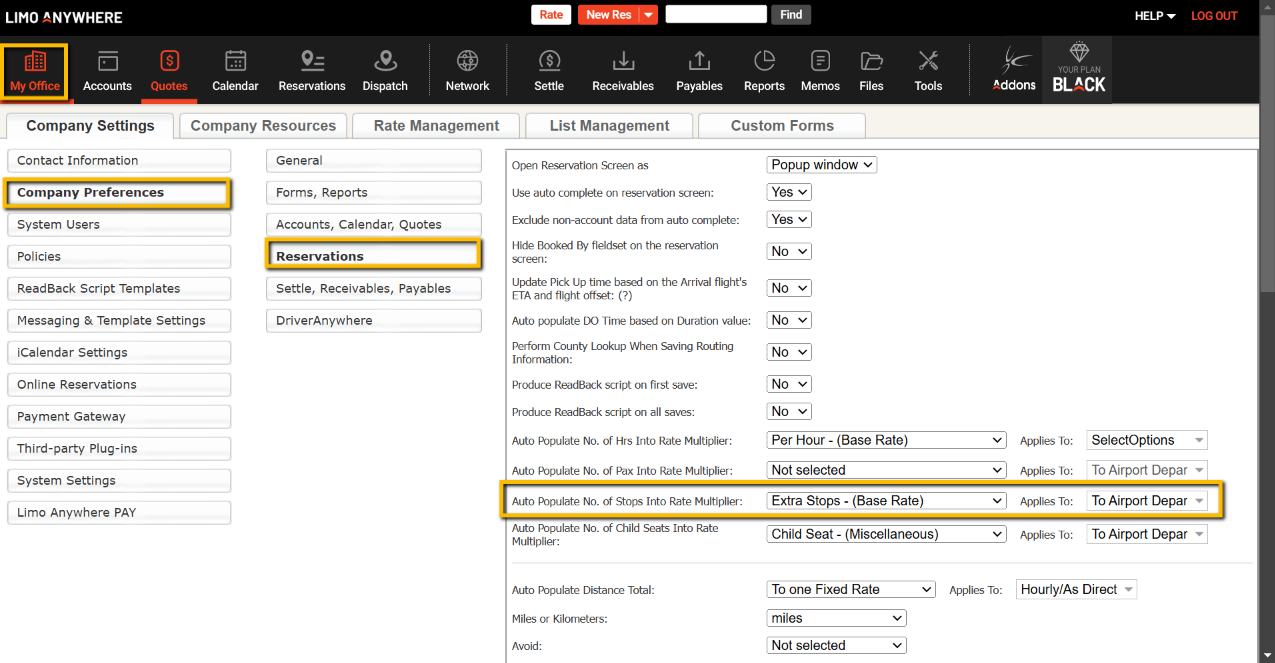
Set Up DriverAnywhere’s Extra Stops Field
- Click on the ‘My Office‘ icon in the toolbar.
- Select the ‘Company Settings‘ tab.
- Select the ‘Company Preferences‘ button.
- Select the ‘Reservations‘ button.
- Set ‘Auto Populate No. of Stops Into Rate Multiplier’: to ‘Extra Stops’.
- Set which status of the reservations you would like the extras stops to in the ‘Applies To’ field.
- Click the ‘Update My Company Preferences‘ button.

Set Up DriverAnywhere’s Company Preferences
- Click on the ‘My Office‘ icon in the toolbar.
- Select the ‘Company Settings‘ tab.
- Select the ‘Company Preferences‘ button.
- Select the ‘DriverAnywhere‘ button.
- Map the rates in Driver Anywhere to rates in Limo Anywhere by selecting the appropriate rate from the drop down list.
- Enter per minute Rates for each active Vehicle Type.
- If a ‘Waiting Time Grace Period’ (a period of time before the waiting time is charged to the customer) is applicable enter that time in minutes for each of the trip types listed.
- Select the options under ‘Payment Processing’ if you would like your drivers to take payments and get a signature with the DriverAnywhere application.
- Select the options under ‘Display’ if you would like to hide either Passenger’s Company Name and/or Phone Number in the DriverAnywhere application.
- Click the ‘Update My Company Preferences‘ button.

Status Mapping
Status Mapping is essential for DriverAnywhere to function properly. Please pay close attention to this critical step.
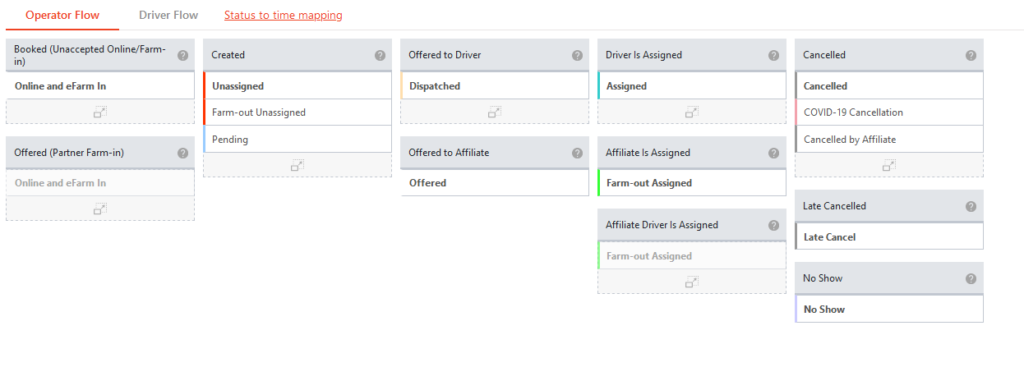
Step 1: Mapping the Operator Flow
- Click on ‘My Office‘.
- The ‘Company Settings‘ tab will be open by default.
- Click on the ‘System Settings‘ button.
- Click on the ‘System Mapping‘ button.
- The Operator Flow is selected by default.
- Statuses can be mapped by dragging and dropping them to the correct function:
- Created – This should have the status that is default for your company if a driver has not accepted (taken no action), or has rejected a trip.
Note: If a driver rejects a trip in the Driver Anywhere app the trip will revert to the status mapped here, and the driver who rejected the trip will be removed from the trip. - Offered to Driver – The status mapped here will trigger the job being sent to DriverAnywhere to the Driver selected on a reservation.
- Driver Is Assigned – The status that is default for your company if a driver has accepted the trip in the Driver Anywhere app.

Step 2: Mapping the Driver Flow
- Click on ‘My Office‘.
- The Company Settings tab will be open by default.
- Click on the ‘System Settings‘ button.
- Click on the ‘System Mapping‘ button.
- Click ‘Driver Flow‘ at top.
- Statuses can be mapped by dragging and dropping them to the correct function
- Driver Is En Route to Pickup – the status mapped to indicate the Driver is traveling to the Pick Up location. Examples might be “On The Way” or “Enroute”.
- Driver Is Circling – (Optional) the status of the trip when Driver is waiting/circling at pickup.
- Driver Is Waiting At Pickup – the status mapped to indicate the driver has reached the pick up location. Examples of this might be “Arrived” or “On Location” or “On Spot”.
- Driving Passenger – the status mapped to indicate the driver has the customer in the car and is traveling to the Drop Off location. Examples might be “Customer In Car” or “Passenger On Board”.
- Driver Is Waiting At Stop – (Optional) Status of the trip when Driver has passenger but is waiting at a location that is not the pick up location.
- Completing – the status mapped to indicate the driver has dropped off the passenger. Example might be “Passenger Dropped Off”. Note: This step will start the closing process for the job in Driver Anywhere.
- Completed – the status of the trip when the driver has closed out the trip.
- Driver Statuses Out of Flow – Statuses the Driver can use but does not fall inside of the Driver Workflow.
Note: There are affiliate driver statuses as well that will work for Farm-Out trips via LA Net if you and your affiliate are opted-in for Real-Time Updates.

Set Up the Status to Time Mapping
- Click on ‘My Office‘.
- The Company Settings tab will be open by default
- Click on the ‘System Settings’ button.
- Click on the ‘System Mapping‘ button.
- For each time Time Label on the left select the corresponding status from the drop down list.
- In the option ‘Overwrite Already Saved Time Values‘ select ‘Yes‘ or ‘No‘. Selecting ‘Yes‘ the system will overwrite any saved times on the reservation and the settlement section of the reservation for example if you have a Drop Off time set on the reservation and the driver set the status to Done the system will overwrite the original field with the new Drop Off time.
- Click the ‘Update‘ button.

Set Up the Dispatch Grid Options
- Click on the ‘Dispatch‘ icon in the toolbar.
- Select the ‘Grid Setup‘ hyperlink.
- Select the ‘Company Preferences‘ tab.
- Scroll to the bottom of the screen.
- Select ‘Flag Driver Rejected Reservations’ if you would like to create a column in the Dispatch Grid with the title ‘DA’. This column will change to Green if the drive ACCEPTED the trip, Red if the drive REJECTED the trip, and Gray if no action has been taken by the driver.
- Select ‘Enable Driver Anywhere Messaging’ if you would like to utilize the Driver Anywhere system as a messaging tool replacing or supplementing SMS and/or eMail.

- Click the ‘Update Dispatch Grid Fields‘ button.
- Click the ‘Grid Setup‘ tab.
- Scroll to the bottom of the list of column options.
- Select the option to display the column ‘Flag Driver Rejected Reservations’ by clicking on the check box.
- Set the width of the column to 30px.

- Left click on the ‘Flag Driver Rejected Reservations‘ and while holding your mouse button down dragging it to the top of the list.

13. Click the ‘Update Dispatch Grid Fields‘ button.
Set Up your Driver’s With DriverAnywhere Access
- Click on the ‘My Office‘ icon in the toolbar.
- Select the ‘Company Resources‘ tab.
- Select the ‘Drivers‘ button.
- Select a ‘Driver‘ by clicking on the name.
- Click the ‘Edit Driver‘ button.
- Scroll down to the bottom right hand side of the profile to the ‘Web Access’ section.
- Enter a ‘Username’ and ‘Password’.
- Click the ‘Update Driver‘ button.

9. Click the ‘Driver Anywhere Settings‘ tab.

- For the driver to use Driver Anywhere, the box on the left of ‘Use Driver Anywhere’ must be checked.
- Checking the box on the left of ‘Edit Trip Times’ allows the driver to change times for Gar-Out, ETA, Spot, In-Car, Drop-off, and Gar-In.
- Checking the box on the left of ‘See Rate Data’ allows the driver to see what rates you have mapped for Driver Anywhere and by default those rates are Tolls, Parking, Misc Fee 1, and Misc Fee 2.
- Checking the box on the left of ‘Edit Rate Data’ allows the driver to change a rate or the components of a rate that you have mapped ( Tolls, Parking, Misc Fee 1, and Misc Fee 2 ) while on a trip.
- Checking the box on the left of ‘Process Payments’ allows the driver to run an “Authorize and Capture” transaction on a credit card through the Driver Anywhere system and get the passenger to sign for it at the time of the transaction.
Note: This feature of Driver Anywhere is dependent on you having the Real-time Payment Processing Module and a payment gateway set up in your Limo Anywhere system. - Checking the box on the left of ‘View Full Rate Breakdown’ will allow your driver to see the full rate breakdown of the reservation.
- Checking the box on the left of ‘Disallow Cancel Reservation’ will disallow your driver to set a trip to any canceled status.
- When you have made the selections for the tasks that you will allow this driver to perform click the ‘Update‘ button.
- Repeat this process for each Driver.
Now the Limo Anywhere system and the Drivers are ready to begin using Driver Anywhere. Drivers can download the free Driver Anywhere App onto Android or Apple phones or tablet devices from:
- Apple App Store for Apple IOS devises including the iPhone or iPad
- Android App Market for Android based devices
