Creating a Scheduled Email Template
Scheduled Email Module allows the creation of dynamically formatted email templates that can be scheduled to be sent to customers, drivers, and/or affiliates based on criteria in the reservation or invoice. Great examples of Scheduled Emails are 24 hour trip reminders, 30 day past due invoice reminders, and automated emails when statuses are set.
Select one of the following links to be brought to that part of the article:
Options for Scheduled Email (Trip) Explained
Options for Scheduled Email (Invoice) Explained
Creating a Trip Type Scheduled Email
Creating an Invoice Type Scheduled Email
Sample 2 Hour Pick-Up Reminder
Sample Driver Arrived Notification
Sample Paid Invoice Notification
Options for Scheduled Email (Trip) Explained
| Email Template Name: | A label that allows you to keep track of the different email schedules you have set up. |
| Email Type: | Trip |
| Reservation Status: | Allows you to specify what type of trips to send the email out on: New/Live are all trips that are not set to a completed status. Settled are all trips that have been settled. |
| Trip Type: | Allows you to specify what type of trip to send the email out on: In-House are all trips that have been taken by and will be performed by your company. Farm-In are all trips sent you by an affiliate and will be performed by your company. Farm-Out are all trips sent out to an affiliate for their company to perform. |
| Email Class: | Allows you to specify who to send the email too. The client, driver, or Passenger. |
| Send To: | This field works hand in hand with the ‘Email Class’. Send To allows you to select specific persons to send the email too. |
| Attach Form: | Allows you to attach a form to the email that will be sent to the client. |
| Attach Files: | Allows you to attach a file that has been uploaded into your ‘Files’ section. |
| When To Send: | Allows you to set when the email to be be triggered for delivery. When Status Changed To: will trigger an email to go out when a specific status is selected. -OR- Set up the email to go out Days/Hours/Minutes before or after the PU Time. Then set which status not to send out the email on under Do Not Send If Status Is. |
| Allow Profile Level Setting Override: | Yes will allow the recipient to block the sending of scheduled email templates by “unsubscribing”. No will ignore an account’s selection to “unsubscribe”, and will send the email regardless of the selection. |
| Restrict Only To Selected Accounts/Passengers/Affiliates: |
Yes makes the scheduled email only send out to specified accounts when selected under the Misc Tab in the Account profile. No allows the scheduled email to be sent out to everyone specified in the ‘Send To’ option. |
| Is Active: | Yes allows the system to send out the scheduled email. No makes the scheduled email inactive in your system. |
| Email Subject: | Is the email subject line that will be displayed in the email. You can use the hash tags located in the ‘Orange Tag’ for this section.
|
| Email Template Content: | Is the body of email. You can use the hash tags located in the ‘Orange Tag’ for this section.
|
Options for Scheduled Email (Invoice) Explained
| Email Template Name: | A label that allows you to keep track of the different email schedules you have set up. |
| Email Type: | Trip |
| Email Class: | Allows you to specify who to send the email too. The client, driver, or Passenger. |
| Send To: | Only allows you to send the Invoice information to the ‘Billing Contact’. |
| Attach Form: | Allows you to attach a form to the email that will be sent to the client. |
| Attach File: | Allows you to attach a file that has been uploaded into your ‘Files’ section. |
| When To Send: | Allows you to set when the email to be be triggered for delivery. |
| Allow Profile Level Setting Override: | Yes will allow the recipient to block the sending of scheduled email templates by “unsubscribing”. No will ignore an account’s selection to “unsubscribe”, and will send the email regardless of the selection. |
| Restrict Only To Selected Accounts/Passengers/Affiliates: |
Yes makes the scheduled email only send out on specified accounts under the Misc Tab in the account section. No allows the scheduled email to be sent out to everyone specified in the ‘Send To’ option. |
| Is Active: | Yes allows the system to send out the scheduled email. No makes the scheduled email inactive in your system. |
| Email Subject: | Is the email subject line that will be displayed in the email. You can use the hash tags located in the ‘Orange Tag’ for this section.
|
| Email Template Content: | Is the body of email. You can use the hash tags located in the ‘Orange Tag’ for this section.
|
Creating a Trip Type Scheduled Email
- Clicking the ‘My Office‘ icon in the toolbar.
- Select the ‘Company Settings‘ tab.
- Click the ‘Email Templates & Settings‘ button.
- Select the ‘Scheduled Email Module‘ tab.
- Type in a ‘Email Template Name‘.
- Set the ‘Email Type‘ to ‘Trip‘.
- Select the ‘Reservation Statuses‘ this ‘Scheduled Email‘ pertains to.
- Select the ‘Trip Type‘.
- Set the ‘Email Class‘.
- Set the ‘Sent to‘ recipients.
- (OPTIONAL STEP) Select a form to attach to the email from the ‘Attach Form‘ list.
- (OPTIONAL STEP) Select a file to attach to the email from the ‘Select Other Files‘ button.
- Set the ‘When to Send‘
- Set the ‘Allow Profile Level Setting Override‘ option.
- Set the ‘Restrict Only To Selected Accounts/Passengers/Affiliates‘ option.
- Keep the template ‘Is Active‘ option set to ‘Yes‘.
- Type in the ‘Email Subject‘ and ‘Email Template Content‘ you would like to have sent to your customer.
Note: You can add hash tags to the ‘Subject‘ and ‘Email Template Content‘. The Orange Tag icon holds the hash tag information.

Creating an Invoice Type Scheduled Email
- Clicking the ‘My Office‘ icon in the toolbar.
- Select the ‘Company Settings‘ tab.
- Click the ‘Email Templates & Settings‘ button.
- Select the ‘Scheduled Email Module‘ tab.
- Type in a ‘Email Template Name‘.
- Set the ‘Email Type‘ to ‘Invoice‘.
- Set the ‘Email Class‘.
- Set the ‘Sent to‘ recipients.
- Select a form to attach to the email from the ‘Attach Form‘ list.
- (OPTIONAL STEP) Select a file to attach to the email from the ‘Select Other Files‘ button.
- Set the ‘When to Send‘.
- Set the ‘Allow Profile Level Setting Override‘ option.
- Set the ‘Restrict Only To Selected Accounts/Passengers/Affiliates‘ option.
- Keep the template ‘Is Active‘ option set to ‘Yes‘.
- Type in the ‘Email Subject‘ and ‘Email Template Content‘ you would like to have sent to your customer.
Note: You can add hash tags to the ‘Subject’ and ‘Email Template Content’. The Orange Tag icon holds the hash tag information.

Sample 2 Hour Pick-Up Reminder
Note: Copying and Pasting into the SEM WYSIWYG editor is done by holding the control key and selecting the appropriate letter.
Copy= CTRL + C
Paste = CTRL + V
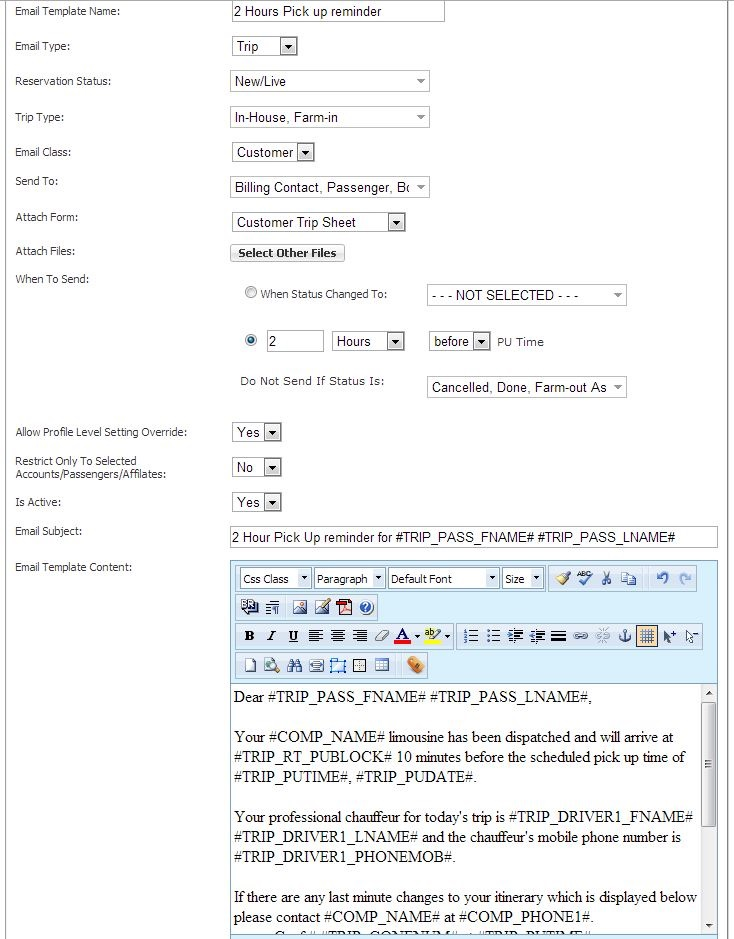
- Copy and paste the text below into the ‘Email Subject‘ field:
2 Hour Pick Up reminder for #TRIP_PASS_FNAME# #TRIP_PASS_LNAME# - Copy and Paste the text below into the composition box of the ‘Email Template Content‘ field.
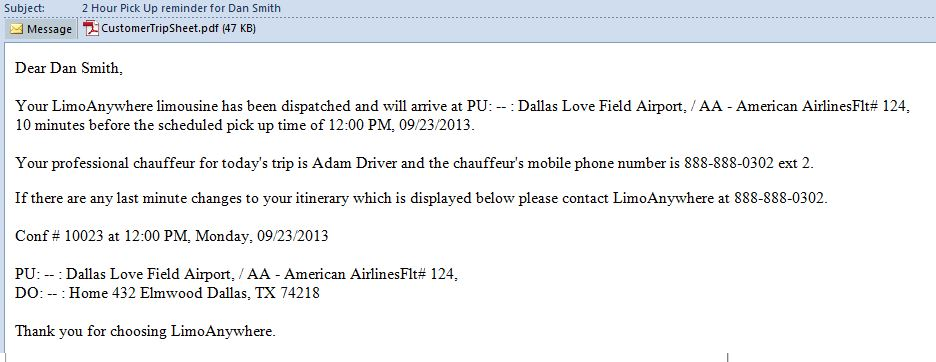
Dear #TRIP_PASS_FNAME# #TRIP_PASS_LNAME#,
Your #COMP_NAME# limousine has been dispatched and will arrive at #TRIP_RT_PUBLOCK# 10 minutes before the scheduled pick up time of #TRIP_PUTIME#, #TRIP_PUDATE#.
Your professional chauffeur for today’s trip is #TRIP_DRIVER1_FNAME# #TRIP_DRIVER1_LNAME# and the chauffeur’s mobile phone number is #TRIP_DRIVER1_PHONEMOB#.
If there are any last minute changes to your itinerary which is displayed below please contact #COMP_NAME# at #COMP_PHONE1#.
Conf # #TRIP_CONFNUM# at #TRIP_PUTIME#, #TRIP_PUDAYNAME#, #TRIP_PUDATE#
#TRIP_RT_ALL#
Thank you for choosing #COMP_NAME#.
Sample Driver Arrived Notification
Note: Copying and Pasting into the SEM WYSIWYG editor is done by holding the control key and selecting the appropriate letter.
Copy= CTRL + C
Paste = CTRL + V
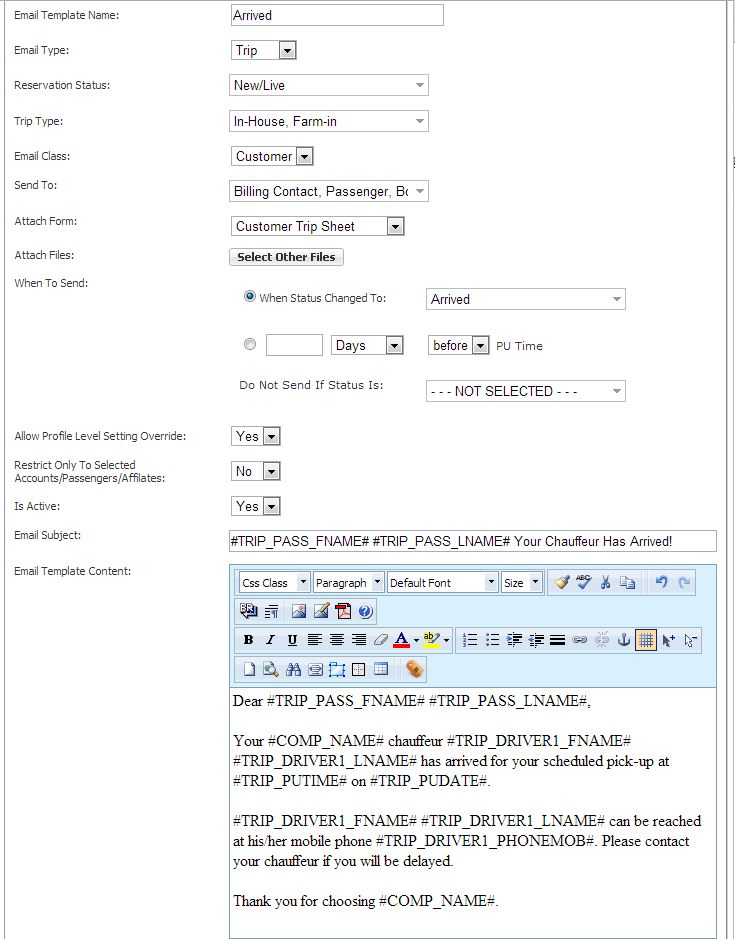
- Copy and paste the text below into the ‘Email Subject’ field.
#TRIP_PASS_FNAME# #TRIP_PASS_LNAME# Your Chauffeur Has Arrived! - Copy and Paste the text below into the composition box of the ‘Email Template Content’ field.
Dear #TRIP_PASS_FNAME# #TRIP_PASS_LNAME#,
Your #COMP_NAME# chauffeur #TRIP_DRIVER1_FNAME# #TRIP_DRIVER1_LNAME# has arrived for your scheduled pick-up at #TRIP_PUTIME# on #TRIP_PUDATE#.
#TRIP_DRIVER1_FNAME# #TRIP_DRIVER1_LNAME# can be reached at his/her mobile phone #TRIP_DRIVER1_PHONEMOB#. Please contact your chauffeur if you will be delayed.
Thank you for choosing #COMP_NAME#.

Sample Thank You Email
Note:Copying and Pasting into the SEM WYSIWYG editor is done by holding the control key and selecting the appropriate letter.
Copy= CTRL + C
Paste = CTRL + V
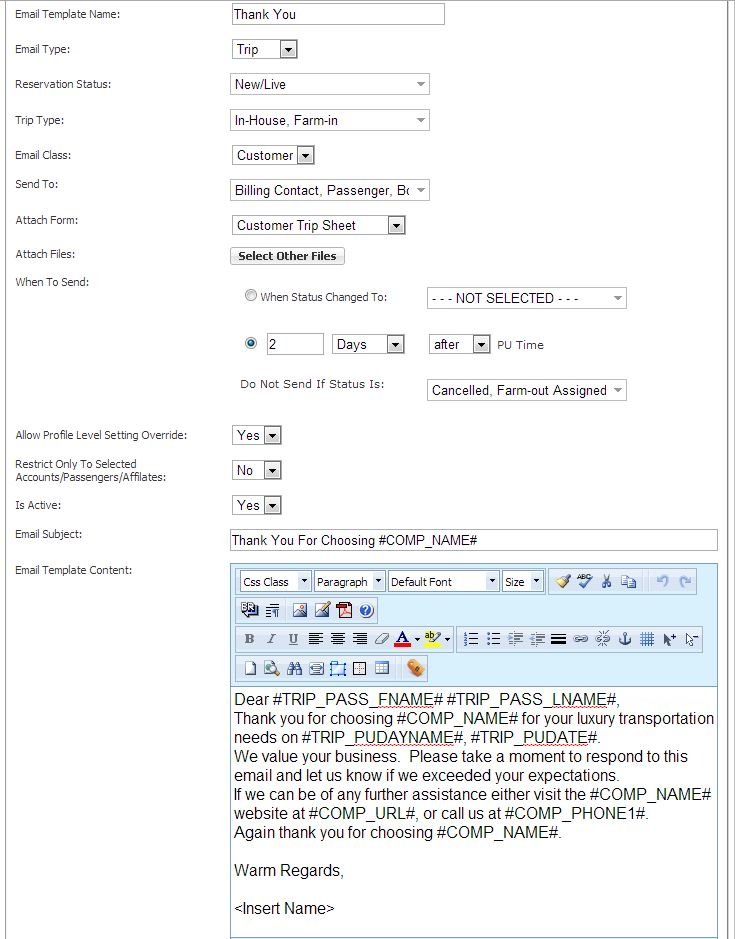
- Copy and paste the text below into the ‘Email Subject’ field.
Thank You For Choosing #COMP_NAME# - Copy and Paste the text below into the composition box of the ‘Email Template Content’ field.
Dear #TRIP_PASS_FNAME# #TRIP_PASS_LNAME#,
Thank you for choosing #COMP_NAME# for your luxury transportation needs on #TRIP_PUDAYNAME#, #TRIP_PUDATE#.
We value your business. Please take a moment to respond to this email and let us know if we exceeded your expectations.
If we can be of any further assistance either visit the #COMP_NAME# website at #COMP_URL#, or call us at #COMP_PHONE1#.
Again thank you for choosing #COMP_NAME#.
Warm Regards,
<Insert Name>

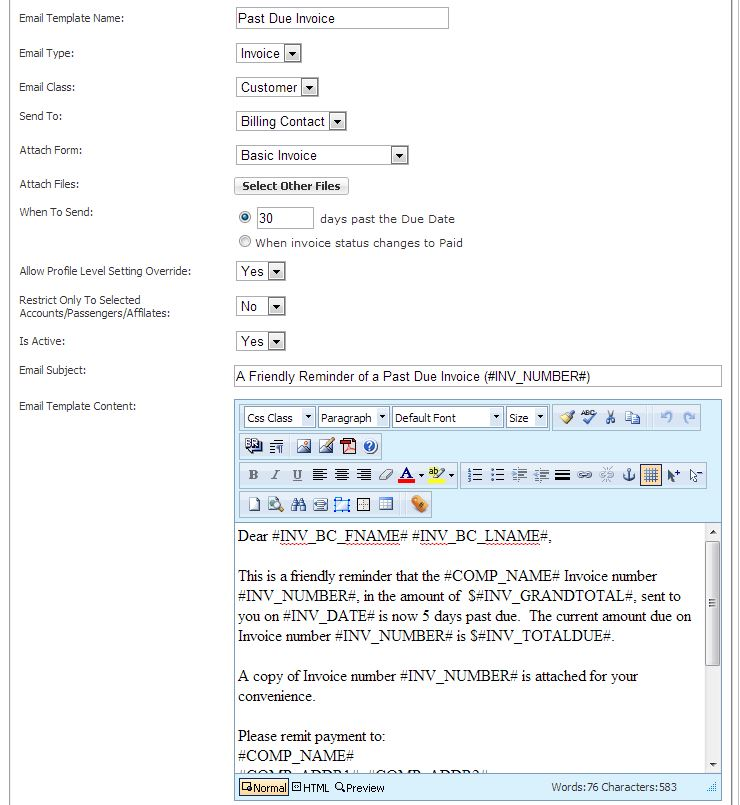
Sample Past Due Invoice
Note:Copying and Pasting into the SEM WYSIWYG editor is done by holding the control key and selecting the appropriate letter.
Copy= CTRL + C
Paste = CTRL + V
- Copy and paste the text below into the ‘Email Subject’ field.
A Friendly Reminder of a Past Due Invoice (#INV_NUMBER#) - Copy and Paste the text below into the composition box of the ‘Email Template Content’ field.
Dear #INV_BC_FNAME# #INV_BC_LNAME#,
This is a friendly reminder that Invoice #INV_NUMBER#, in the amount of $#INV_GRANDTOTAL#, sent to you on #INV_DATE# is now 30 days past due. The current amount due on Invoice number #INV_NUMBER# is $#INV_TOTALDUE#.
A copy of Invoice number #INV_NUMBER# is attached for your convenience.
Please remit payment to:
#COMP_NAME#
#COMP_ADDR1#, #COMP_ADDR2#
#COMP_CITY#, #COMP_STATEPROV# #COMP_ZIPPOST#
If there are any questions or concerns please contact #COMP_NAME# at #COMP_PHONE1#.
Thank you for your business!
#COMP_NAME#

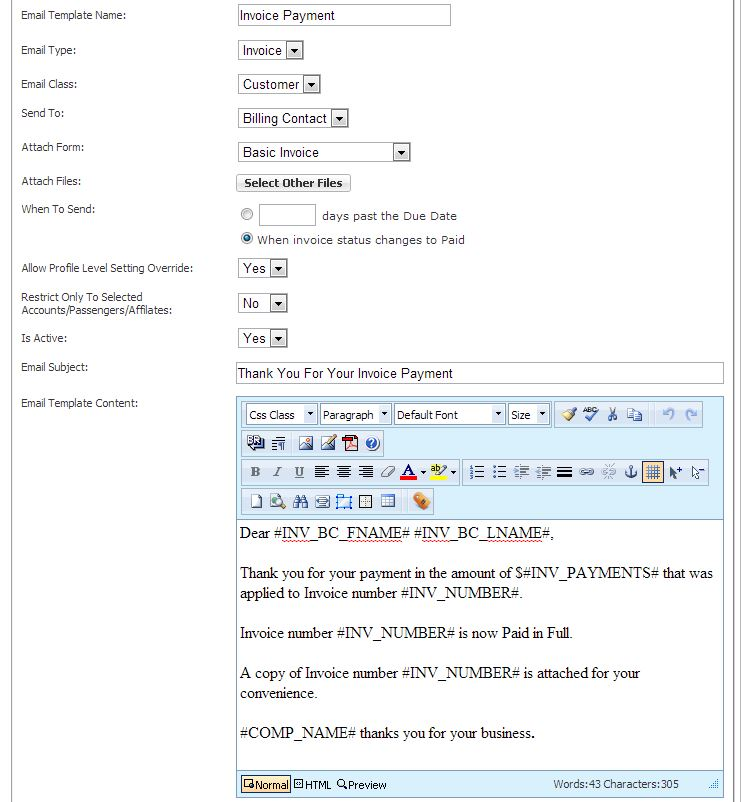
Sample Paid Invoice Notification
Note: Copying and Pasting into the SEM WYSIWYG editor is done by holding the control key and selecting the appropriate letter.
Copy= CTRL + C
Paste = CTRL + V
- Copy and paste the text below into the ‘Email Subject’ field.
Thank You For Your Invoice Payment - Copy and Paste the text below into the composition box of the ‘Email Template Content’ field.
Dear #INV_BC_FNAME# #INV_BC_LNAME#,
Thank you for your payment in the amount of $#INV_PAYMENTS# that was applied to Invoice number #INV_NUMBER#.
Invoice number #INV_NUMBER# is now Paid in Full.
A copy of Invoice number #INV_NUMBER# is attached for your convenience.
#COMP_NAME# thanks you for your business.

