Establishing and Managing Vehicle Types
Establishing and managing Vehicle Types in Limo Anywhere is an important step in effectively managing the company’s by the hour, per passenger, distance, and fixed rate pricing structure.
A Vehicle Type as defined in Limo Anywhere is a group of vehicles that share common characteristics such as Sedan, Luxury Sedan, SUV, and Limousine. Normally the most important characteristic is the rate or rates charged for that vehicle’s service regardless of whether the rate is a Flat Rate or Multiplier Rate (per hour, per passenger). There is no limit to the number of Vehicle Types a company can have, but using the pricing or rate structure to determine what Vehicle Type an individual Vehicle should be assigned leads to a more logical rate structure.
Note: Vehicle Types are groups of vehicles and NOT the individual vehicles. Specific vehicles are managed in the ‘Fleet‘ section.
Select one of the following links to be brought to that part of the article:
Adding a Vehicle Types
- Click on the ‘My Office‘ icon on the toolbar.
- Open the ‘Company Resources‘ tab.
- Select the ‘Vehicle Type’ button.
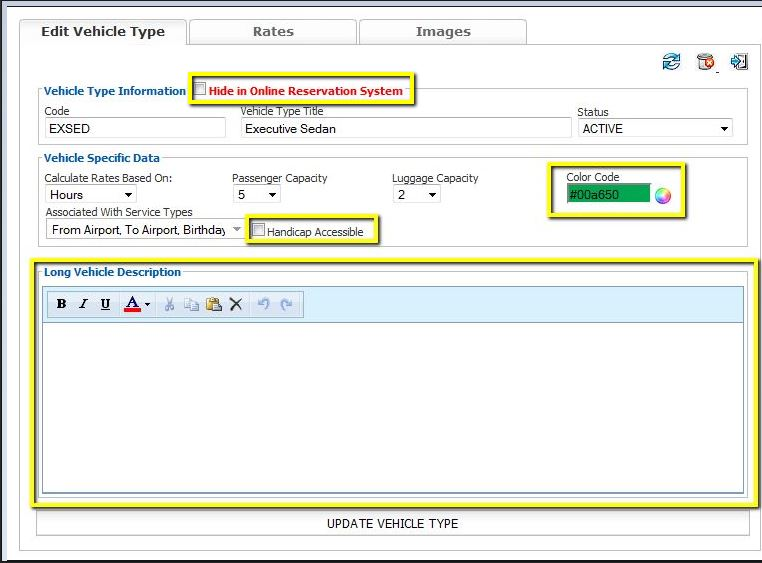
- (OPTIONAL STEP) Select the “Hide in Online Reservation System” check box ONLY IF the Vehicle Type is NOT available to Online Reservation booked by your customers.
- Enter a vehicle ‘Code‘ (Each Vehicle Type ‘Code’ must be unique).
- Enter a ‘Vehicle Type Title‘ (Sedan, SUV, Stretch Limo, 10pax Limo, etc).
- Select whether the vehicle type needs to ‘Calculate Rates Based On‘: Hourly Rates (Hours) or By the Passengers Rates (Passenger).
- Select the ‘Passenger Capacity‘.
- Select the ‘Luggage Capacity‘.
- (OPTIONAL STEP) Select the Color Code will appear on the Dispatch grid.
- Check off all the service types that can be used with this vehicle under ‘Associated With Service Types‘.
- (OPTIONAL STEP) ‘Check Handicap Accessible‘ if this Vehicle Type is Handicap Accessible.
- (OPTIONAL STEP) Enter a ‘Long Vehicle Type Description‘ of the Vehicle Type (description will appear in the Online Reservation System if the Vehicle Type is enabled for ORES).
- Click the ‘Add New Vehicle Type‘ button.
NOTE:In the screenshot below all optional steps are enclosed in the yellow box/s.

Set up all the vehicle types available to your clients.
IMPORTANT NOTE: if you do not set up all of the vehicle types now you will more then likely have to go back and add them at a later time, which will cause you to do more work or possible over look some additional driver ‘payroll schedules’ in the driver payroll section.
For information on setting up your Hourly and By the Passengers rates please see Knowledge Base article ‘Setting Up Vehicle Type Hourly Rates‘ and/or ‘Setting Up Vehicle Type Per Passenger Rates‘.
Click here to return to the top of the page.
Editing a Vehicle Type
- Click on the ‘My Office‘ icon on the toolbar.
- Open the ‘Company Resources‘ tab.
- Select the ‘Vehicle Type‘ button.
- Select the Vehicle Type to be edited from the ‘Vehicle Type Listing‘ box.
- Click the ‘Edit Vehicle Type‘ button.
- Make your desired to changes.
- Click the ‘Update Vehicle Type‘ button.
Click here to return to the top of the page.
Deleting a Vehicle Type – Inactivate them instead!
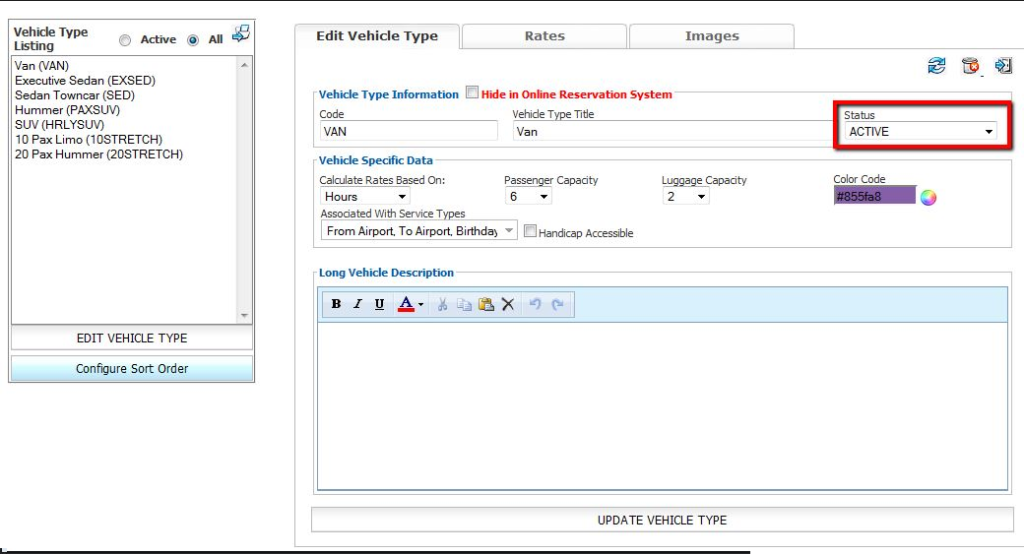
WARNING: Deleting Vehicle Types can cause a lot of problems with reporting, reservations, and rates! We strongly recommended that you change the ‘Status’ to INACTIVE instead of deleting them.
- Click on the ‘My Office‘ icon on the toolbar.
- Open the ‘Company Resources‘ tab.
- Select the ‘Vehicle Type‘ button.
- Select the Vehicle Type to be edited from the ‘Vehicle Type Listing‘ box.
- Click the ‘Edit Vehicle Type‘ button.
- Change the ‘Status‘ to INACTIVE.
- Click the ‘Update Vehicle Type‘ button.

