Establish Connection:
The following describes how to enable permission for Boston Coach to connect to your system. You must have an agreement/account established in order to receive trips from Boston Coach.
- Click the ‘Network‘ icon from the top menu.

- Click on the ‘Partner Network‘ tab.

- Click on the ‘Partners‘ button on the left.
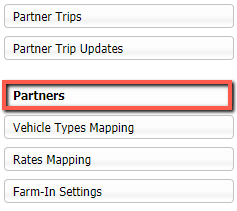
- This is the Partners connection page. Click on the ‘Connect‘ button for Dav El | Boston Coach. Once he connection is made you will see the 2 hands shaking symbol displayed.


Configure Vehicle Types Mapping:
All Partners have a set list of vehicle categories they can work with. You will need to map the Vehicle Types you have defined internally to associate them with a vehicle category for Boston Coach to access.
If you are already working with another Partner, your vehicle mapping might already be setup. If not, here’s how it works:
- Under the ‘Partner Network‘ select the ‘Vehicle Types Mapping‘ button.

- By default, your vehicle types will be listed in the ‘Vehicle Types’ column on the left. If you look to the right, you will see lanes for different categories of vehicles. In each lane, there are subcategories such as ‘Economy Sedan’ or ‘Sprinter Van.’
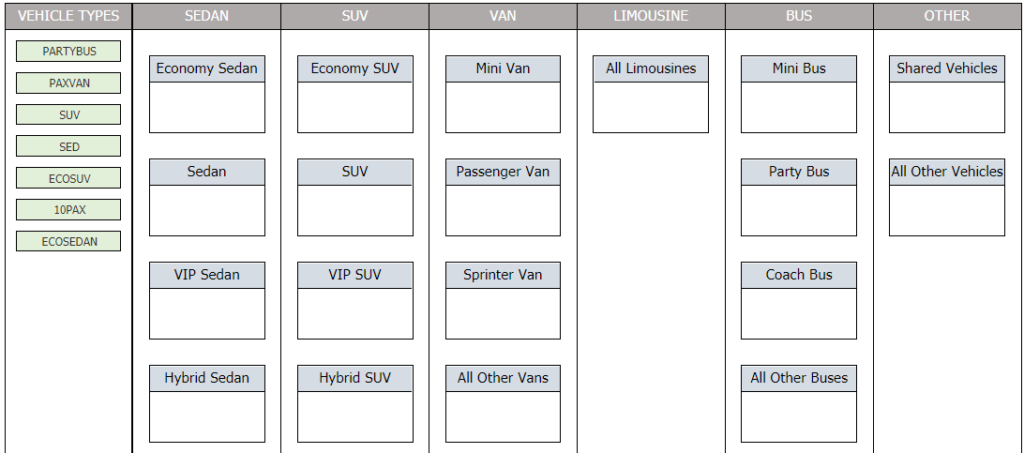
- At the very least, there needs to one vehicle type mapped in Economy Sedan, Sedan Economy SUV and SUV. Move each of your Vehicle Types on the left to a specific subcategory on the right. Click and hold on a vehicle type in the left lane (green background) with your mouse, drag it to the appropriate subcategory on the right, then release the mouse button. The vehicle type should drop into the subcategory. When you are done, it might look something like this:
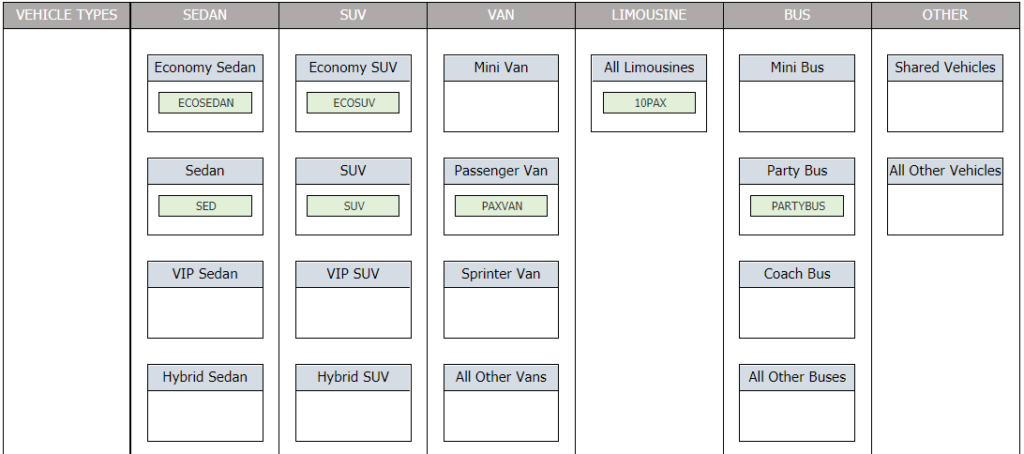
Please Note: Boston Coach will not be able to see any Vehicle Types that are not mapped here. Additionally any reservation requiring a Vehicle Type under a subcategory cannot be sent if they do not have Vehicle Types mapped to them. Having this section properly mapped will allow Boston Coach to accurately understand your inventory of vehicles.
If you need to add any additional Vehicle Types to be displayed here please see the article for Establishing and Managing Vehicle Types .
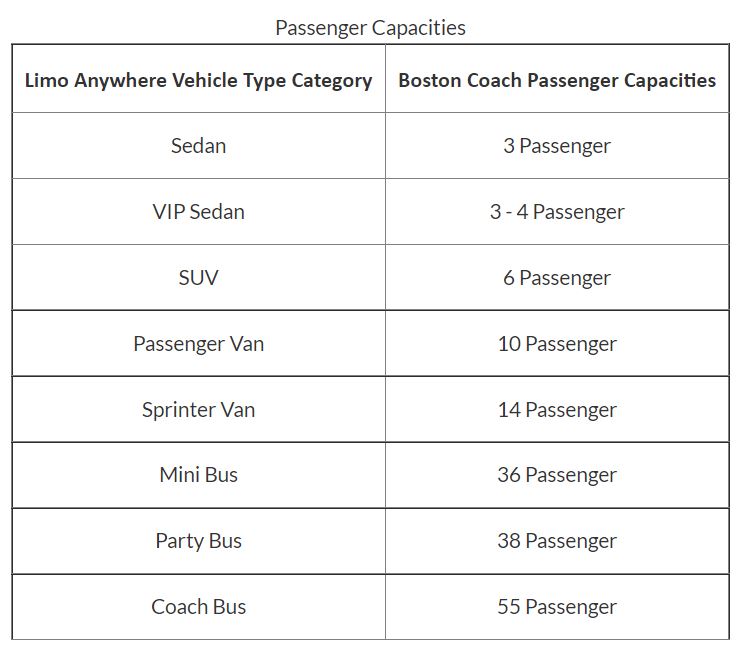
You will also want to make sure that the passenger capacities are set properly for your Vehicle Types. Below are examples for common passenger capacities and vehicle type categories used by Boston Coach.
Configure Rates Mapping:
All Partners have a set list of rate categories they can work with. You will need to map your rate line items to associate them with a rate category for the Partner to access.
If you are already working with another Partner, your rate mapping might already be setup. If not, here’s how it works:
- Click on the ‘Network‘ icon from the top menu.
- Click on the ‘Partner Network‘ tab.

- Click on the “Rates Mapping” button.

You should now see lanes for each rate category that exists for Boston Coach to access. Properly mapping your rates will allow the Boston Coach to retrieve a proper rate breakdown. Click and hold on one of your rates from the list (green background) with your mouse, drag it to the appropriate rate category on the right, then release the mouse button. The rate should now be associated with the correct category. When completed, your mapping should look similar to the image below (this will differ for every operator based on actual line items.)

If you need to add any additional rates to be displayed here please see the article How to Use The System Rate Manager.
Configure Service Types:
To efficiently use the integration, you should configure your Service Types. If you are taking advantage of the Limo Anywhere Online Reservation System, this might already be configured. Here’s what you need to be aware of.
There are 4 service type categories Boston Coach can work with:
- Hourly (used whenever a duration is supplied)
- Airport Arrival (used when PU is at an airport)
- Airport Departure (used when DO is at an airport)
- Point-to-Point (used when trip is not any of the above)
Below are the steps for setting up these default service types:
- Click on ‘My Office‘ icon.
- Click on ‘Company Settings‘ tab.
- Click on ‘System Settings‘ button.
- Click on ‘Service Types‘ button.
- Click on each Service Type.
- Select your ‘Pricing Type‘ for that service type.
- Assign the correct Service Type in Default Mapping.
- Slide the Visible in ORES 4 slider to the right to make the service type active for the online reservation system.
- Type in your Custom Label Name. (this is what your customers will see when booking online).
- Click ‘Save‘ to make sure changes are saved.
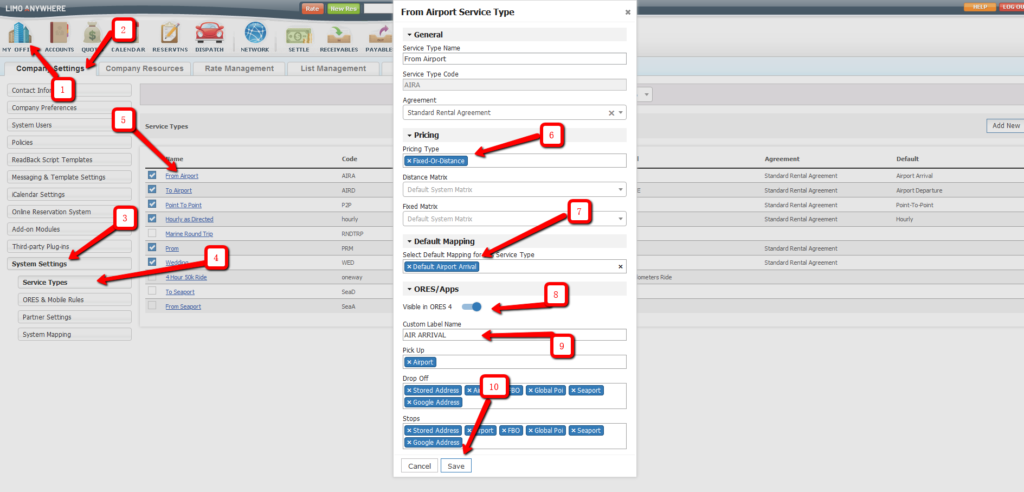
Please note: You can have as many service types as you wish, but you will need to associate a default service type for each of the categories above. Notice the ‘Default’ column and check to make sure all 4 of the above mentioned service type categories are listed. These will be the service types Boston Coach can access.
Below are the steps on setting up Status to Time Mapping:
Please Note: It is necessary to have the Status to Time Mapping setup in order for trip times and final charges to transfer back to Boston Coach.
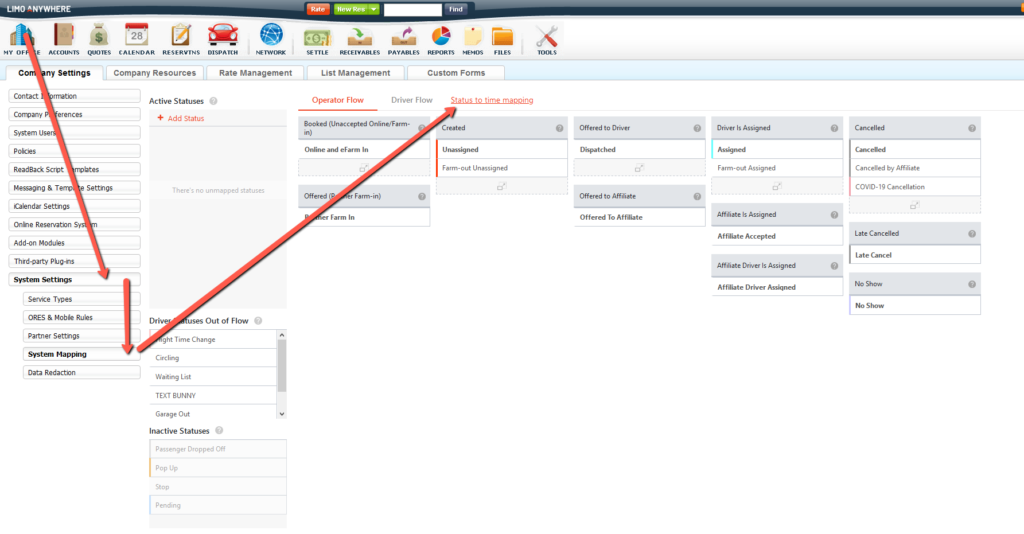
1. Click the ‘My Office‘ icon.
2. Click the ‘System Settings‘ button.
3. Click the ‘System Mapping‘ button.
4. Click on the ‘Status to time mapping‘ link.
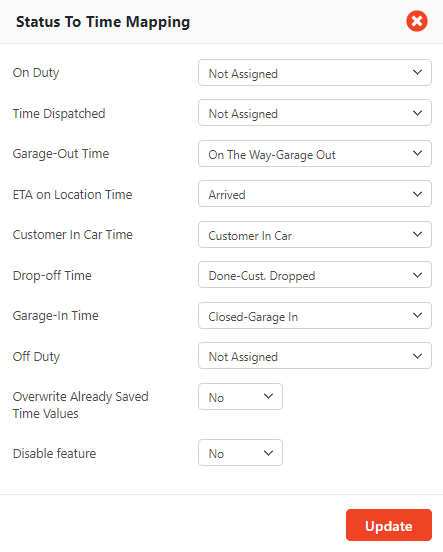
5. Select the appropriate status from the drop down list that corresponds to the time field. Example: ‘On The Way‘ status would be selected for ‘Garage-Out Time‘.
6. Set the ‘Overwrite Already Saved Time Values‘ to ‘Yes‘ or ‘No‘.
7. Click the ‘Update‘ button.
Provide Your Limo Anywhere Details to Boston Coach:
You will need to provide Boston Coach with your Company ID, otherwise known as a company alias. This is the Company ID you enter on the login page when accessing your Limo Anywhere system.
