Setting Company Preferences
Company Preferences control a great number of the aspects of Limo Anywhere, and the settings here allow the customization of Limo Anywhere to fit the company’s needs.
Access Company Preferences
- Click on the ‘My Office‘ icon on the toolbar.
- Open the ‘Company Settings‘ tab.
- Click on the ‘Company Preferences‘ button. The Company Preferences screen will appear as illustrated below with the General Settings open.
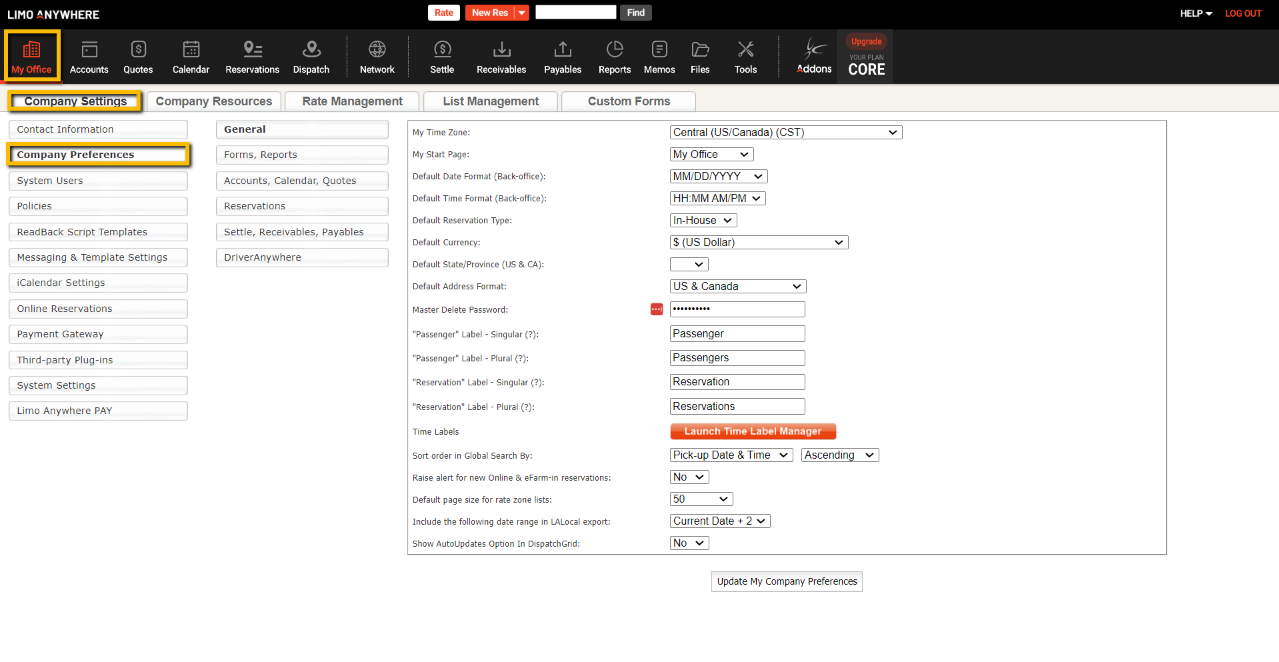
General Settings
- My Time Zone: <Central (US/Canada)(CST)> Choose from seventeen Time Zones from across the globe. Choose the one appropriate for the bulk of the company’s operations.
- My Start Page: <My Office> When Limo Anywhere is opened this choice will determine which of the sections as indicated by the icons on the toolbar will open first. For Example some of the choices are the default My Office, Reservations, Dispatch or Accounts.
- Default Date Format (Back-office): <MM/DD/YYYY> Choose from six formats of date, month, and year as best suits the customers of the company. This format will be used on all processes and forms produced in the Back-office portion of Limo Anywhere.
- Default Time Format (Back-office): <HH:MM AM/PM> Choose from four formats of minutes, hours and AM/PM as best suits the customers of the company. This format will be used on all processes and forms produced in the Back-office portion of Limo Anywhere.
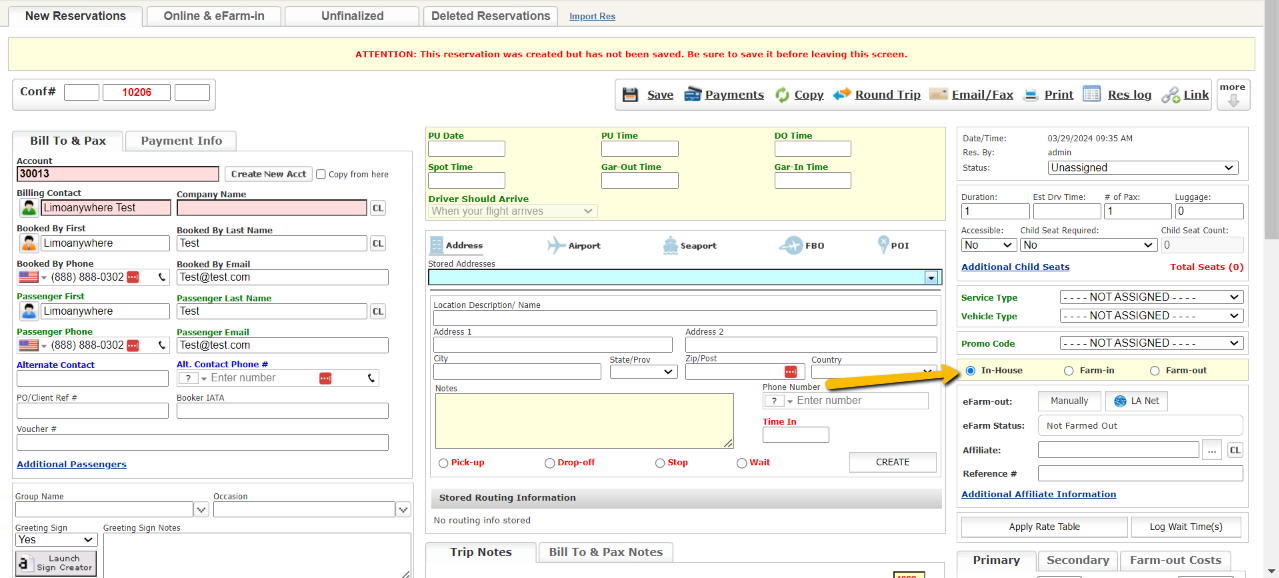
- Default Reservation Type: <In-House> Select ‘In House’ if most reservations made by the company are performed by the company vehicles and staff. Choose ‘Farm In’ if most reservations come from affiliate companies. Choose ‘Farm Out’ if most reservations made by the company are performed by affiliate companies. This selection is on the Reservation screen as illustrated below where the ‘In House’ selection has been made.
- Default Currency: <$ (US Dollar)> Choose the currency that is applicable for where the company has the bulk of their operations
- Default State/Province (US & CA):<N/A> Choose the State (US) / Province (Canada) where the company operates. For Non US/Canada locations a State/Province can be added to Limo Anywhere to be selected. See the Knowledge Base article Managing States/Provinces in Limo Anywhere for details.
- Default Address Format:<US & Canada> Choose from US & Canada or International (free form). More options will become available in the routing area of the reservations.
- Master Delete Password: <masterpass> Change this to a value that is easily remembered or record it. The Master Delete Password is used when an account, driver, rate, POI, and many other values that are tied to a reservation are deleted because deleting these values can have far reaching effects on the company’s database. It is advisable to keep the Master Delete Password limited to as few a number of people as possible to reduce the possibility of errors or malicious acts.
- “Passenger” Label – Singular (?):<Passenger> Setting determines the label for Limo Anywhere generated forms Standard Confirmation, Customer Trip Sheet, Driver Trip Sheet, Affiliate Trip Sheet, Cancellation Confirmation, and Invoice when a single passenger name appears in a reservation. Allows the company to use a different word to identify a passenger such as “Customer” or “Client”.
- “Passenger” Label – Plural (?): <Passengers> Setting determines the label for Limo Anywhere generated forms Standard Confirmation, Customer Trip Sheet, Driver Trip Sheet, Affiliate Trip Sheet, Cancellation Confirmation, and Invoice when a multiple passenger names appears in a reservation. Allows the company to use a different word to identify passengers such as “Customers” or “Clients”.
- “Reservation” Label – Singular (?): <Reservation> Setting determines the label for Limo Anywhere on labels where the singular word “Reservation” is used. Allows the company to use a different word to identify a reservation such as “Trip” or “Job” as best suits the company.
- “Reservation” Label – Plural (?): <Reservations> Setting determines the label for Limo Anywhere on labels where the plural word “Reservations” is used. Allows the company to use a different word to identify a reservation such as “Trips” or “Jobs” as best suits the company.
- Time Labels: Click the orange ‘Launch Time Label Manager‘ button which opens the pop up window illustrated below.
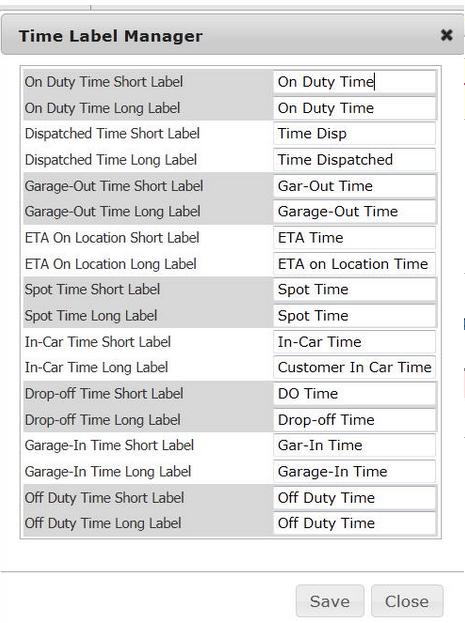
Change the way the Time Label will appear in the company’s Limo Anywhere by entering in the new name in the right and column for that Time Label. See the article Setting Up Time Label Management for details.
- Sort order in Global Search By: <Pick Up Date & Time and Ascending> Select the default search order display for the company as either ‘Pick-up Date & Time’, ‘Creation Date’, or ‘Confirmation Number’. Select the preference to display the results in Ascending or Descending order.
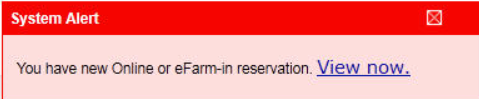
- Raise alert for new Online & eFarm-in reservations:<No> Select Yes or No. Selecting ‘Yes’ adds a red Alert Box to the lower right side of any screen to alert the user that there are new online reservations awaiting a response. Illustrated below is the Alert Box.
- Default page size for rate zone lists: <50> Select ‘Show All’ or a numeric value from the drop down list. The value will change how many rates and zones are displayed when accessed through Fixed Rates and Zones function of Rate Management; before having to look on the next page(s).
- Include the following date range in LA Local export: <Current Date + 2> Select one of the options in the drop down list. The default setting is ‘Current Date + 2’ which will populate today, tomorrow and the next day when Limo Anywhere Local updates or syncs. For more information see the Knowledge Base article Limo Anywhere Local.
Forms and Report Settings
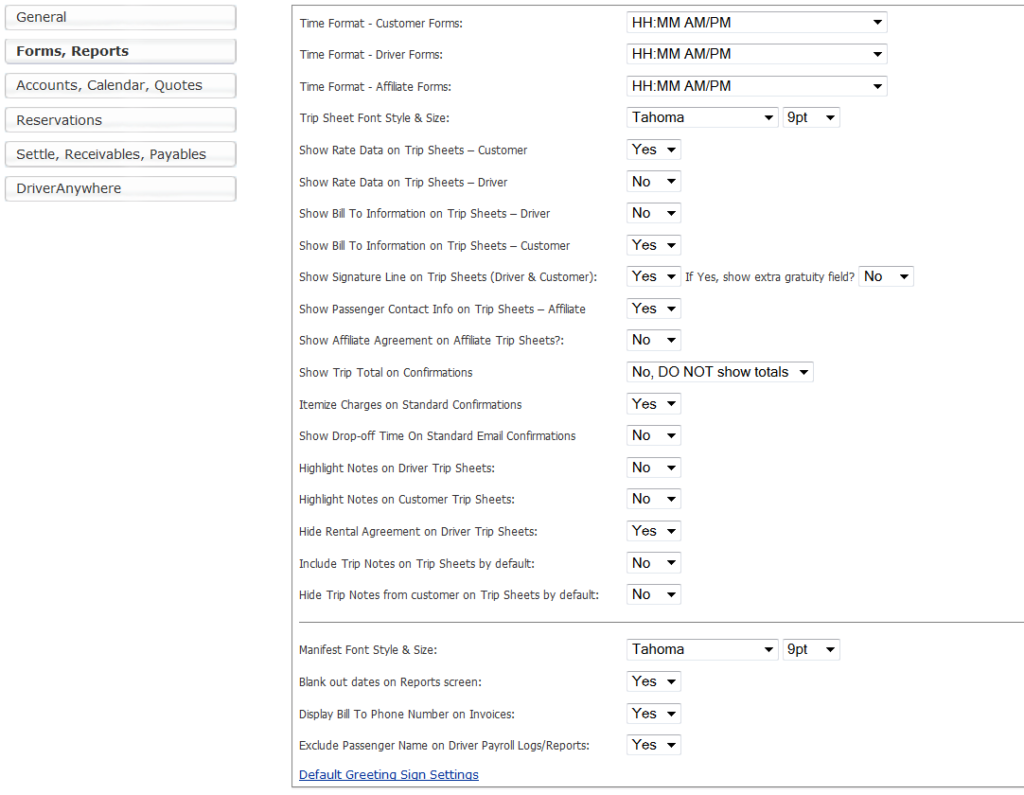
- Time format: Customer Forms: <HH:MM AM/PM> Choose from four formats of minutes, hours and AM/PM as best suits the customers of the company. This format will be used only on the Limo Anywhere generated forms for customers such as Reservation Receipt, Customer Trip Sheet, and Standard Confirmation. This setting also applies to Scheduled Email Module Templates, and Custom Forms that are designated as Customer class.
- Time Format: Driver Forms: <HH:MM AM/PM> Choose from four formats of minutes, hours and AM/PM as best suits the drivers of the company. This format will be used only on the Limo Anywhere generated forms for drivers such as the Driver Trip Sheet. This setting also applies to Scheduled Email Module Templates, and Custom Forms that are designated as Driver class.
- Time Format: Affiliate Forms: <HH:MM AM/PM>> Choose from four formats of minutes, hours and AM/PM as best suits the affiliates of the company. This format will be used only on the Limo Anywhere generated forms for affilaites such as the Affiliate Trip Sheet. This setting also applies to Scheduled Email Module Templates, and Custom Forms that are designated as Affiliate class.
- Trip Sheet Font Style & Size:<Arial Size: 8pt> Controls the Font Style and Size on the Limo Anywhere generated forms Affiliate Trip Sheet, Customer Trip Sheet, and Driver Trip Sheet.. Choose from five fonts and sizes from 8pt to 15pt.
- Show Rate Data on Trip Sheets – Customer: <Yes> Select ‘Yes’ or ‘No’. If ‘Yes’ is selected the rate data will show on the Limo Anywhere generated form Customer Trip Sheet. If ‘No’ is selected the rate data will be blocked.
- Show Rate Data on Trip Sheets – Driver: <Yes> Select ‘Yes’ or ‘No’. If ‘Yes’ is selected the rate data will show on the Limo Anywhere generated form Driver Trip Sheet. If ‘No’ is selected the rate data will be blocked.
- Show Bill To Information on Trip Sheets – Driver: <Yes> Select ‘Yes’ or ‘No’. If Yes is selected the Bill To Information (Name and contact information) will show on the Limo Anywhere generated form Driver Trip Sheet. If ‘No’ is selected the Bill To Information will be blocked and replaced with ‘N/A’.
- Show Bill To Information on Trip Sheets – Customer: <Yes> Select ‘Yes’ or ‘No’. If ‘Yes’ is selected the Bill To Information (Name and contact information) will show on the Limo Anywhere generated form Customer Trip Sheet. If ‘No’ is selected the Bill To Information will be blocked and replaced with ‘N/A’.
- Show Signature Line on Trip Sheets (Driver & Customer):<Yes> Select ‘Yes’ or ‘No’. Selecting ‘Yes’ adds a space at the bottom of the Limo Anywhere generated forms Customer Trip Sheet and Driver Trip Sheet where the customer can sign agreeing to the charges for the service rendered. Illustrated below is the Signature Line that is added when ‘Yes’ is selected.

- Show Passenger Contact Info on Trip Sheets – Affiliate:<Yes> Select ‘Yes’ or ‘No’. If ‘Yes’ is selected the Passenger Contact Information (phone, email addresses) will show on the Limo Anywhere generated form Affiliate Trip Sheet. If ‘No’ is selected the Passenger Contact Information will be blocked.
- Show Affiliate Agreement on Affiliate Trip Sheets: <Yes> Select ‘Yes’ or ‘No’. If ‘Yes’ is selected the Affiliate Agreement applicable to the affiliate will show on the Limo Anywhere generated form Affiliate Trip Sheet. If ‘No’ is selected the Affiliate Agreement will be blocked.
- Show Trip Total on Confirmations: <Yes, Show Totals> Select ‘Yes, Show Totals’ or ‘No, DO NOT Show Totals’. Selecting ‘Yes, Show Totals’ will show the Trip Totals that apply to a reservation in the Limo Anywhere generated form Standard Confirmation.
- Itemize Charges on Standard Confirmations: <Yes> Select ‘Yes’ or ‘No’. Selecting ‘Yes’ will display the itemized charges that are applied in a reservation in the Limo Anywhere generated form Standard Confirmation.
- Show Drop-off Time On Standard Email Confirmations: <Yes> Select ‘Yes’ or ‘No’. Selecting ‘Yes’ will show the Drop Off Time applicable to a reservation on the Limo Anywhere generated form Standard Confirmation.
- Highlight Notes on Driver Trip Sheets: <No> Select ‘Yes’ or ‘No’. Selecting ‘Yes’ adds light yellow highlighting to the Notes field on the Limo Anywhere generated form Driver Trip Sheet as illustrated below. Selecting ‘No’ leaves the field with out highlighting.
- Highlight Notes on Customer Trip Sheets: <No> Select ‘Yes’ or ‘No’. Selecting ‘Yes’ adds light yellow highlighting to the Notes field on the Limo Anywhere generated form Customer Trip Sheet. Selecting ‘No’ leaves the field with out highlighting.
- Hide Rental Agreement on Driver Trip Sheets:<No> Select ‘Yes’ or ‘No’. Selecting ‘Yes’ will eliminate the assigned Rental Agreement for that trip type to be added to the Limo Anywhere generated form Driver Trip Sheet. Selecting ‘No’ includes the Rental Agreement on the Driver Trip Sheet.
- Include Trip Notes on Trip Sheets by default: <No> Select ‘Yes’ or ‘No’. Selecting ‘Yes’ results in the “Add to T/S” option to be checked on the Reservation screen as default which then adds trip notes to Limo Anywhere generated forms Driver Trip Sheet and Customer Trip Sheet. Selecting ‘No’ will deselect the “Add to T/S” option on the reservation screen as default. This is a default setting and regardless of the option selected in this setting; the option to include Trip Notes on Trip Sheets can be changed on the Reservation screen.
- Hide Trip Notes from customer on Trip Sheets by default: <No> Select ‘Yes’ or ‘No’. Selecting ‘Yes’ results in the ‘Hide From Customer’ option to be checked on the Reservation screen as default which then hides trip notes on the Limo Anywhere generated form Customer Trip Sheet. Selecting ‘No’ will deselect the ‘Hide From Customer’ option on the reservation screen as default. This is a default setting and regardless of the option selected in this setting; the option to hide Trip Notes on Customer Trip Sheets can be changed on the Reservation screen. Illustration below is for selection of No on this setting.
- Manifest Font Style & Size: <Font: Arial Size: 8pt> Controls the Font Style and Size on the Limo Anywhere generated form Reservation Manifest. Choose from five fonts and sizes from 8pt to 15pt.
- Blank out dates on Reports screen: <No> Select ‘Yes’ or ‘No’. Selecting ‘Yes’ results in the date fields on the Reports screen to be blank requiring input of a date. Selecting ‘No’ causes the date fields to be populated with today’s date.
- Display Bill To Phone Number on Invoices: <No> The default selection ‘No’ will result in the phone number of the Billing Contact to not be displayed on an invoice. Select ‘Yes’ to allow the population of the Billing Contact phone number on all invoices.
- Exclude Passenger Name on Driver Payroll Logs/Reports: <No> The default selection ‘No’ will mean that on Driver Payroll Logs and Reports the Passenger Name will appear for each trip. For it to not display the Passenger Name select ‘Yes’.
Click ‘Update My Company Preferences‘ to retain the selections.
Default Greeting Sign Settings
Click on ‘Default Greeting Sign Settings’ to open the below window and edit your Greeting Sign.
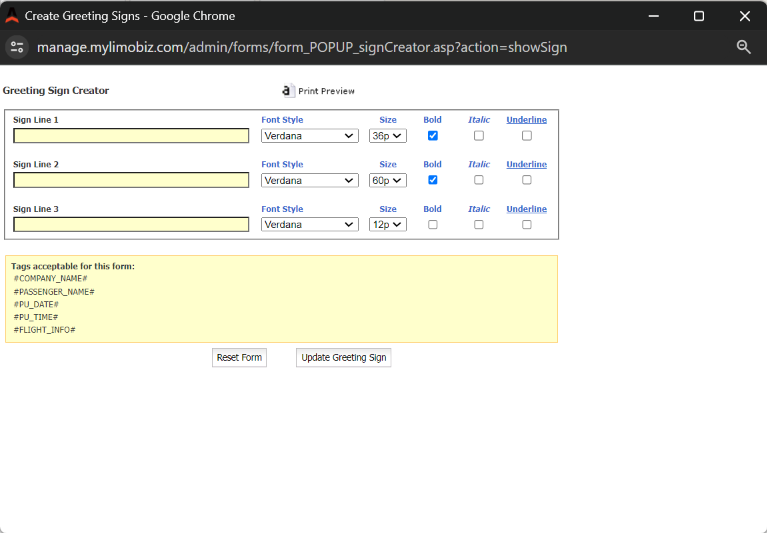
Change the content on the lines 1, 2 or 3 by entering text or selecting one of the tags to populate the sign with information form the reservation. Select the Font Style, Size, and effect (Bold, Italic, or Underline) if desired.
Click Update to save these settings as the default for all future greeting signs.
Accounts, Calendar, and Quotes Settings
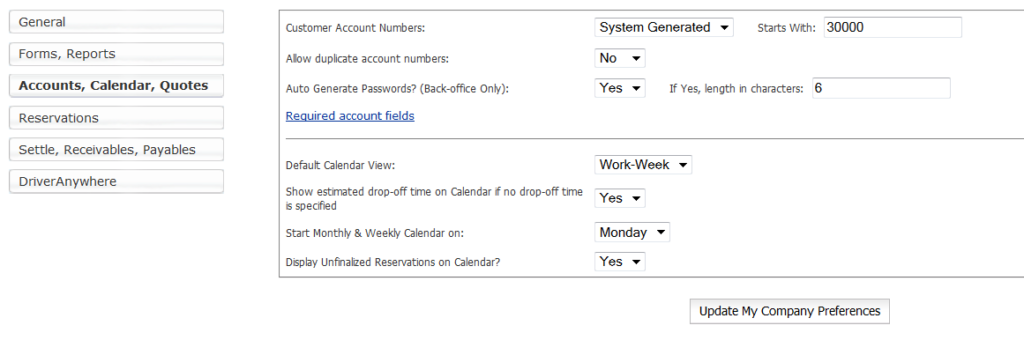
- Customer Account Numbers: <System Generated and begin at 30000> Select either System Generated on Manually Entered and at which number it is desired to start account numbers. System Generated numbers means anytime a new account is created Limo Anywhere will assign the next available account number. Manually Entered would require the account number be entered by the person setting up the account.
- Allow Duplicate Account Numbers:<No> Select ‘Yes’ or ‘No’. Selecting ‘Yes’ in conjunction with selecting Manually Entered on the setting for Customer Account Numbers, allows multiple passengers, booking contacts, and billing contacts to be assigned the same account number this linking those persons with that account number for the purpose of invoicing or reporting.
- Auto Generate Passwords? (Back-office Only): <Yes and length is 6 characters> Select the ‘Yes’ or ‘No’ and the minimum character length of the password for customer accounts created in the Online Reservations Module. This option requires that the company has subscribed to the Online Reservations Module. Selecting Yes will result in Limo Anywhere generating the password for the customer. Selecting ‘No’ will allow the customer to create the password. Regardless of the ‘Yes’ or ‘No’ selection the minimum character length of the password can still be specified.
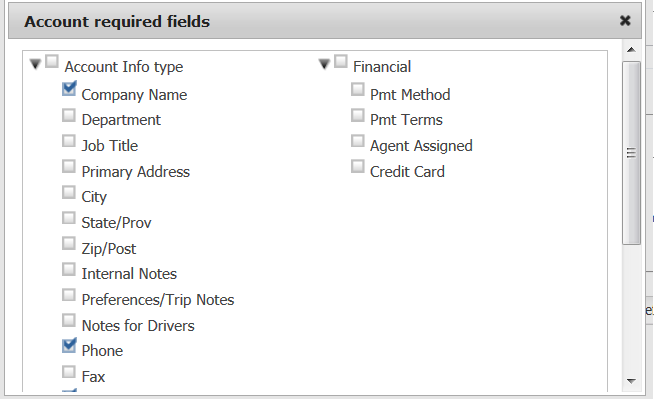
- Required Account Fields link. Click to display this window. Click to select which fields of information are required to save a new account.
- Default Calendar View:<Month> Choose Day, Work Week (Monday through Friday), Week, or Month as best suits the company’s business.
- Show estimated drop-off time on Calendar if no drop-off time is specified:<Yes> Select ‘Yes’ or ‘No’. Selecting Yes displays the estimated Drop-off time on each job on the calendar.
- Start Monthly & Weekly Calendar on:<Monday> Select either Monday or Sunday as suits the company’s business.
- Display Unfinalized Reservations on Calendar? <Yes> Select Yes or No. Selecting Yes will display both “Live” and “Unfinalized” reservations on the calendar. Unfinalized reservations are created when a partial reservation is started either in the back office or in the Online Reservation system and then abandoned.
Reservations Settings
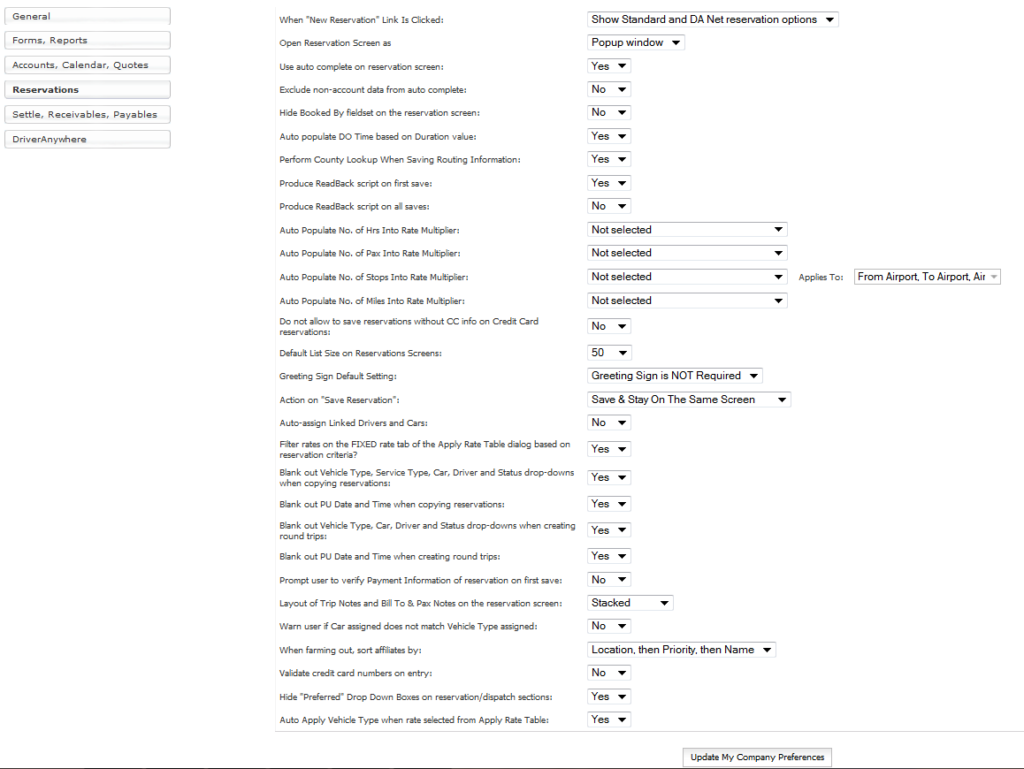
- Open Reservation Screen as: <Model Dialogue> Choose ‘Model Dialogue’ or ‘Popup Window’. Selecting ‘Model Dialogue’ will not be affected by popup blockers in the browser being utilized. It is necessary to select “Popup Window” for certain devices such as the iPad or other tablet type devices.
- Use auto complete on reservation screen: <Yes> Select ‘Yes’ or ‘No’. Selecting Yes enables Limo Anywhere to suggest options that can be selected when the first few characters in a name or location are entered.
- Exclude non-account data from complete:<No> Select ‘Yes’ or ‘No’. Selecting Yes prohibits Limo Anywhere from suggesting options that can be selected when the first few characters in a name or location are entered, in any fields other than the account portion of a reservation; or to block this action primarily in the routing section of a reservation.
- Hide Booked By fieldset on the reservation screen:<No> Select ‘Yes’ or ‘No’. Selecting ‘Yes’ eliminates the Booked By fields (First Name, Last name, Phone, Email) from the Reservation screen.
- Auto populate DO Time based on Duration value:<No> Select ‘Yes’ or ‘No’. Selecting ‘Yes’ enables Limo Anywhere to calculate and populate a Drop-off Time based on the Pick-up Time and the trip Duration.
- Perform County Lookup When Saving Routing Information: <No> Select ‘Yes’ or ‘No’. Selecting ‘Yes’ enables Limo Anywhere to assign the county to an address in a reservation based on the city and/or zip code in the reservation when that reservation is saved. The county assignment is not displayed, and is held in the data base and is used to calculate taxes due based on a particular Pick-up or Drop-off in a given county.
- Produce Read Back script on first save: <No> Select ‘Yes’ or ‘No’. Selecting ‘Yes’ will enable Limo Anywhere to produce and display a Read Back Script to be used when a new reservation is first saved.
- Produce Read Back script on all saves: <No> Select ‘Yes’ or ‘No’. Selecting ‘Yes’ will enable Limo Anywhere to produce and display a Read Back Script to be used anytime a reservation is saved.
- Auto Populate No. of Hrs Into Rate Multiplier: <Not Selected > Select a Multiplier Rate from the drop down if it is desired to have the Trip Duration populate the multiplier. Most often the rate selected would be Per Hour (Base Rate). The number of hours are then multiplied by the per hour rate for that Vehicle Type to determine a total hourly rate.
- Auto Populate No. of Pax Into Rate Multiplier: <Not Selected> Select a Multiplier Rate from the drop down if it is desired to have the number of passengers in a trip populate the multiplier. Most often the rate selected would be Per Passenger (Base Rate). The number of passengers are then multiplied by the per Passenger rate for that Vehicle Type to determine a total passenger rate.
- Auto Populate No. of Stops Into Rate Multiplier: <Not Selected> Select a Multiplier Rate from the drop down if it is desired to have the number of stops in a trip populate the multiplier. The number of stops are then multiplied by the per stop rate to determine a total stops rate.
- Auto Populate No. of Miles Into Rate Multiplier:<Not Selected> Select a Multiplier Rate from the drop down if it is desired to have the number of miles in a trip populate the multiplier. The number of miles are calculated by the distance from the pick up to the drop off. Most often the rate selected would be Per Mile (Base Rate). The number of miles are then multiplied by the per mile rate to determine a total mileage rate.
- Do not allow to save reservations without CC info on Credit Card reservations:<No> Select ‘Yes’ or ‘No’. Select ‘Yes’ if it is required by your company that credit card information be entered into the reservation before the reservation can be saved if the Form of Payment is Credit Card.
- Default List Size on Reservations Screens: <15> Choose a value from the drop down list (15, 20, 25, 30, 35, 50, 75, or 100) that determines how many reservations will appear by default in the list under each tab. This value can be changed on the list under each tab while viewing but will return to this default value when the page is refreshed.
- Greeting Sign Default Setting:<Greeting Sign is NOT Required> Select ‘Greeting Sign is NOT Required’ or ‘Greeting Sign is Required’ to set a default for the value of this field in the reservation screen. The value should be select to reflect what most of the company’s customers demand. It can be changed in each individual reservation.
- Action on “Save Reservation” <Save & Stay on The Same Screen> Select ‘Save & Stay On the Same Screen’ if when a reservation is saved it should re-display the saved reservation. Select ‘Save & Start New Reservation’ if when a reservation is saved a blank reservation screen should display. Select ‘Save & Go To Main Reservation Area’ if when a reservation is saved a return to the list under the New Reservations tab should display.
- Auto-assign Linked Drivers and Cars: <No> Select ‘Yes’ or ‘No’. Selecting ‘Yes’ will assign the car if the driver is assigned to a reservation, or assign the driver if a car is assigned to a reservation if that car and driver are linked. This is useful in companies that utilize sub contractors as drivers that drive their own cars.
- Filter rates on the FIXED rate tab of the Apply Rate Table dialog based on reservation criteria?<Yes> Select ‘Yes’ or ‘No’. Selecting ‘Yes’ filters the displayed rates available when the Apply Rate Table action is selected in the Reservation process based on the Service Type, Vehicle Type and Routing. Fixed Rates are determined by the Pick-Up and Drop-off points entered in the reservation if those points are identifiable to Zones and a Fixed Rate is established between those Zones.
- Blank out Vehicle Type, Service Type, Car, Driver and Status drop-downs when copying reservations: <No> Select ‘Yes’ or ‘No’. Select ‘Yes’ if when copying a reservation the fields for Vehicle Type. Service Type, Car, Driver and Status are to be default blank, or in the case of Status the system default value; in the copy (new) reservation. The application of setting Yes would be if previous reservations of a customer are copied, but it is required that the company staff enter the values in these fields for each new reservation.
- Blank out PU Date and Time when copying reservations: <No> Select ‘Yes’ or ‘No’. Select ‘Yes’ if when copying a reservation the values in the fields for Pick-up Date and Pick-up Times are to be default blank in the copy (new) reservation as blank fields. The application of setting Yes would be if in most instances previous reservations of a customer are copied because they repeat the same routing frequently such as trips to the airport, and only the date and time are likely to change.
- Blank out Vehicle Type, Car, Driver and Status drop-downs when creating round trips: <No> Select ‘Yes’ or ‘No’. Select ‘Yes’ if when creating a round trip reservation the fields for Vehicle Type. Service Type, Car, Driver and Status are to be default blank, or in the case of Status the system default value; in the return (new) reservation. The application of setting Yes will require the company staff enter the values in these fields for each new reservation.
- Blank out PU Date and Time when creating round trips: <No> Select ‘Yes’ or ‘No’. Select ‘Yes’ if when creating a round trip reservation the values in the fields for Pick-up Date and Pick-up Times are to be default blank in the return (new) reservation as blank fields. The application of setting Yes would be applicable in most instances because return trip (new) reservation of a customer will seldom be on the same date, and at the same time as the outbound (original).
- Prompt user to verify Payment Information of reservation on first save:<No> Select ‘Yes’ or ‘No’. Selecting ‘Yes’ will on first save of a reservation prompt the system user creating the reservation to get payment information. This is only a reminder, and it can be overridden by the system user by opening the payment tab in the reservation and clicking ‘Save’; unless the payment type is credit card and in setting above ‘Do not allow to save reservations without CC info on Credit Card reservations’ is set to ‘Yes’.
- Layout of Trip Notes and Bill To & Pax Notes on the reservation screen: ‘Tabbed’ Select ‘Tabbed’, ‘Side by Side’, or ‘Stacked’ to control how the ‘Trip Notes’, and ‘Bill To & Pax Notes’ fields are displayed in a reservation. Illustrations of each are shown below.
- Warn user if Car assigned does not match Vehicle Type assigned: <No> Select ‘Yes’ or ‘No’. Selecting ‘Yes’ creates a pop up warning when a specific Car assigned does not match the Vehicle Type assigned for that reservation.
- When farming-out, sort affiliates by: <Location, then name> Select the setting to determine how Affiliates entered in the company’s Limo Anywhere will display on the drop down of the Reservation for Affiliate Name.
- Validate credit card numbers on entry: <Yes> The default setting ‘Yes’ will cause Limo Anywhere to validate the credit card number upon its entry in the reservation or payment process before authorization or capture. The validation is only the format and does not determine whether the card has available funds for the transaction.
- Hide “Preferred” Drop Down Boxes on reservation/dispatch sections: <Yes> The default setting is ‘Yes’ which will hide the Preferred Vehicle Type and Preferred Driver fields. Selecting ‘No’ will enable these fields to be viewed and utilized. Two fields will show on the Reservation screen, and Dispatch Quick and Detailed Edit Screens where the customers preferences are shown. These fields act as a memo to the dispatcher or person assigning the drivers and vehicles as to the preference of the customer. They are not binding on the dispatcher and can be overridden simply by assigning another driver or vehicle type.
- Auto Apply Vehicle Type when rate selected from Apply Rate Table:<Yes> Select ‘Yes’ or ‘No’. Selecting ‘Yes’ (default) will automatically assign the Vehicle Type in the reservation based on the rate chosen when Apply Rate Table is clicked. Selecting ‘No’ will mean the Vehicle Type will need to be manually assigned by clicking the drop down arrow and selecting from the drop down list.NOTE: Apply Rate Table is only applicable for Limo Anywhere users that have the Instant Rate Lookup Module.
Click ‘Update My Company Preferences‘ to retain the selections.
Settle, Receivables, and Payable Settings
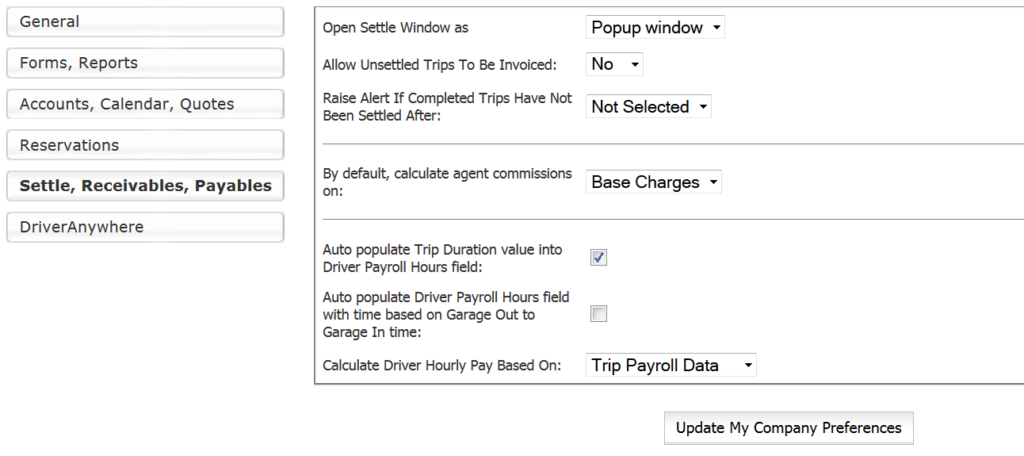
- Open Settle Window as: <Model Dialogue> Choose ‘Model Dialogue’ or ‘Popup Window’. Selecting ‘Model Dialogue’ will not be affected by popup blockers in the browser being utilized. It is necessary to select ‘Popup Window’ for certain devices such as the iPad or other tablet type devices.
- Allow Unsettled Trips To Be Invoiced: <No> Select ‘Yes’ or ‘No’. Selecting ‘Yes’ will allow any trip to be invoiced including trips yet to be completed. If Yes is selected the trips will not appear in the Receivables/Create Invoice tab without searching trips to include on the invoice and selecting the ‘Include Unsettled Trips” option.
- Raise Alert If Completed Trips Have Not Been Settled After: <0 Hours> Select from the drop down list the number of hours or days from 0 hours to 30 days that a trip can be completed (Done), and in the To Be Settled tab of the Settlement section before the following alert will display in the lower right corner of the company’s Limo Anywhere. The selection “Not Selected” disables this alert.

- Auto populate Trip Duration value into Driver Payroll Hours field: <Not Selected> Select this option by clicking the check-box. Doing so will result in the Trip Duration as measured by the time between the Pick-up and Drop-off Times to be the value that is populated in the hours worked field of the Driver Payroll, for the purpose of calculating the number of hours a Driver is paid for a trip, or day.
- Auto populate Driver Payroll Hours field with time based on Garage Out to Garage In time: <Not Selected> Select this option by clicking the check-box. Doing so will result in the Trip Duration as measured by the time between the Garage Out and Garage In Times to be the value that is populated in the hours worked field of the Driver Payroll, for the purpose of calculating the number of hours a Driver is paid for a trip, or day
- Calculate Driver Hourly Pay Based On:<Trip Payroll Data> Select “Trip Payroll Data” or “Logged Trip Times” from the drop down list. The option “Trip Payroll Data” will be selected by default. If only one rate is to be used to pay a driver for the entire trip (for example Garage out to Garage In, or Pick-up to Drop off) Trip Payroll Data is the correct setting. Select “Logged Trip Times” if multiple pay scales are to be use on a trip. For example if a different rate is paid from Garage Out to Pick-up and Drop-off to Garage In, as opposed to Pick-up to Drop-off.
Driver Anywhere Settings
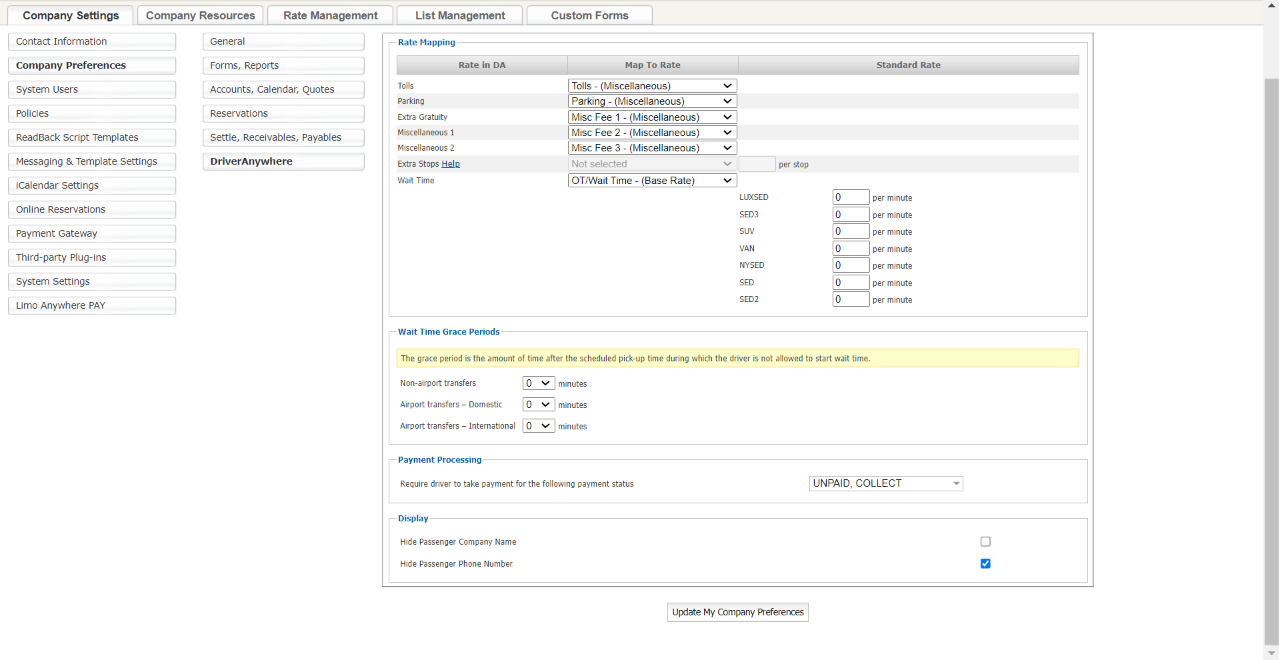
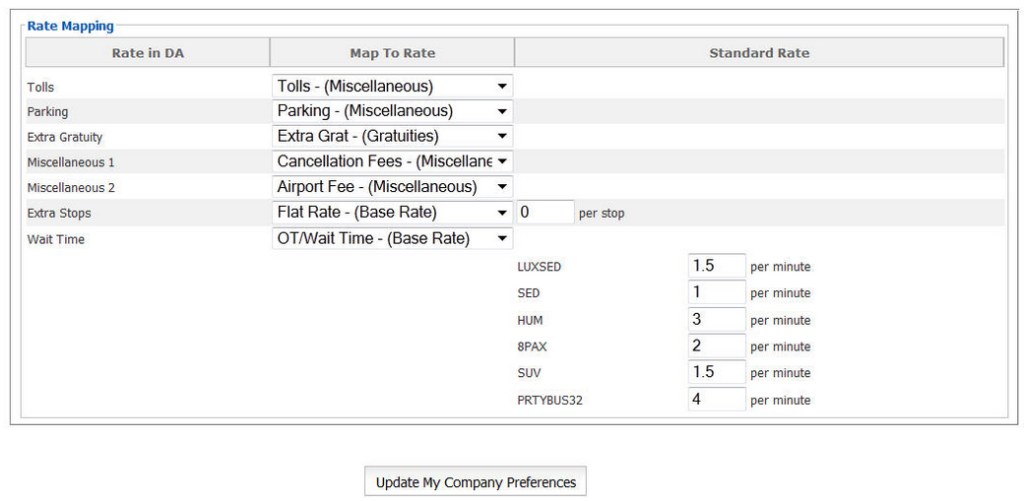
Rate Mapping
First select for each Driver Anywhere Rate a corresponding rate from the drop down list. When each rate is done the Driver Anywhere Rate Mapping may appear as below.
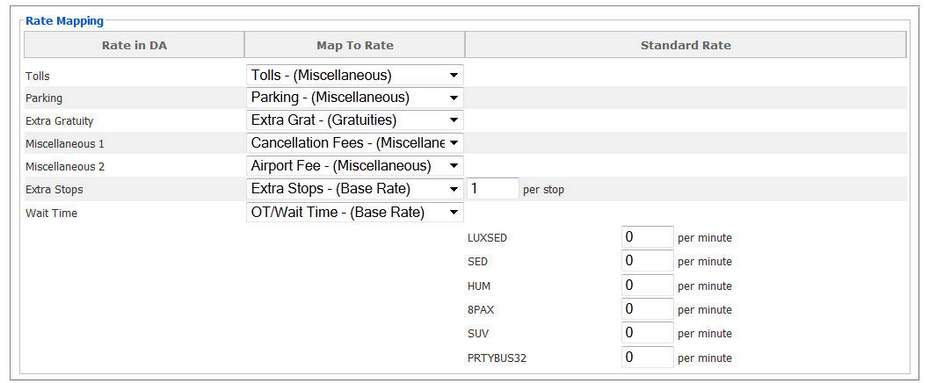
Next enter a per minute Rate amount for each active Vehicle Type. Because Driver Anywhere is able to track time by the minute the hourly rates must be restated in a per minute basis. For example $60.00 per hour would equal $1.00 per minute.
Wait Time Grace Period
Is set to <0 minutes> by default.
The grace period is the amount of time after the scheduled pick-up time during which the driver is not allowed to start wait time. It is set for:
Non Airport Transfers.
Airport Transfers- Domestic (flights).
Airport Transfers – International (flights).
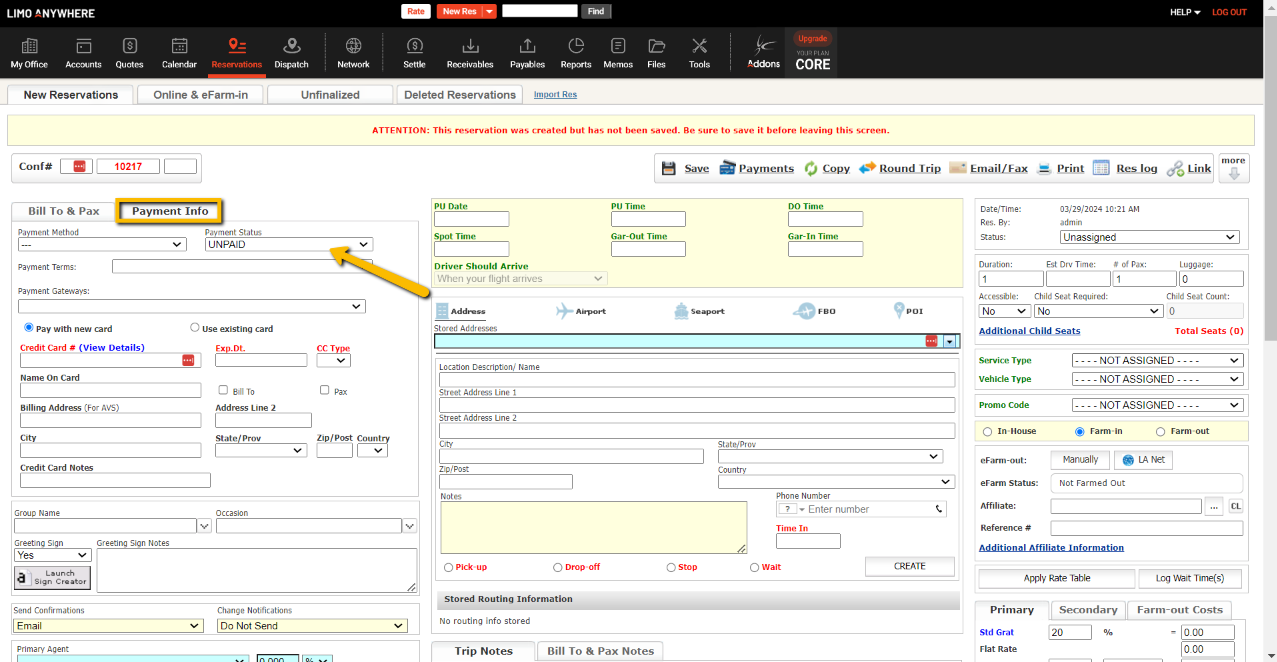
Payment Processing
Require driver to take payment for the following payment status <—NOT SELECTED—>:
To allow drivers to take payments, first you’ll have to go to My Office > Company Resources > Drivers. Once there, select the driver profile, go under Driver Anywhere settings and make sure the driver is allowed to process payments. The options for collecting payments are as listed below:
- Unpaid: Allow your drivers to collect payments on Reservations that have the Payment Status set as Unpaid.
- Collect: Allow your drivers to collect payments for Reservations that have the Payment Status Collect.
- Unpaid & Collect: Allow your drivers to collect payments for Reservations that have either Unpaid or Collect as the Payment Status. You can see where the payment status is located on a reservation in the screenshot below.
Click ‘Update My Company Preferences‘ to retain the selections or entries.