iCalendar Setup
With iCalendar, you subscribe to have event information updated to your preferred calendar application (such as Microsoft Outlook, Google Calendar,Yahoo Calendar, or your mobile Android & iOS devices.) You can utilize this built-in function of Limo Anywhere to sync your trip/event data to these services. Follow the instructions below to setup your iCalendar URL and subscribe to it in your preferred calendar application service.
Note: Limo Anywhere publishes updates to your iCalendar within a few minutes any new/updated data. However, each calendar service performs data syncs at different intervals so updated information may vary depending on the calendar service you are using. Testing results show Google Calendar sometimes takes greater than 24 hours to sync updates while other providers such as Apple and Microsoft Outlook can retrieve updates within minutes. On mobile devices, you may also be able to manually refresh the calendar to check for updates.
Step 1 – Setting up iCalendar in Limo Anywhere
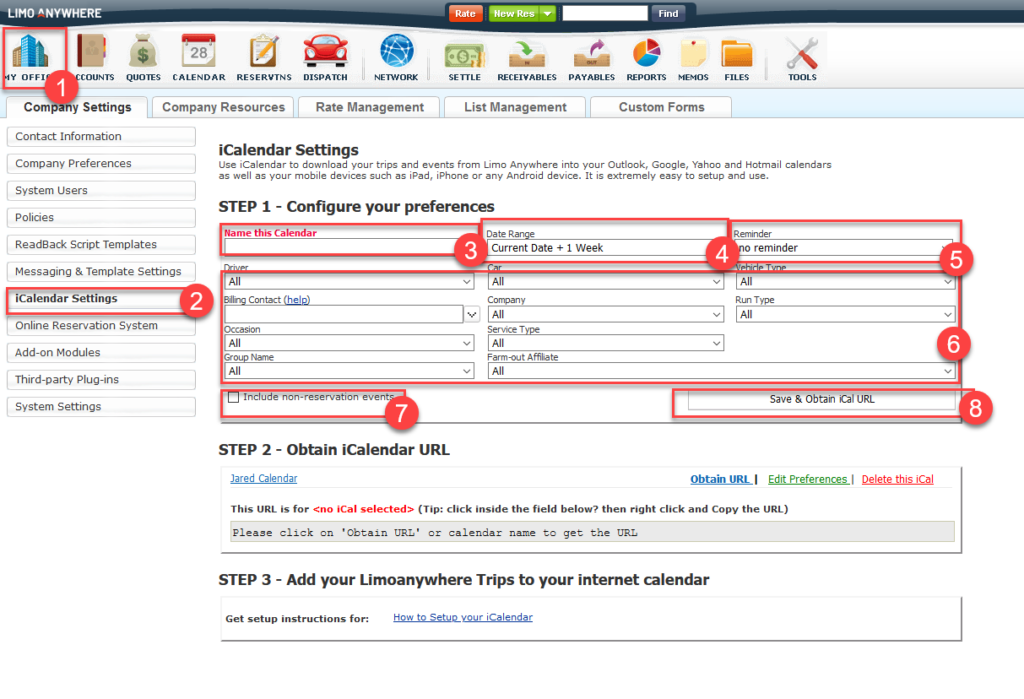
- Click on the ‘My Office‘ icon in the toolbar.
- Click on the ‘iCalendar Settings‘ button.
- Enter a ‘Calendar Name‘.
- Select Date Range: Select the date range you would like to sync to your calendar.
- Reminder: If you would like a reminder of upcoming events select a time form the drop down list.
- Filtering Fields: If you would like to filter the reservations being synced to your calendar select the different options form the drop down list: Driver, Car, Vehicle Type, Billing Contact, Company, Run Type, Occasion, Service Type, Group Name, Farm-out Affiliate.
- Include Non Reservation Events: check the box to enable the synchronizing of events on the Limo Anywhere Calendar that are not reservations or trips.
- Click the ‘Save & Obtain iCal URL‘ button.
You may create multiple iCalendars that are filtered based on the the selected criteria in ‘Step 1’ of the iCalendar configuration. For example if an iCalendar is created for a specific Driver or a Billing Contact (third party): that third party could be sent the iCal URL so that they could view just the trips relative to the third party in their calendars or a single user can create multiple filtered calendars for their calendar program.
Step 2 – Obtain the iCalendar URL
The iCalendars created will appear in the list illustrated below
- Click Obtain URL to display the URL for that iCalendar in the window below
- Click Edit Preferences to alter the properties of that iCalendar
- Delete this iCal will erase the URL and the properties associated with it.
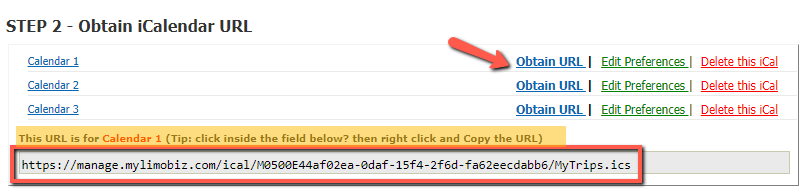
You may setup and subscribe to multiple iCalendars if you wish.
Step 3 – Subscribe to the iCalendar in your preferred calendar application
You can use any calendar application/platform which supports iCalendars. Below we have listed some of the popular ones along with instructions on how to subscribe to iCalendars with those services.
Cloud Services
- Microsoft Outlook Calendar (instructions for Outlook Online and Outlook mail client.)
- Google Calendar (Google Calendar does not allow users to add a refresh rate to iCalendars, so syncing times may be variable. From our experience, data typically gets updates every 24-48 hours with their service.)
- Yahoo Calendar
- iCloud Calendar (must be done from a Mac device)
The above listed are cloud services meaning you can access these calendars from any devices where you have access to that platform (eg: computer, phone, tablet, etc.) You may already have your mobile devices setup to sync with one of those cloud providers. Below are instructions to subscribe to an iCalendar directly on your mobile device.
Mobile Devices
- Apple iOS devices (iPhone/iPad)
- Android devices (you can subscribe directly to the calendar application in your mobile device. Due to the number of devices with Android, it is suggested to utilize one of the cloud services above to sync with your mobile device instead of subscribing to the iCal directly from your mobile device.)