Establishing and Managing the Fixed Rate Matrix
The Fixed Rate Matrix is a quick and easy way to establish a Fixed Rate table for an Account, and to apply that schedule repeatedly with multiple Accounts.
A Fixed Rate Matrix is established using the existing Zones, and Vehicle Types in the company’s Limo Anywhere. The existing Fixed Rate table will become the default Rate Matrix. Think of this as a “Master” Fixed Rate Table. A Rate Matrix can be established using all the Zone Pair/Vehicle Type combinations in the Default Rate Table or just a few…whatever is appropriate for the accounts the Rate Matrix is to be applied to.
Establishing a Fixed Rate Matrix
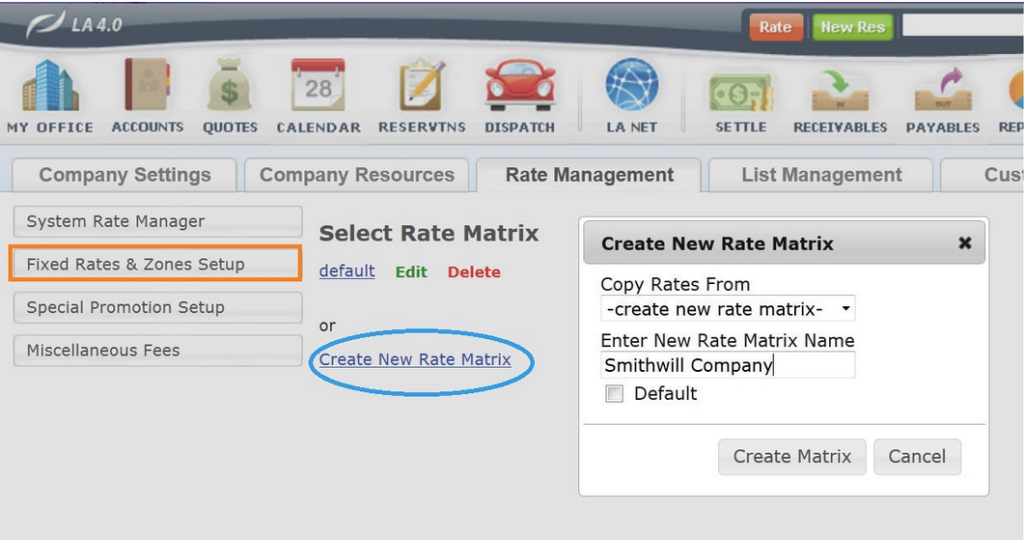
- Click on the ‘My Office‘ icon on the tool bar.
- Select the Rate Management tab.
- Click on the ‘Fixed Rate & Zones Setup button‘ (highlighted orange).
- Click on the ‘Create New Rate Matrix‘ link (highlighted blue).
- The ‘Create New Rate Matrix‘ pop up opens.
- In the Copy Rate From do not select an existing Rate Matrix from the drop down list
- Enter New Rate Matrix Name. Each Rate Matrix should have a unique name.
- Do not click the Default check box. Note: there can only be one Default Rate Matrix. These are the basic Fixed Rates that any customer would get. Using a limited or discounted rate matrix as the default could effect almost every customer.
- Click ‘Create Matrix‘ to continue, or ‘Cancel‘ to erase the fields and start over.
Adding Fixed Rates to a New Rate Matrix
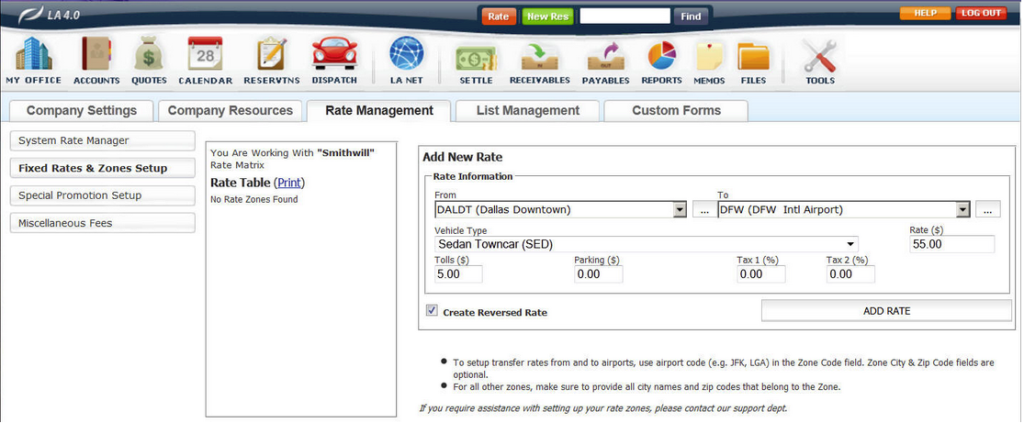
Fixed Rates for a Zone Pairs and Vehicle Type within a Rate Matrix are added the same way Fixed Rates have previously been added.
- Select the ‘From Zone‘ from the drop down list.
- Select the ‘To Zone‘ from the drop down list.
- Select the ‘Vehicle Type‘ from the drop down list.
- Enter the amount of the rate in Rate($).
- Enter amounts for Tolls and Parking if appropriate to this rate.
- Enter percentage values for the Tax 1 and Tax 2 fields if appropriate to this rate.
- Click the check box for ‘Create a Reversed Rate‘ if it is desired to create a rate reversing the From/To Zone automatically.
- Click ‘Add Rate‘ to retain entry.
- The two rates added will be displayed in the Rate Table (highlighted orange).
- The reverse rate created will be displayed in the Edit Rate section. Changes can the be made to the reverse rate that were not applicable to the first rate. Note: If no changes are required of the reversed rate click the icon (highlighted green). The reverse rate will be retained as entered.
- In this case a $3.00 Parking fee is being added the the reverse rate which was not in the first rate (highlighted blue).
- Click ‘Update Rate’ to retain any changes.
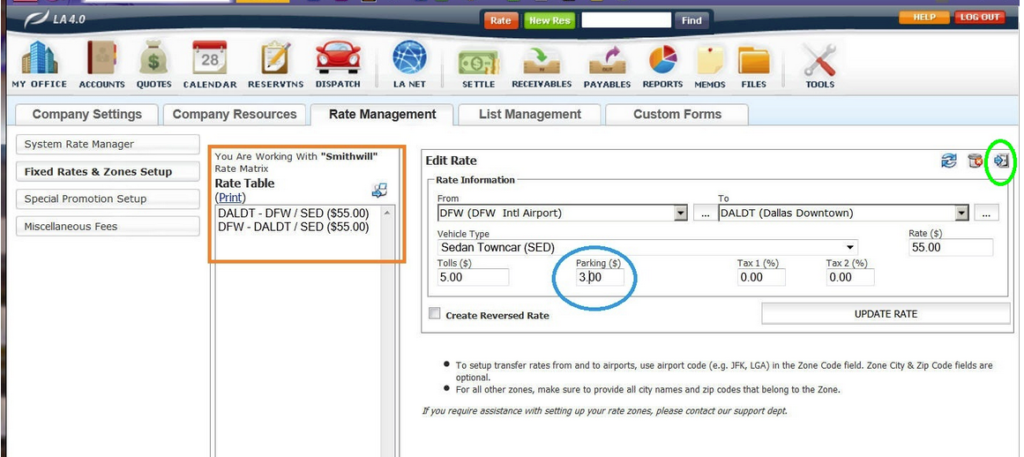
Continue adding all rates for the appropriate Zone Pairs and Vehicle Types to complete the Rate Matrix. Each time a new Fixed rate is added to the Rate matrix it will display in the Rate Table (highlighted orange).
Copying a Rate Matrix
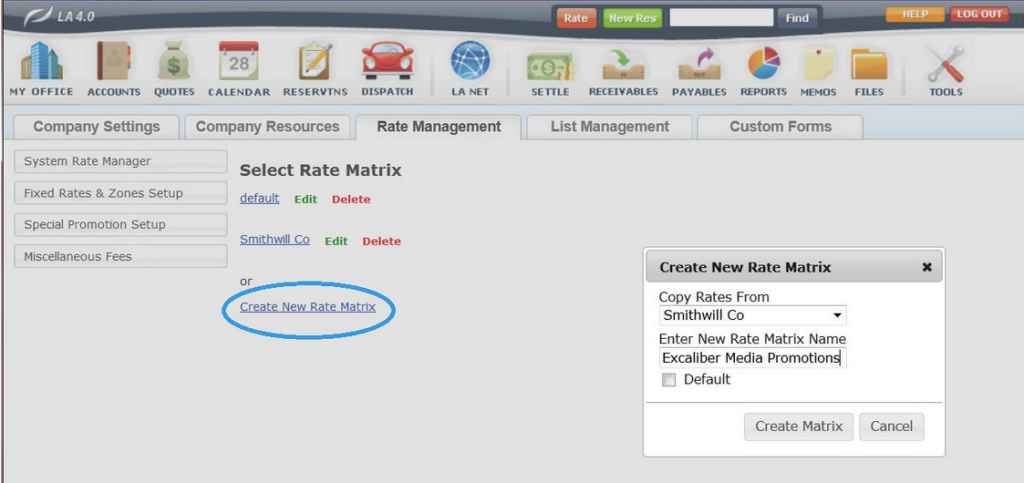
Copying an existing Rate Matrix may be an easy way to create a new Rate Matrix. Note that copying the default Rate Matrix will copy every Fixed Rate in the company’s Limo Anywhere.
Creating a new Rate Matrix by copying an existing Rate Matrix
- Click on the ‘Create New Rate Matrix‘ link (highlighted blue).
- The Create New Rate Matrix pop up opens.
- In the Copy Rate From select an existing Rate Matrix from the drop down list.
- Enter New Rate Matrix Name. Each Rate Matrix should have a unique name.
- Do not click the Default check box.
Note: there can only be one Default Rate Matrix. These are the basic Fixed Rates that any customer would get. Using a limited or discounted rate matrix as the default could effect almost every customer. - Click ‘Create Matrix‘ to continue, or ‘Cancel‘ to erase the fields and start over.
Editing An Existing Rate Matrix
Edit a Rate Matrix Name
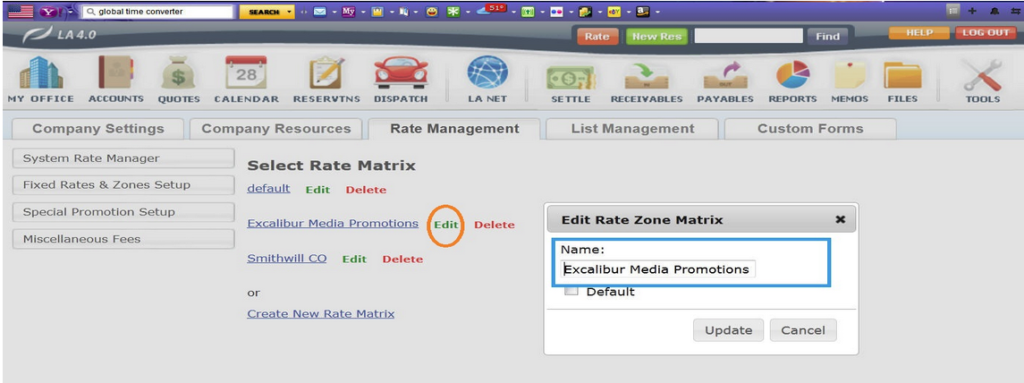
On the Fixed Rate and Zones screen find the Rate Matrix to be changed and click ‘Edit‘ (highlighted orange).
In the Edit Rate Zone Matrix pop up enter the new Name (highlighted blue) if applicable and click ‘Update‘; or if the name is not changed click ‘Cancel‘ to continue without changing the name.
Edit Rates in a Rate Matrix
Editing the Fixed Rates in a Rate Matrix can be done by Batch Editing or changing an individual rate, exactly the same as Fixed Rates were edited in Limo Anywhere previous to the Rate Matrix feature.
- On the Fixed Rate and Zones screen find the Rate Matrix to be changed and click the linked Rate Matrix name (highlighted orange).
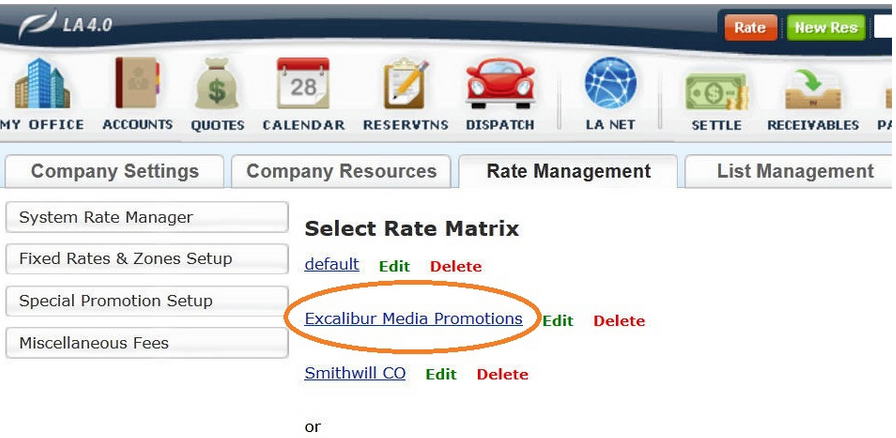
- The selected Rate Matrix will display with the fixed rates listed in the Rate Table.
- To Add a Fixed Rate to a Rate Matrix follow the steps detailed above in the section Adding A Fixed Rate to a New Rate Matrix
- To Edit and individual Fixed Rate...
- Select the Fixed Rate to be changed in the Rate Table.
- Click ‘Edit Rate‘ (highlighted orange).
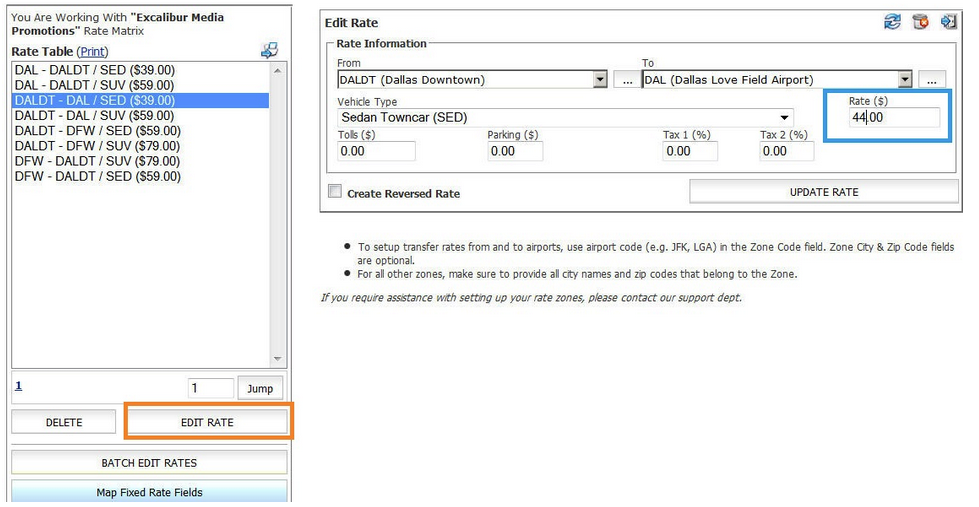
- The rate parameters will appear in the Edit Rate section.
- Change any parameters as appropriate. In this cases the Rate($) is changed from $39.00 to $44.00 (highlighted blue).
- Click ‘Update Rate‘ to retain any changes.
To Batch Edit Fixed Rates in a Rate Matrix:
- Open the Rate Matrix as described above.
- Click the ‘Batch Edit Rates‘ button.
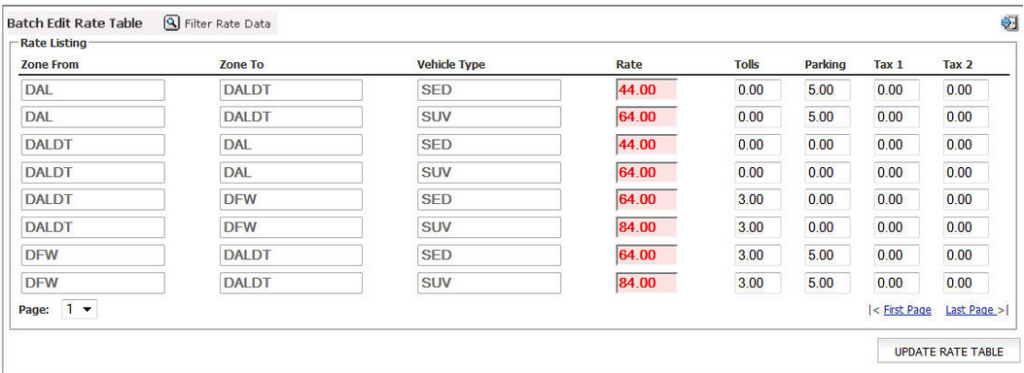
- The Batch Edit Rate table will display as illustrated below.
- Change any Fixed Rate parameters as appropriate. In the illustration below each Rate is increased $5.00.
- Click ‘Update‘ to retain any changes.
Deleting a Rate Matrix
On the Fixed Rate and Zones screen find the Rate Matrix to be deleted and click Delete. (highlighted orange) Note:Deleting a Rate Matrix is an irreversible action so proceed with caution. Deleting a Rate Matrix will also automatically make those rates unavailable for any account the Rate Matrix was applied to.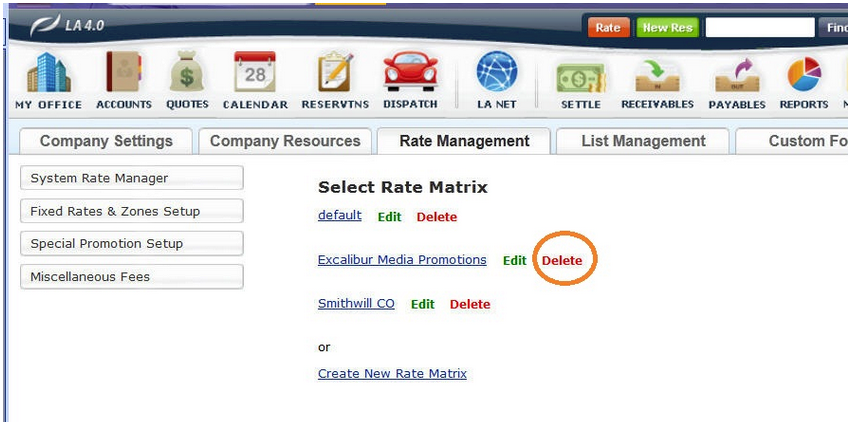
For information on the Hourly or Per Passenger Rate Matrix see the Knowledge Base article Establishing and Managing an Hourly or Per Passenger Rate Matrix.
For information on applying a Rate Matrix to an Account see the Knowledge Base article Utilizing a Rate Matrix with an Account.
