Copying a Reservation
Copying an existing reservation is useful for creating regularly scheduled trips, or just to save time in creating a new reservation that is very similar to a past trip that customer has taken. Utilizing the copy reservation feature increases efficiency and reduces the possibility of errors.
Settings that Affect the Copy Reservation Feature
There are a couple of settings that can be adjusted to determine how the Copy Reservation feature will function.
- Click the ‘My Office‘ icon on the toolbar.
- Select the ‘Company Settings‘ tab.
- Click the ‘Company Preferences‘ button.
- Click the ‘Reservations‘ button.
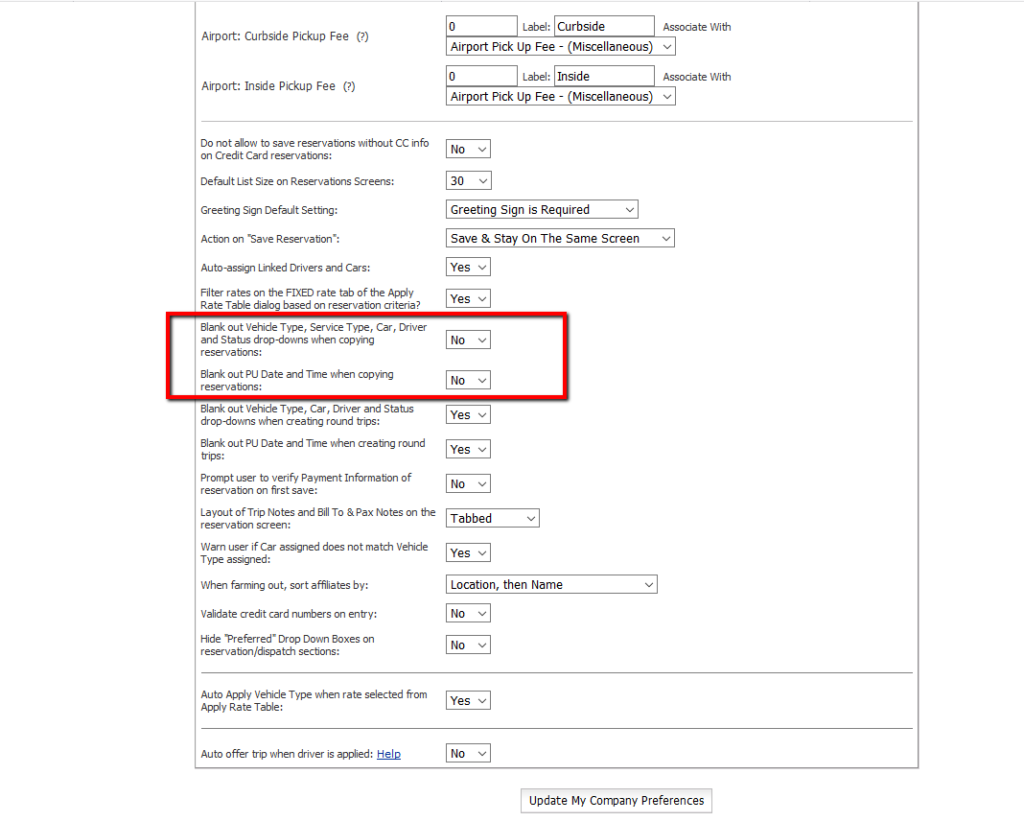
- Find the settings illustrated here, and adjust them accordingly

- Click the ‘Update My Company Preferences‘ button to retain the changes.
Copying a Reservation
- Find the existing reservation that is to be copied, and open it.
- From the existing reservation click the ‘Copy‘ link in the Reservation toolbar as illustrated below.

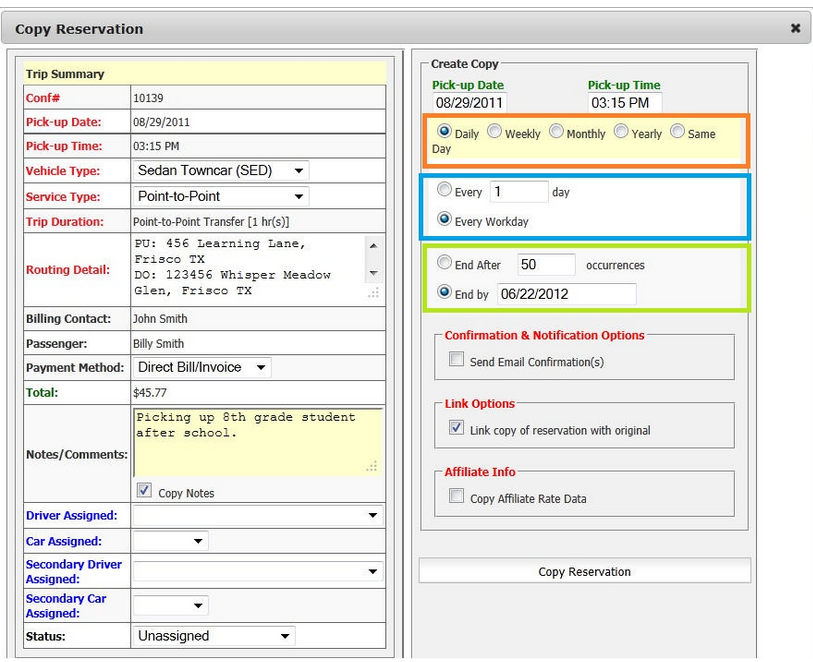
- The Copy Reservation pop up window will display as illustrated below.

- Edit any of the fields that will be changed from the original reservation to the new reservation.
- Click the check box to select the option to ‘Send Email Confirmations‘.
- Click the check box to deselect the option to ‘Link copy of reservation to the original‘.
- Click the check box to select the option to ‘Copy Affiliate Rate Data‘.
Note: This would only apply if the original reservation was a Farm-in or Farm-out. - Click the ‘Copy Reservation‘ to retain changes and create the copied reservation
Creating Multiple Copies for a Regularly Scheduled Trip
Within the Copy Reservation function the option exists to create multiple reservations that are scheduled regularly. The Copy Reservation Pop Up below illustrates this feature. In this example a passenger is being scheduled for pick-up after school. 
- Make the original reservation Pick-up Date for the first day the regular scheduled trip will begin.
- Click the ‘Copy‘ button on the Reservation toolbar while in the original reservation
- Change the ‘Pick-up Date‘ for the next occurrence of this regularly scheduled trip. In this example the trip is a daily trip so the next date would be selected. If the trip was weekly the date seven days forward would be scheduled.
- In the orange highlighted area select the frequency with which this trip will occur. In this example the default selection of ‘Daily‘ is chosen.
- In the blue highlighted area select the option that will determine if this trip will occur:
-Every number of days. The value in the number field is set to default at ‘1’, but can be changed.
-Every Workday which will mean the trip is scheduled Monday through Friday. - In the green highlighted area select the option that will determine if the regularly scheduled trip will end:
-After a certain number of occurrences. Note: This is the default selection and the default value is “1”. Not changing this will mean only a single copy of the original reservation is created.
-On a selected date - It is recommended that the option to ‘Email Confirmations’ not be checked. Checking this will generate and email for each trip which in this example would be hundreds of email confirmations.
- Linking the trips is optional.
- Click the ‘Copy Reservation‘ to retain changes and create the copied reservation
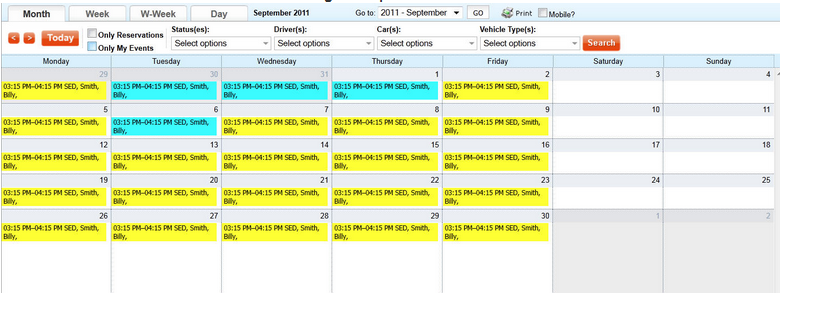
- Below is an illustration of the calendar showing the trip created above. The different colors are reflective of different statuses of the trips.

