Everything You Could Ever Wish to Know About the Accounts Section
Managing your accounts correctly in Limo Anywhere can impact your user experience, and increase your efficiency across the Limo Anywhere system.
It is important to know that Accounts are People. The company name field is used to link and/or group accounts together. Then the account type Billing Contact, Passenger, Booking Contact, or both Billing Contact & Passenger.
First let’s review some of the important terms that apply to accounts in Limo Anywhere.
- Account – An Account can be either a Billing Contact only, Passenger only, Booking Contact only, or a Billing Contact and Passenger.
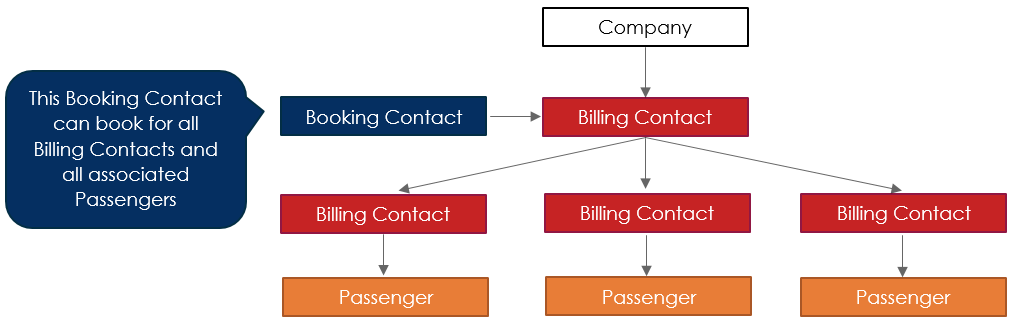
- Billing Contact – This is the person that would receive an invoice for a Passenger(s) that received the service. Billing Contacts can have multiple Booking Contacts or Passengers.
- Passenger – This is the account type of the person that will ride in the car. A Passenger can be linked with only one Billing Contact.
- Booking Contact – This is the account type for a person that arranges trips for Passenger(s). A Booking Contact can be link with only one Billing Contact.
Here are some examples of typical account set ups.
Billing Contact with Multiple Passengers
ABC Company has several persons that travel as consultants frequently but all the bills go to the company for payment. In this case the person who pays the bill is set up as the Billing Contact, and each person that travels is a Passenger only linked to the ABC Company Billing Contact. Trips will be grouped under the Billing Contact, invoiced and the bill paid by the Billing Contact. The Billing Contact Payment method would be set to Direct Bill/Invoice.
Company with Multiple Billing Contacts/Passengers
XYZ Company has 20 people that travel, and four people that manage the billing for 5 travelers each that are billed on a monthly basis. In this case each of the four persons that pay bills would need to be a Billing Contact, and the 5 people they manage would need to be Passengers linked to the appropriate Billing Contact. The Payment Method for each Billing Contact is set to Direct Bill/Invoice. Each Billing Contact would receive a separate invoice for the travel by their passengers at the end of the month.
Customers who Pay Their Own Bill
Customers who both travel with you and pay their own bill need to be set up as a Billing Contact and Passenger. The Payment Method on the account would be set to Direct/Bill Invoice if you were going to invoice the customer periodically; or to another Payment Method (ie Credit Card) if the customer is going to pay for each ride as it occurs.
Companies Tab
Note: Companies are automatically added to the ‘Companies’ tab when an account is created with a company name in that field.
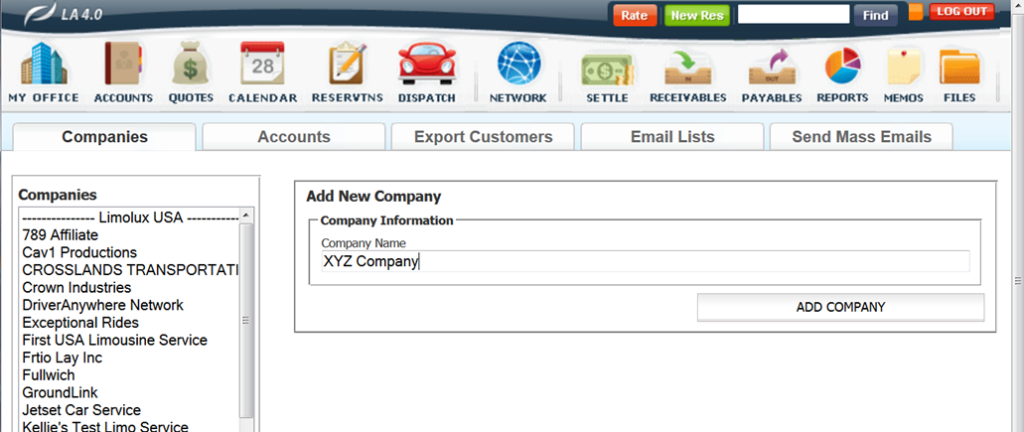
Adding a Company
- Select the ‘Companies Tab‘.
- Type in the company name.
- Click the ‘Add Company‘ button.
Editing a company
- Select a Company from the Company list.
- Click ‘Edit Company‘.
- Make changes and click ‘Update Company‘ to save changes.
Deleting a company
- Select a Company from the Company list.
- Click ‘Edit Company‘.
- Click the ‘Delete Symbol‘ in the upper right corner.
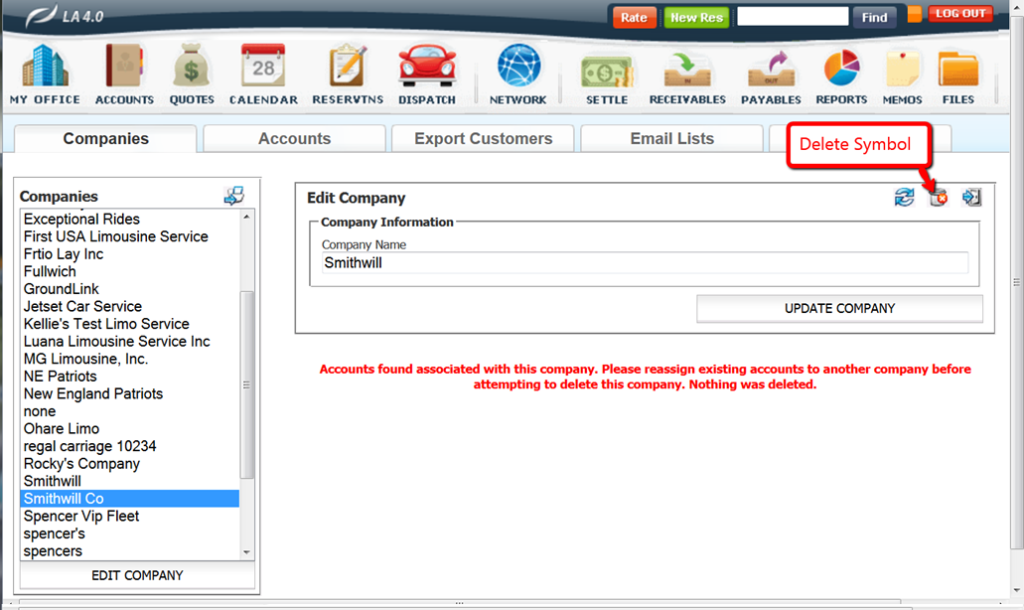
Note:If the company that is to be deleted is assigned to any accounts the message above in red will appear and the company will not be deleted. It would be required to remove the company from any accounts before deleting it.
Account Tab
Creating an Account
Accounts can be created through the account section or directly from the reservation screen.
Before adding accounts it is possible to define what fields in the Account Profile are required before the Account can be saved. Click on:
- My Office
- Company Settings tab
- Company Preferences
- Accounts, Calendar, Quotes button
- Required Account Fields Link
This will open this pop up window.
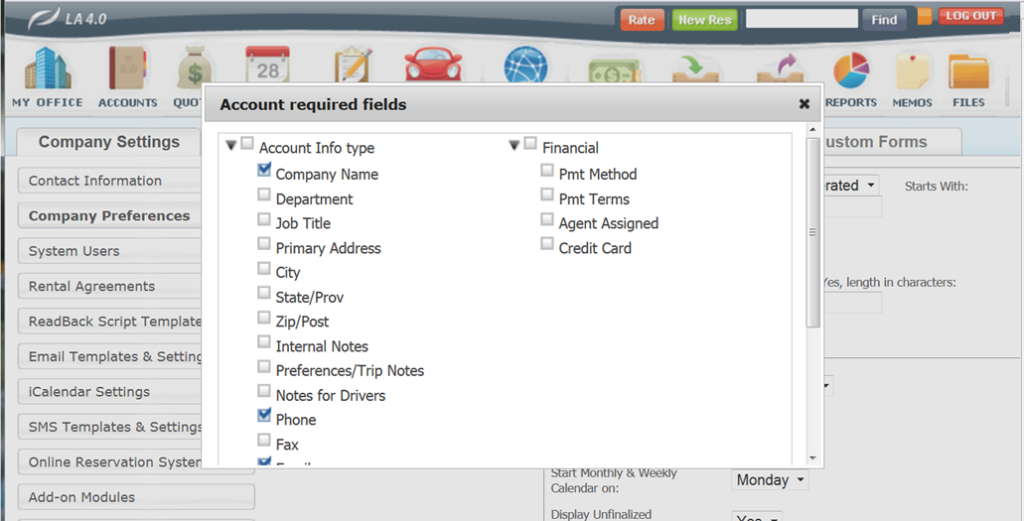
Select which fields will be required to save an Account for your company, scroll to the bottom of the pop up window, and click ‘Update Account Required Fields‘ to save selection.
Note: Account Numbers are automatically assigned in sequence by Limo Anywhere when the account is created by default. Account Numbers can be adjusted to be created manually by adjusting the setting in:
- My Office
- Company Settings
- Company Preferences
- Account, Calendar, Quotes
- Customer Account Numbers
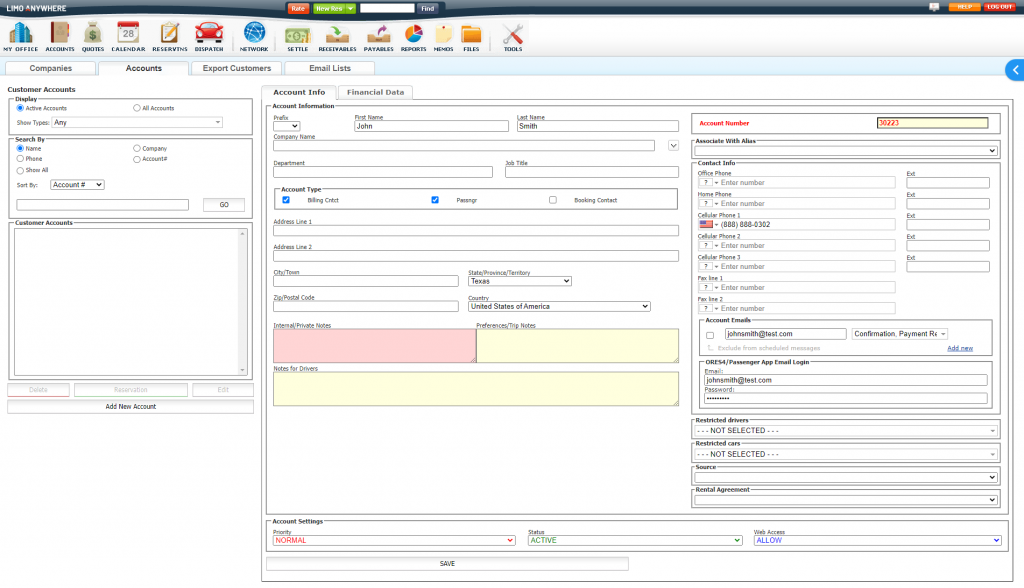
Steps for Adding an Account
- Click on the ‘Accounts‘ icon in the toolbar.
- Select the ‘Add New Account‘ button.
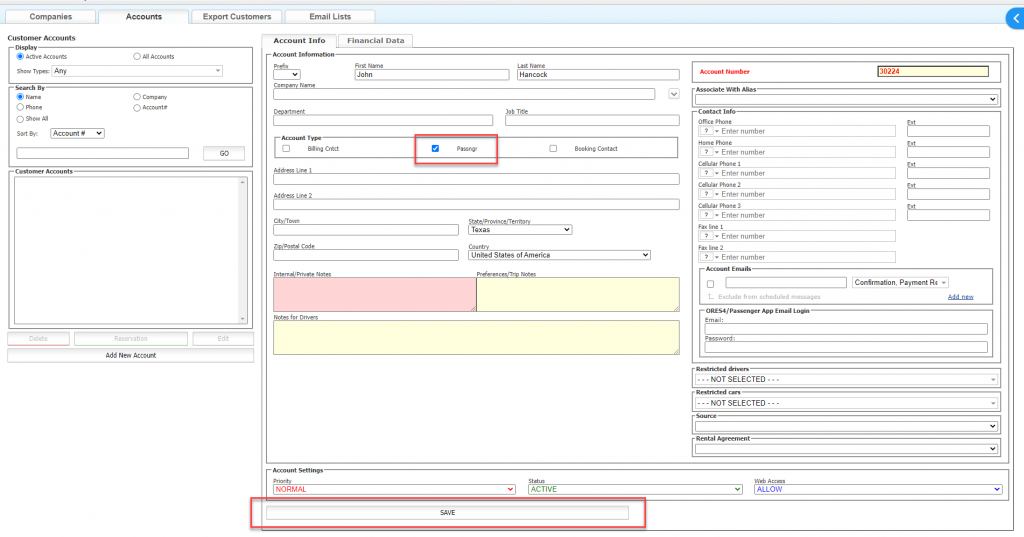
- Enter the Account’s ‘First Name‘ and ‘Last Name‘ (these are required fields).
- Select the Company for this individual by clicking the down arrow to display the drop down list -or- enter the name of the Company.
Helpful Hint: Entering the name of a Company that is not currently in the Limo Anywhere will create a new Company. - (OPTIONAL STEP) Enter the Department and/or Job Title.
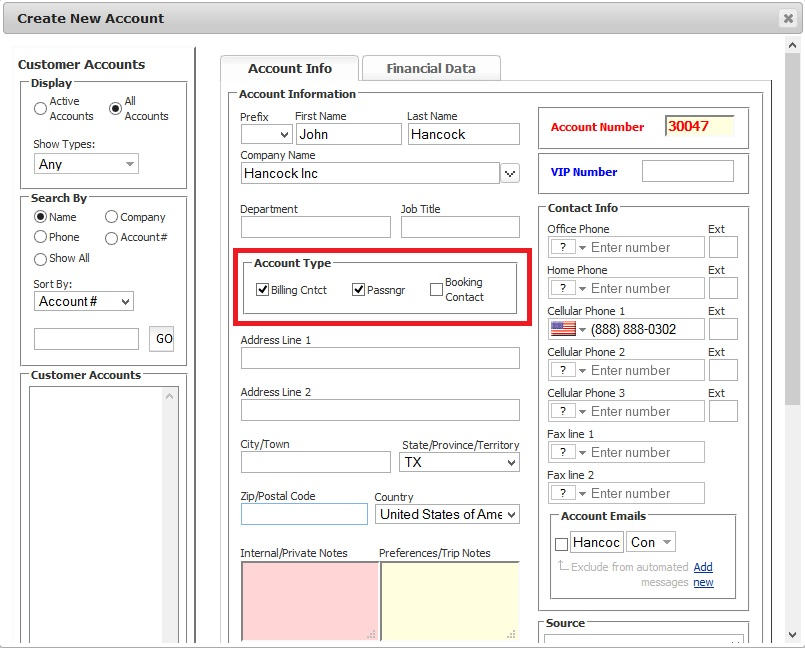
- Select the Account Type:Billing ContactPassengerBooking Contact
- (OPTIONAL STEP) Enter the Primary Address, City, State and Zip Code of the account.
- (OPTIONAL STEP) Enter Notes as they apply to the account:
Internal/Private Notes: are for the limousine company personnel to use in managing the account.Preferences/Trip Notes: Will populate into the reservation Trip Notes.Driver Notes: Will appear on Driver Trip Sheets. - (OPTIONAL STEP) Select Settings on the account:
Passenger Priority: Normal (default), VIP, or VVIPStatus: Active or Inactive in Limo AnywhereWeb Access: Allow or Disallow - (OPTIONAL STEP) Enter the Phone Numbers associated with this account.
- Enter an ‘Account Email Address‘.
- Click the drop down list to select which types of communications will be sent to this ‘Account Email Address‘:
Select All (default)
Confirmations
Payment Receipts
Invoices
Others - (OPTIONAL STEP) Enter the ‘ORES4/Passenger App Email Login’ email address. This is the email address that your client will use to log into ORES, PWA, or the Passenger App (along with the password set). The email address for login can only be used on one account.
- (OPTIONAL STEP) If setting up the above step, enter the ‘ORES4/Passenger App Email Login’ password. This is the password that your client will use to log into ORES, PWA, or the Passenger App (along with the email address set). The password should be 8 characters in length including uppercase, lowercase letters, numbers and special symbols.
- (OPTIONAL STEP) Select from the ‘Restricted Drivers‘ drop down list IF any drivers are to be not assigned to a trip for this account.
- (OPTIONAL STEP) Select from the ‘Restricted Cars‘ drop down list IF any cars are to be not assigned to a trip for this account.
- (OPTIONAL STEP) Select the applicable ‘Source‘ form the drop down list.
- (OPTIONAL STEP) Select the applicable ‘Rental Agreement‘.
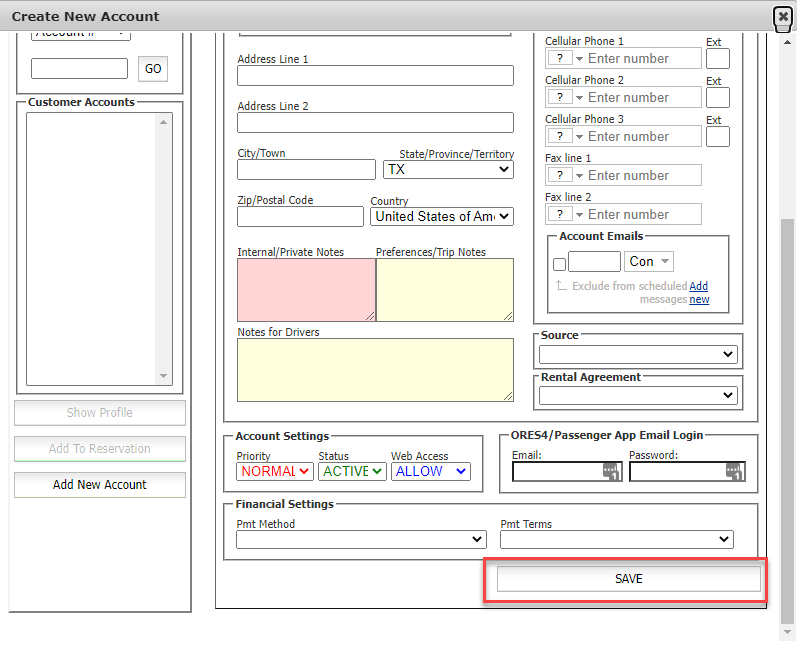
- Click the ‘Save‘ button.
Creating an Account From a Reservation
- Completely fill out a reservation and save it or open an existing reservation.
- Click to the ‘Copy from here‘ check box.
Note: The ‘Copy from here’ check box pulls the information from the ‘Passenger First’, ‘Passenger Last Name’, ‘Passenger Phone’, ‘Passenger Email’, ‘Company Name’, and ‘Credit Card Information’ then placed the information in to the account when the ‘Create New Acct’ button is selected. - Click the ‘Create New Acct‘ button.
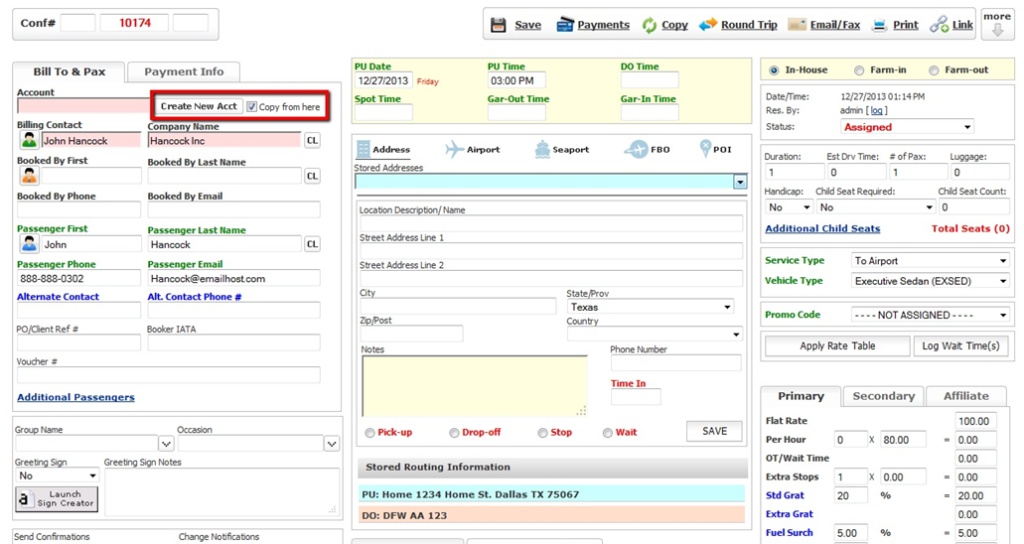
- Select the ‘Account Type‘.
- Click the ‘Save‘ button.
- Once saved, the newly created account will auto populate onto the reservation.
Linking a Passenger Account to an existing Billing Account
Before beginning it is important to be sure that the Billing Contact’s account has been created and the Company Name is listed in the accounts as well.
- Click on the ‘Accounts‘ icon in the toolbar.
- Create the ‘Passenger Account‘ (DO NOT Select ‘Billing Cntct‘) by filling out the required fields in the ‘Account Info‘ section.
- Once you have entered all the necessary information into the account click the ‘SAVE‘ button.
Note: If done correctly a window should pop up instructing you to select the billing contact to link the passenger account. The billing contact drop down box will list any and all billing contacts from the specified company name. - Select the correct ‘Billing Contact‘.
- Click ‘Select Billing Contact and Continue‘ as illustrated below.

Changing a Billing Contact in an Existing Passenger Account
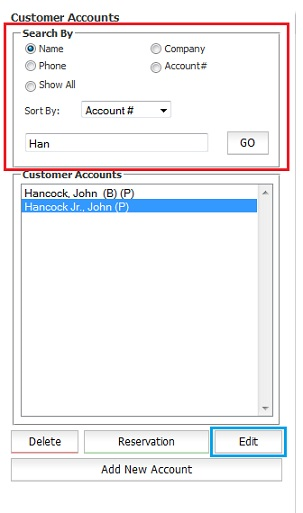
- In the Account tab search for the passenger account you wish to modify.
- Select the Passenger Only Account (P).
- Click the ‘EDIT‘ button.
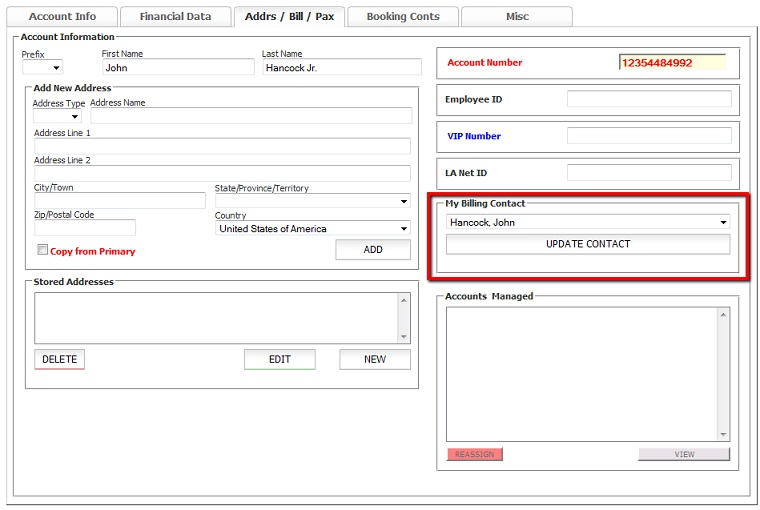
- Select the ‘Addrs/Bill/Pax‘ tab.
- Select the correct Billing Contact from the ‘My Billing Contact‘ drop down box.
- Click the ‘UPDATE CONTACT‘ button.
Financial Data
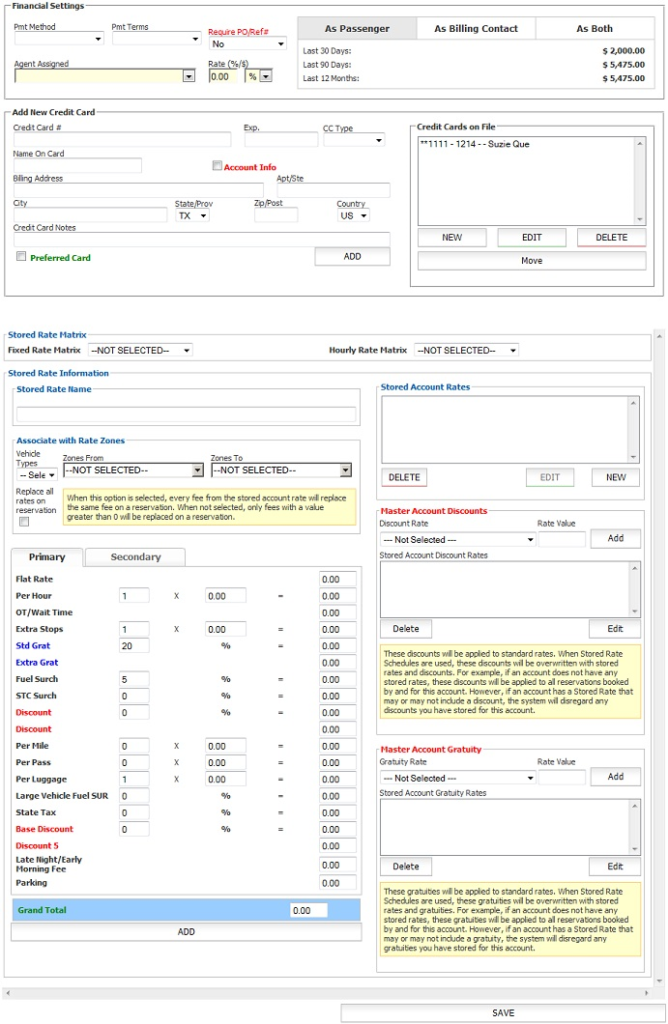
The Financial Data tab contains Financial Settings, Credit Card, and Account Rate for your account holders.
Financial Settings
| Setting Title | Description |
| Payment Method | Select the way your account holder will be paying for their reservations. If the account holder needs to be invoices for multiple trips set the account to ‘Direct Bill/Invoice’. |
| Payment Terms | Is a specify the period of time your company allows the account holder to pay off the amount due. |
| Agent Assigned | You would add an ‘Agent’ to an account if/when the account holder was refereed to your company and the agent need to be to compensated for the reservations made by the account. |
| Agent Rate | You would add the ‘Agent’ commission rate once the agent is applied to the account. |
| Historical Revenue Display | Shows the amount of revenue brought in for this account as a billing contact, passenger, or both. |
Credit Cards
Credit card numbers that are added to a reservation that contains an account will automatically be saved in this section. You can also add/edit credit card numbers here so that they will show up in the stored credit card list for the account on the reservation.
To Add a Credit Card on File:
- Enter the ‘Expiration Date‘ (Exp.).
- Select the ‘Credit Card Type‘ (CC Type).
- Enter the ‘Name On Card‘.
- Enter the ‘Billing Address information‘.
- Click the ‘Add‘ button.
To Edit a Credit Card on File:
- Select the card in the ‘Credit Cards on File‘ list.
- Click the ‘Edit‘ button.
- Change any fields except the credit card number. Credit card number cannot be edited.
- Click the ‘Update‘ button or the ‘Cancel‘ button to clear the fields and revert to the previous saved information.
To Delete a Credit Card on File:
- Select the card in the ‘Credit Cards on File‘ list.
- Click the ‘Delete‘ button.
Stored Rate Information
It is possible to store default Master Account Discounts or Master Account Gratuities as well as specific rates that might apply to a customer known as Stored (Account) Rate Schedules.
The Master Account Discounts and Gratuities will be applied to standard rates. When Stored (Account) Rate Schedules are used the Master Account Discounts and/or Gratuities will be overwritten with stored rates and discounts/gratuities associated with the Stored (Account) Rate. For example, if an account does not have any stored rates, these discounts and/or gratuities will be applied to all reservations booked by and for this account. However, if an account has a Stored (Account) Rate that may or may not include a discount and/or gratuities, the system will disregard any Master Account Discounts and/or Gratuities that are stored for the account.
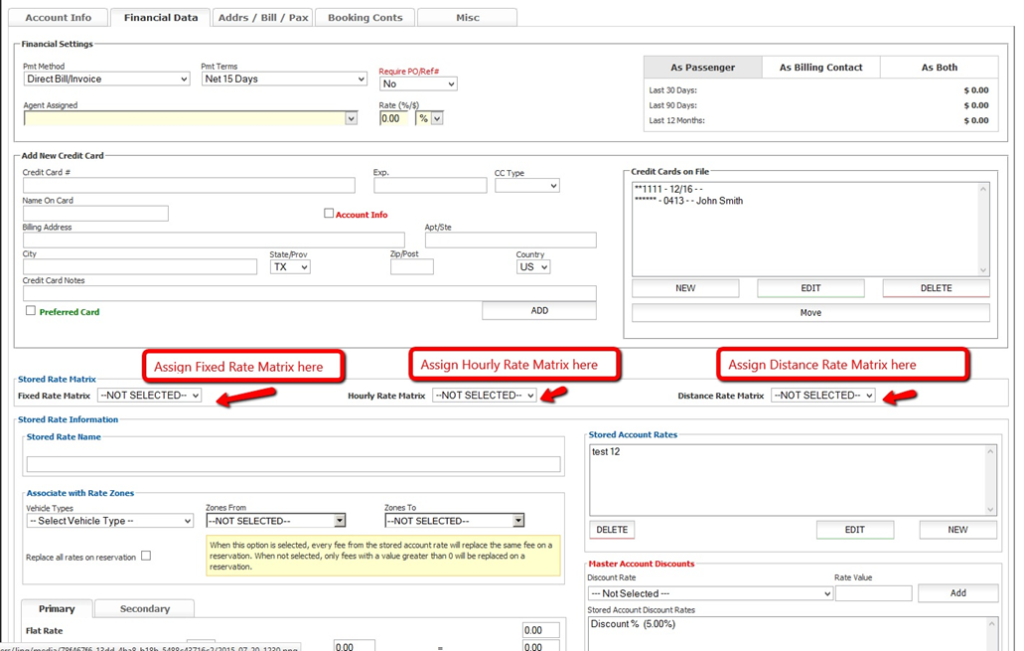
Adding a Rate Matrix to an Account
A Rate Matrix can either be:
- Fixed Rates between a pair of Zones for a specific Vehicle Type
- Per Hour for a specific Vehicle Type
- Per Passenger for a specific Vehicle Type
For information on establishing a Rate Matrix see the Knowledge Base articlesEstablishing and Managing the Fixed Rate Matrix, Establishing and Managing a Hourly or Per Passenger Rate Matrix and Setting up Distance Based Pricing.
Adding a Rate Matrix to an Account
- Click on the ‘Accounts‘ icon on the toolbar.
- Locate the account to which the Rate Matrix is to be applied to.
Note: When deciding the account to apply a rate matrix to it is important to keep in mind if that account is a Billing Contact or a Passenger. If the Rate Matrix is applied to a Passenger account it will only apply to that Passenger. If the Rate Matrix is applied to a Billing Contact it will apply to all Passenger accounts that are tied to the Billing Contact, assuming a Passenger does not have a different Rate Matrix applied. In order to apply a Rate Matrix across an entire Company with multiple Billing Contacts the Rate Matrix would need to be applied to each Billing Contact in that Company. - Double click on the account, or click on the account and then click ‘Edit‘ to open the account in edit mode.
- Select the ‘Financial Data‘ tab.
- To add a Fixed Rate Matrix…..
- Select the appropriate Fixed Rate Matrix from the drop down list
- Click ‘Save‘ (bottom of page) to retain the selection
- To add a Per Hour/Per Passenger Rate Matrix….
- Select the appropriate Per Hour/Per Passenger Rate Matrix from the drop down list
- Click ‘Save‘ (bottom of page) to retain the selection
- To add a Distance Rate Matrix….
- Select the appropriate Distance Rate Matrix from the drop down list
- Click ‘Save‘ (bottom of page) to retain the selection
How an Applied Rate Matrix is Utilized
Once a Rate Matrix is applied to an account those rates will appear in the Fixed or Hourly rate tab either in the Online Reservations System (ORES) if the account books their own trips, or in the Limo Anywhere Core System when the Apply Rate button is clicked in a reservation; IF THE TRIP BOOKED MEETS THE PARAMETERS OF THE RATE STORED IN THE RATE MATRIX. Note: This differs from the previous Account Rate function where Account Rates only appeared in the account Rate tab.
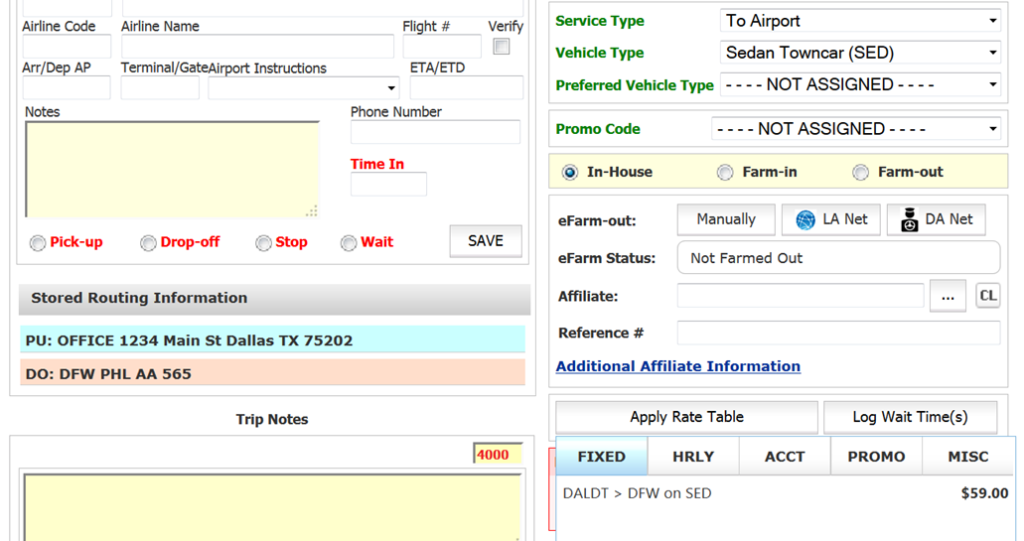
In the example above a Rate Matrix (Corp DT Dallas Airport) that offers reduced rates between downtown Dallas and the Airports for the Vehicle Types Sedan and Luxury SUV was applied to the Smithwill Co. account. Below a reservation is made from the Smithwill office to DFW for a Sedan. The Sedan rate for this routing from the Corp DT Dallas Airport Rate Matrix is displayed and can be selected.
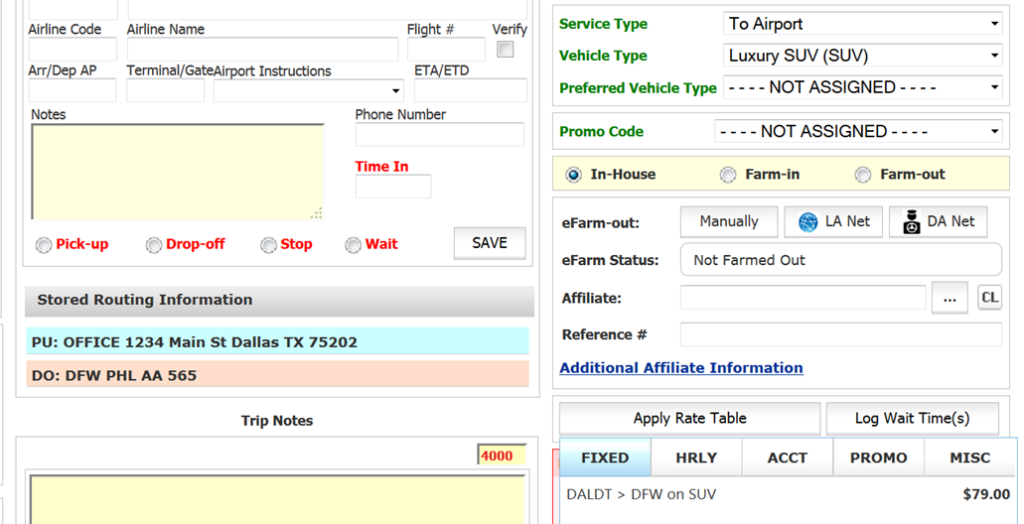
If the Vehicle Type is changed on this reservation to Luxury SUV the rate displayed will be the Luxury SUV rate for this routing from the Corp DT Dallas Airport Rate Matrix is displayed and can be selected.
Non-Matrix Account Rates
The Stored (Account) Rate Information section appears as below.
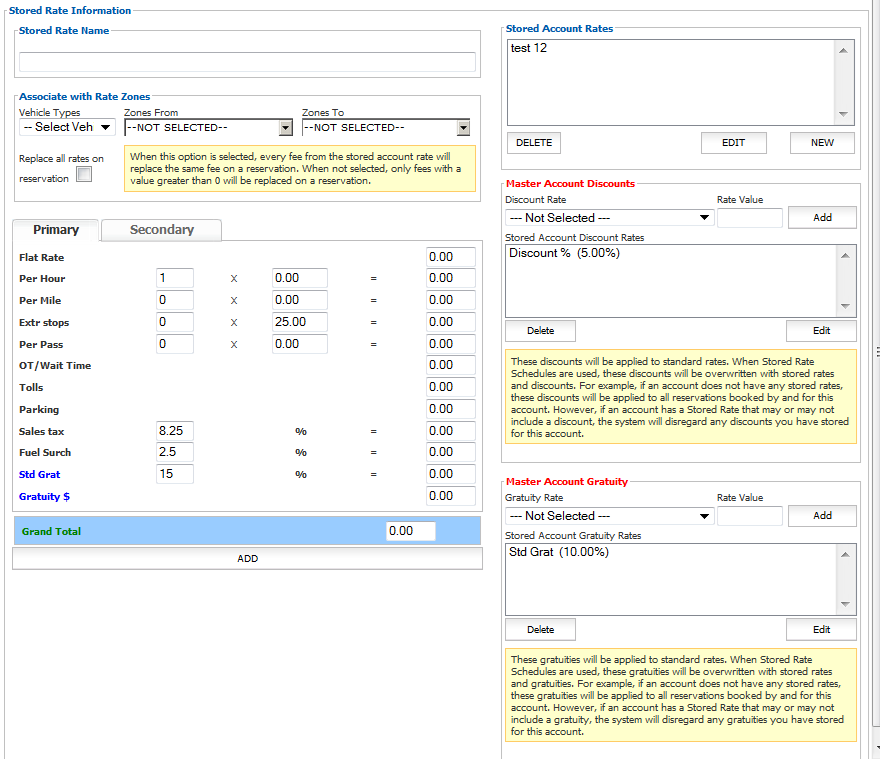
Master Account Discounts
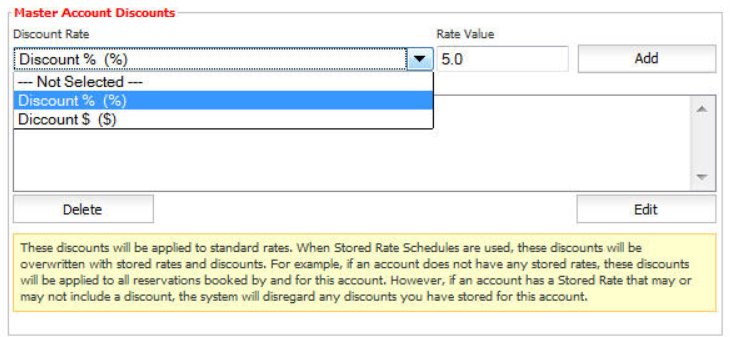
Add a Master Account Discount
- Select the Discount Rate that will be used from the drop down list. The rates are established in System Rate Manager. See the Knowledge Base article Understanding System Rate Manager for additional details.
- Enter a value for the discount in Rate Value. In this example the account is getting a 5% discount from the regular rates.
- Click ‘Add‘ to save the Master Account Discount.
- Multiple Master Stored Discounts can be applied to a single account. However all will be applied in every reservation so it is best to decide on one discount to be used for the account.
Edit a Master Stored Discount
- Click to select the discount on the Stored Account Discount Rates list.
- Click ‘Edit‘.
- Change any of the fields detailed above.
- Click ‘Update‘ to retain changes; or ‘Cancel‘ to ignore the changes and retain the stored discount.
Delete a Master Stored Discount
- Click to select the discount on the Stored Account Discount Rates list.
- Click ‘Delete‘.
Master Account Gratuities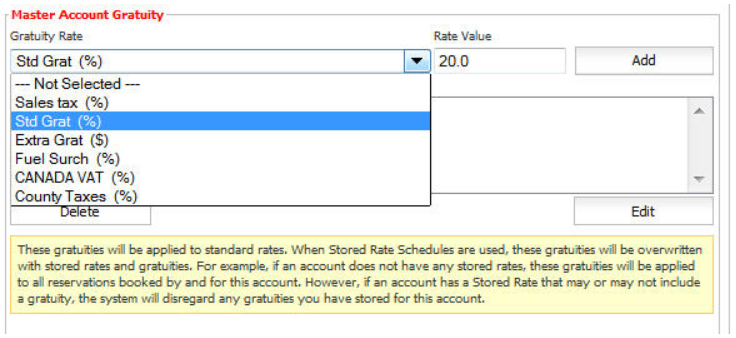
Add Master Account Gratuities
- Select the Gratuity Rate that will be used from the drop down list. The rates are established in System Rate Manager. See the Knowledge Base article Using System Rate Manager for additional details.
- Enter a value for the discount in Rate Value. In this example the account is getting a 5% discount from the regular rates.
- Click ‘Add‘ to save the Master Account Gratuity.
- Multiple Master Stored Discounts can be applied to a single account. However all will be applied in every reservation so it is best to decide on one discount to be used for the account.
Edit a Master Stored Gratuity
- Click to select the discount on the Stored Account Gratuity Rates list.
- Click ‘Edit’.
- Change any of the fields detailed above.
- Click ‘Update‘ to retain changes; or ‘Cancel‘ to ignore the changes and retain the stored discount.
Delete a Master Stored Gratuity
- Click to select the discount on the Stored Account Gratuity Rates list.
- Click ‘Delete’.
Stored (Account) Rate Schedules
Stored Account Rates can be set up as either Base Rates that are either per hour, per passenger, per unit, or per mile for a given Vehicle Type; or Flat Rates(Fixed Rates or Point to Point Rates). Below each rate will be illustrated.
Base Rate Method
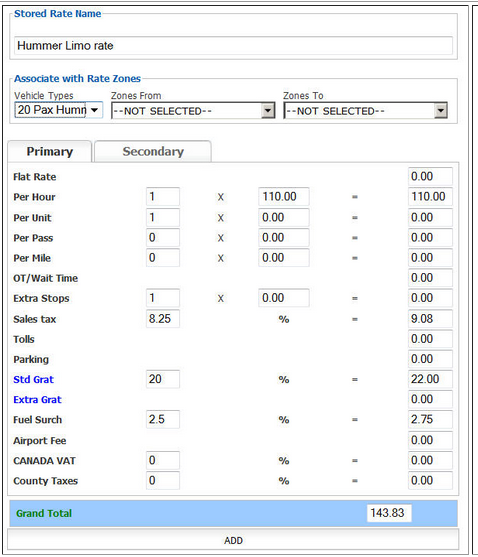
- Enter the Stored Rate Name. Each Rate Name for this account must be unique.
- Select the Vehicle Type this rate will apply to from the drop down list.
- Select the Zones From/To that apply for this Base type rate.
- Enter a Base Rate. In this example a rate of $110.00 per hour is entered.
- The taxes, gratuities and surcharges will populate and calculate based on the settings in System Rate Manager. They can be adjusted here as applicable to this Account Rate.
- Click the Secondary tab to adjust any rates there.
- Click ‘Add‘ to retain the entered rate data, and save the rate.
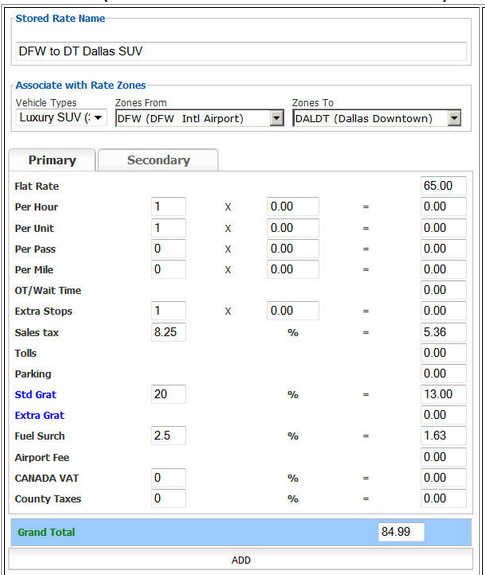
Flat Rates(Fixed Rates or Point to Point Rates)
- Enter the Stored Rate Name. Each Rate Name for this account must be unique.
- Select the Vehicle Type this rate will apply to from the drop down list.
- Select the Zones From/To from the drop down list. For more information on Zones see the Knowledge Base article Fixed Rates & Zone Setup.
- Enter a Flat Rate. In this example a rate of $65.00 per trip form DFW zone to Dallas DT zone in Vehicle Type Luxury SUV is entered.
- The taxes, gratuities and surcharges will populate and calculate based on the settings in System Rate Manager. They can be adjusted here as applicable to this Account Rate.
- Click the Secondary tab to adjust any rates there.
- Click ‘Add to retain the entered rate data, and save the rate.
Editing / Deleting Stored Rates
Stored Account Rates are displayed in the list as illustrated below.
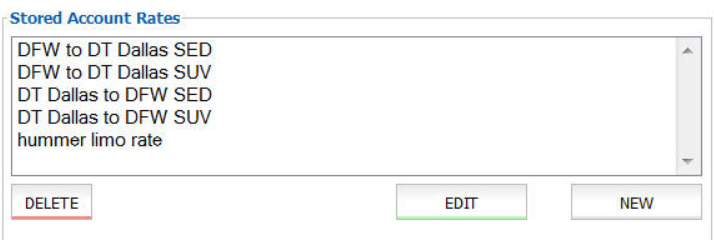
Edit a Stored Account Rates
- Click to select the discount on the Stored Account Rates list.
- Click ‘Edit‘.
- Change any of the fields detailed above.
- Click ‘Update‘ to retain changes; or ‘Cancel‘ to ignore the changes and retain the stored discount.
Delete a Stored Account Rates
- Click to select the discount on the Stored Account Rates list.
- Click ‘Delete‘.
Addrs/Bill/Pax
The Addrs/Bill/Pax tab contains Address record for this account, and manages the relationship between Billing Contacts and Passengers as illustrated below.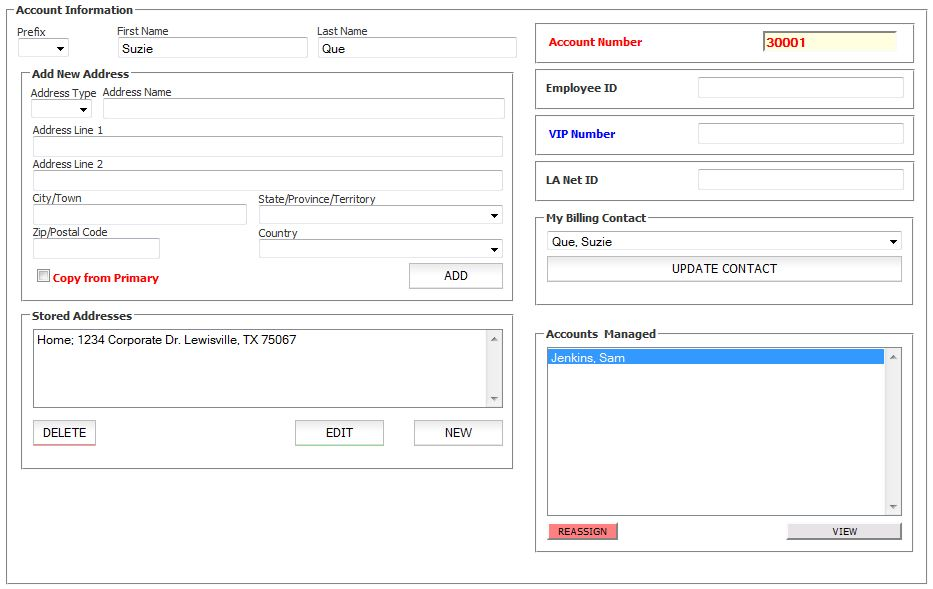
| Name of the Addrs/Bill/Pax | The ‘Prefix’, ‘First Name’, ‘Last Name’, and ‘Account Number’ will populate from the Account Info tab. |
| Add Address | Add New Address by selecting the ‘Address Type’ (Home, Work, Other) from the drop down list, and then entering the fields for Address, Apt/Ste, City, State/Prov, and ZIp/Post. Click “ADD” to retain the entered address as a Stored Address. Helpful Hint: Click to select the check box for “Copy from Primary”. This action populates the Address fields with the Address information on the Account Info tab. Helpful Hint: Selecting an Address Type is optional however doing so will improve the display of Stored Address in the Reservation process. |
| Stored Addresses | Stored Addresses: Move to additional pages if any by clicking the page number at the bottom of the list; or entering the desired page number and clicking “Jump”. Note: if an account makes a reservation, any new address put on that reservation will automatically store it to the account here. |
| Employee ID | The ‘Employee ID’ field is not currently used at this time and can be disregarded. |
| VIP number | The ‘VIP Number’ field is not currently used at this time and can be disregarded. |
| LA Net ID | The ‘LA Net ID’ field is used for ‘Affiliate Accounts’ that were created through LA Net. Limo Anywhere Company ID’s are used in this field to allow other companies that use Limo Anywhere to farm-out to your system. |
| My Billing Contact | The ‘My Billing Contact’ drop down box will display the current Billing Contact for the account that you are currently viewing/editing. |
| Accounts Managed | This area displays the all the Passenger Accounts for a specific Billing Contact Account. |
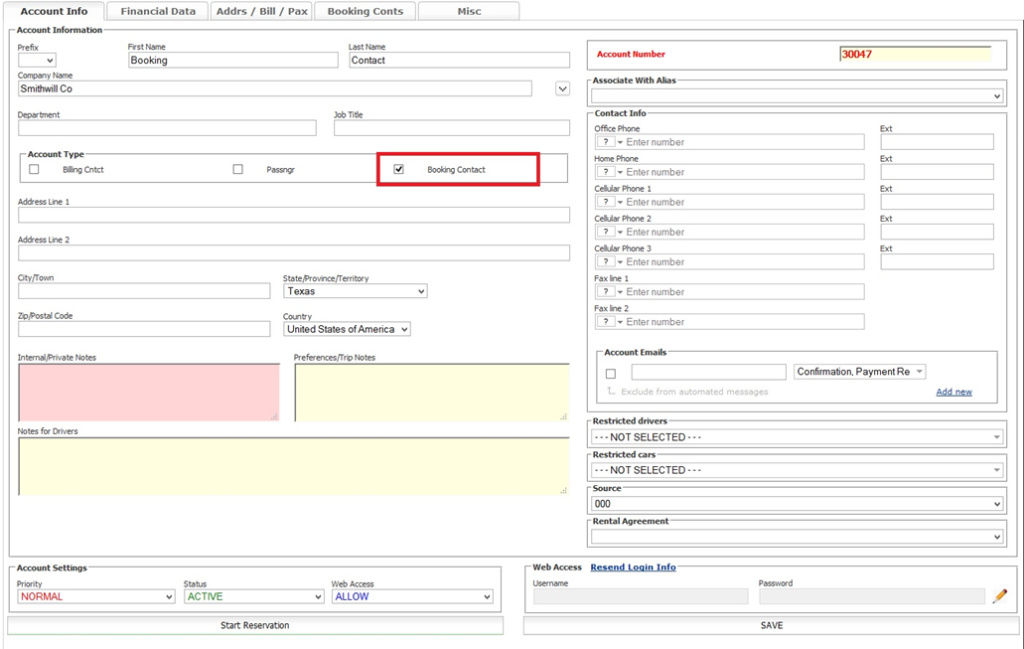
Booking Contacts
Booking Contacts are accounts as well. They are people that do not necessarily use the limousine service, but they make reservations for others. An Executive Assistant that makes reservations for his/her boss, or a Travel Manager that makes reservations for a staff are some examples of possible booking contacts.
Assigning a Booking Contact to another Account
Once you add the Booking Contact account make sure that you go to Addrs/Bill/Pax tab and assign them to a Billing Contact.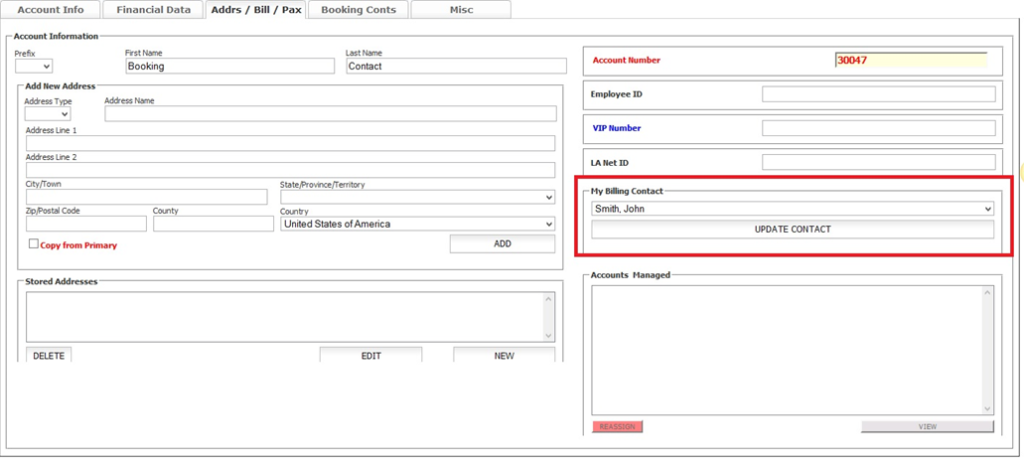
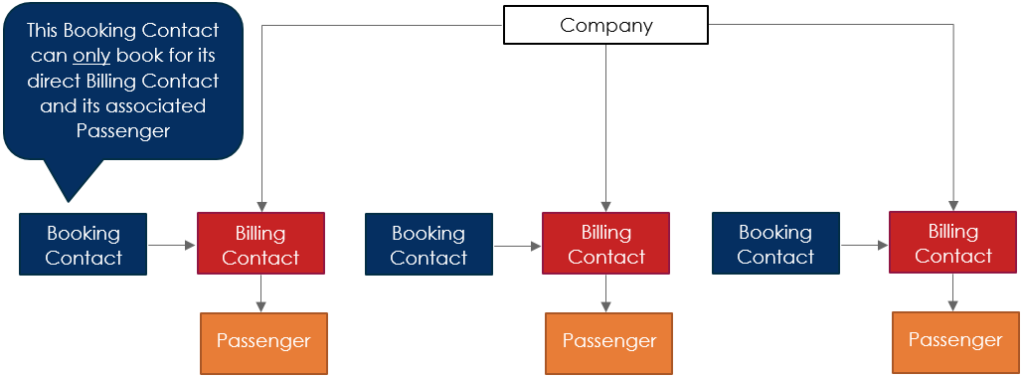
Examples of how to Assign Booking Contact to Account:
If each Billing Contact was to have one or more dedicated Booking Contacts, the structure would likely be similar to the below visual representation.
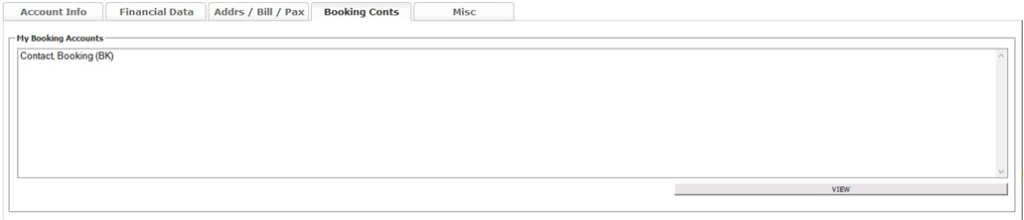
Booking Contacts Tab
Booking Contacts assigned to the Account are displayed in the My Booking Accounts list.
Misc
The Miscellaneous tab as various historical and reference data.
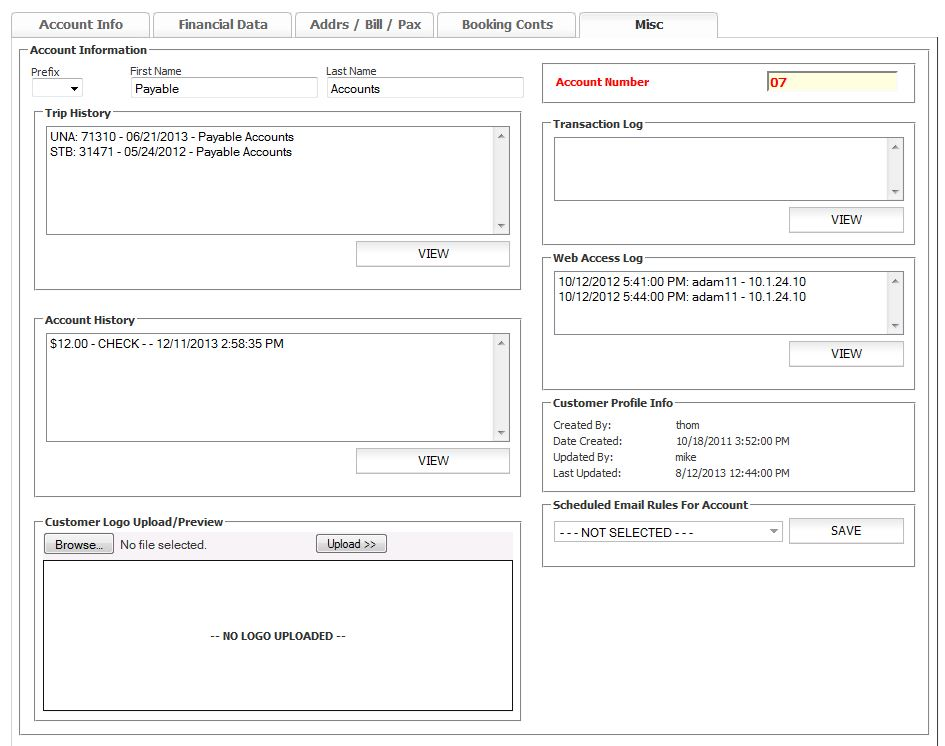
| Setting Title | Description |
| Trip History | This section displays each trip booked under the ‘Billing Contact account’. If a ‘Passenger Only Account’ is selected (tied to a different account as Billing Contact) no trips will be displayed here. The information displayed is ‘Trip Status Code’, ‘Configuration Number’, ‘Pick-up Date’, and ‘Passenger Name’. |
| Account History | This section displays each trip booked under the ‘Billing Contact account’. If a ‘Passenger Only Account’ is selected (tied to a different account as Billing Contact) no trips will be displayed here. The information displayed is ‘Amount. Payment Type’, ‘Date’, and ‘Time’ of transaction. |
| Transaction Log | This space is currently not utilized in Limo Anywhere and can be disregarded at this time. |
| Web Access Log | The information displayed is the Date and Time of the log in activity, the Web Access ID as set in the Account Profile, and the IP Address from which the login occurred. |
| Customer Profile Info | This area displays the ‘Created By’ and ‘Updated By’ historical data on the account. |
| Scheduled Email Rules for Account | This section will only apply if the company subscribes to the Scheduled Email Module (SEM).
For more information please see the Knowledge Base article ‘Scheduled Email Module’. |
| Company Logo Upload/Preview | A logo for the customers company can be uploaded here by saving the file as a JPEG or GIF file type of a size no larger then 250 by 150 pixels, clicking ‘Browse’ to locate it on the computer and clicking ‘Upload’ The uploaded file will appear in the box where ‘—NO LOGO UPLOADED—‘ now appears.
NOTE: You can display this account logo in Custom Forms. It is also displayed on DriverAnywhere Greeting Sign. |
Export Customers Tab
Exporting Customer Data out of Limo Anywhere allows the creation of files that can be used to facilitate marketing efforts, import into other programs such as an email utility, or create helpful back up files that can be used should internet service be interrupted.
Before beginning please note that Data tables are presented in Comma Delimited, CSV text file format. Although this file format allows for the data table to be easily retrieved into a variety of applications, they are best viewed by applications that will allow you to easily manipulate data in columnar format. The most popular applications that are used are Microsoft Excel or Microsoft Access.
It is against Payment Card Industry Data Security Standards (PCI-DSS) to export customer credit card data from Limo Anwyhere.
Creating an Exported Customer Data File
- Click on the ‘Accounts‘ icon on the tool bar.
- Open the ‘Export Customers‘ tab.
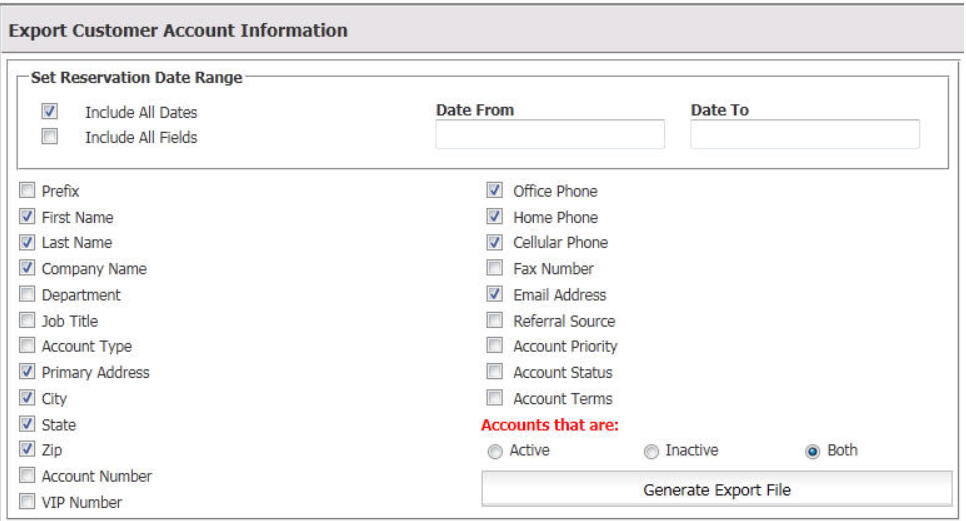
- In the ‘Export Customers Account Information‘ box:
- Include All Dates by checking the box; or set a date range to only export customer data from customers that had trips during these dates
- Include All Fields to get all exportable data on accounts; or select the fields you wish to export.
- Select if the data is to be exported from Active, Inactive or Both (all) accounts.
- Click ‘Generate Export File‘.
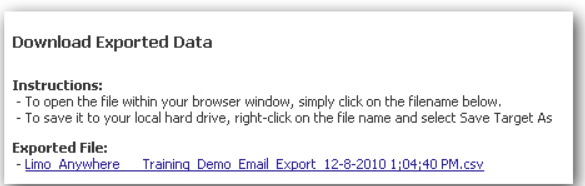
- After clicking ‘Generate Export File‘ the following window is displayed.
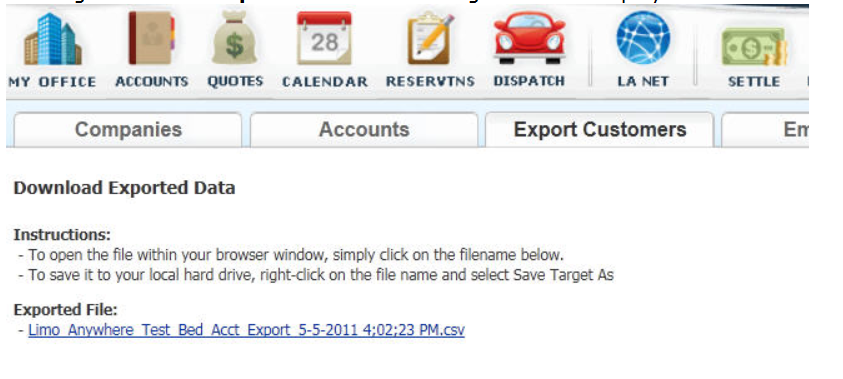
- Follow the instructions to Save or Open the file. Remember to open the file with Excel, Access, or some other columnar program.
Email List Tab
Creating an Email List
- Click on the ‘Accounts‘ icon on the toolbar.
- Click on the ‘Email Lists’ tab.
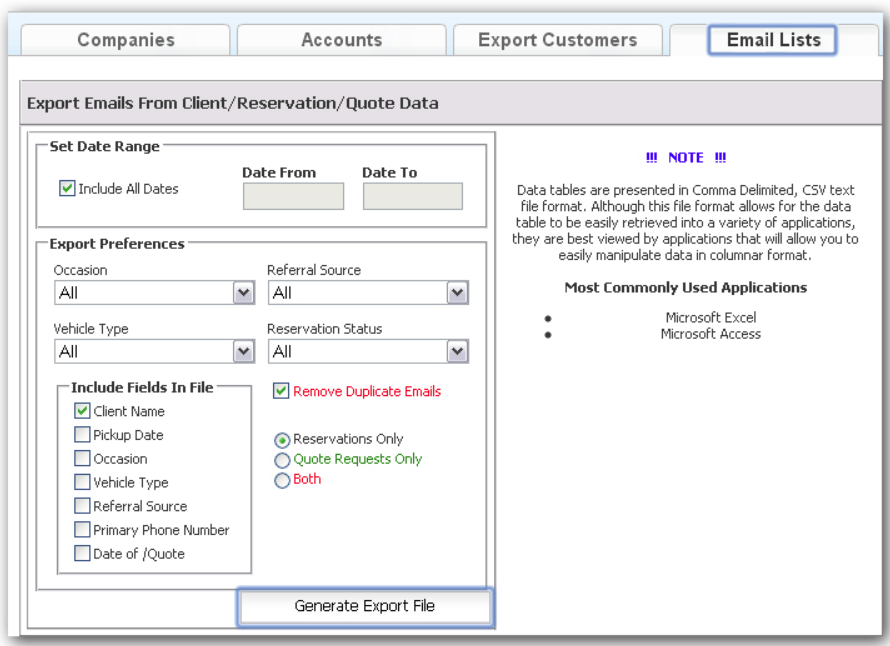
- Select a date range to narrow the email addresses you will retrieve, or click to check ‘Include All Dates‘.
- Select an Occasion, Referral Source, Vehicle Type or Reservation Status to narrow the email addresses you will retrieve, or leave as ‘All‘.
- Include Fields in File allows you to select the information you want in the export that will be linked to these email addresses
- Select whether you want to pull email addresses from ‘Reservations‘, ‘Quotes‘ or both.
- Click ‘Generate Export File‘ to will export the list a list
- Follow the instructions on the next screen: