Establishing and Managing Quotes
The quote section was designed to handle that time when your customer needs a price for their travel, but isn’t sure if they want to use your service or not. An example of this would be when your customer requests a quote from your Online Reservation System (ORES) for a trip that you have not configured in your system yet or when a potential customer calls your company wanting a price quote for comparison with other companies.
Creating a Quote Response Template (Important step before utilizing Quote Response Templates)
Quote Response Templates contain dynamic information from the quote that are populated by the use of tags. Tags are commands that pull a specific piece of data from the quote request and populate that into the response that is sent to your client.
Note: A tag will always be surrounded by ‘#’ symbols for example #COMPANY# for the company name that was entered in your Limo Anywhere contact information.
- Click on the ‘Quotes‘ icon in the toolbar.
- Click on the ‘Response Templates‘ tab.
- Give the template a title in the ‘Title‘ box (highlighted red).
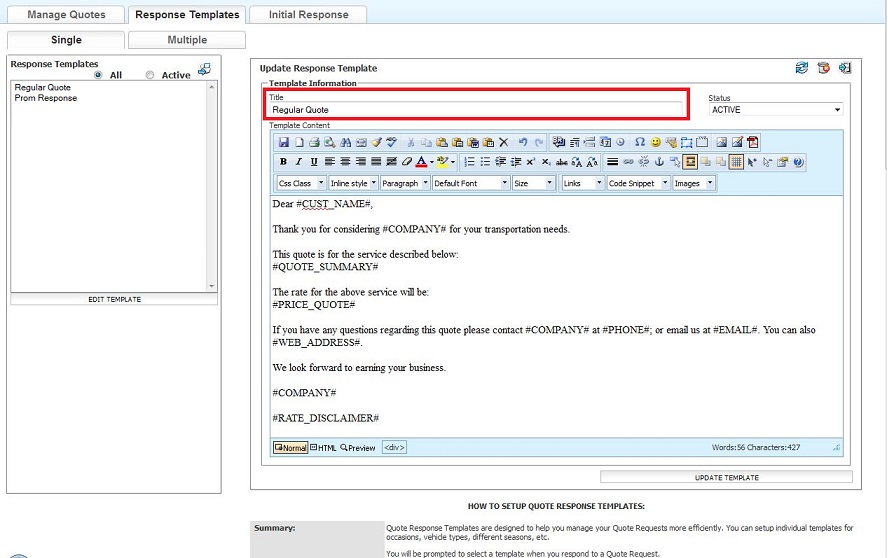
- Enter the text and ‘tags’ needed to create the template.
Note: Detailed instructions are available below the ‘Add Template’ button. There is also an Example in that section that may be used. Another example of text that can be used is listed below:Dear #CUST_NAME#,Thank you for considering #COMPANY# for your transportation needs.This quote is for the service described below:#QUOTE_SUMMARY#The rate for the above service will be:#PRICE_QUOTE#If you have any questions regarding this quote please contact #COMPANY# at #PHONE#; or email us at #EMAIL#. You can also #WEB_ADDRESS#.We look forward to earning your business.#COMPANY##RATE_DISCLAIMER# - Click the ‘Add Template‘ button to save the entry and create the Quote Response Template.
Editing a Quote Response Template
- Select the Quote Response Template that is to be edited.
- Click the ‘Edit‘ button.
- Make any changes to the ‘Template Name’, ‘Status’, ‘Text’, and/or ‘Tags’.
- Click the ‘SAVE TEMPLATE‘ button.
Quote Request Options
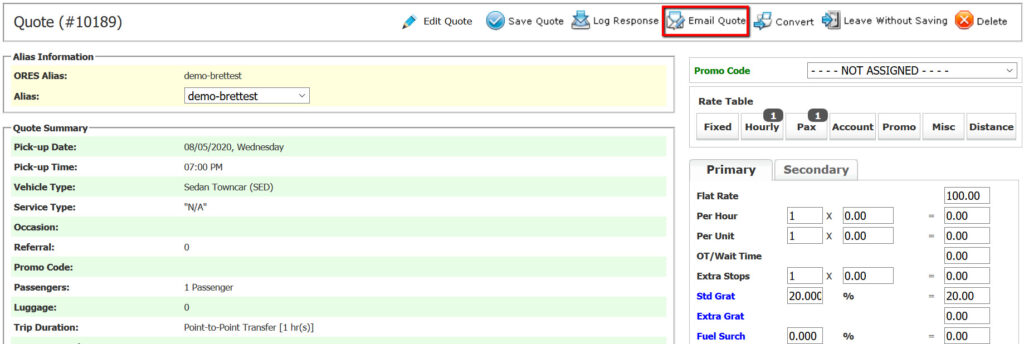
When opening a quote request, you’ll find a toolbar at the top right, quote details on the left and the rate table on the right.
The toolbar will give you a few options when managing your quotes:
When opening a quote request, you’ll find a toolbar at the top right, quote details on the left and the rate table on the right.
The toolbar will give you a few options when managing your quotes:

Saves any changes made to the quote from this screen.
Displays any response history on the quote.
Opens the Quote Response window to email the quote.
Allows conversion from Quote to Reservation.
Exits the quote without saving any changes.
Deletes the Quote Request.
Our rate toolbar brings the rate integration you use on your reservations to the quote screen. Based on the routing details for the quote, as well as your settings, you’ll find a number above each type of rate. This represents the number of rates the system found that may apply to the quote.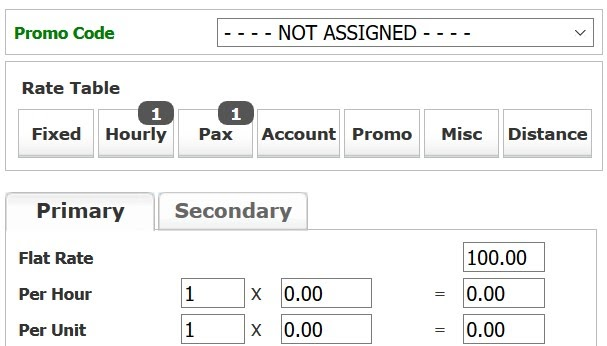
After selecting a rate type, the system will display any matching rates it found. Selecting the rate will plug that value into the rate table below. You can also simply enter a rate manually in the rate section below.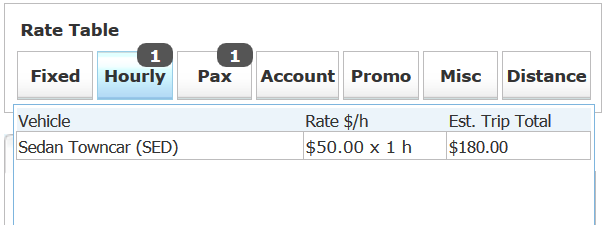
Utilizing Quote Response Templates/Responding to a Quote
- Click on the ‘Quotes‘ icon in the toolbar.
- Click the ‘Action‘ hyper link to the left of the Quote ‘Ref’ number you wish to send a quote too.
- Click the ‘Open Quote Request‘ option from the drop down menu.
 Note: This will bring up the information about the quote and allow you to enter a price if needed.
 - Click the ‘Email Quote‘ button to send the quote to the customer.
- Select a ‘Response Template’ from the drop-down list and click the ‘Load’ button (highlighted in green).
Note: If you do not have any ‘Response Templates’, go to ‘Quotes’ icon in the toolbar, click on ‘Response Templates’ tab and scroll down for instructions ‘How to set up Quote Response Templates”. - Scroll down through the information loaded into the template to verify that it is correct. Make any changes needed to the ‘Response Message’ (highlighted in red).
- Click the ‘Send and Log Response‘ button.
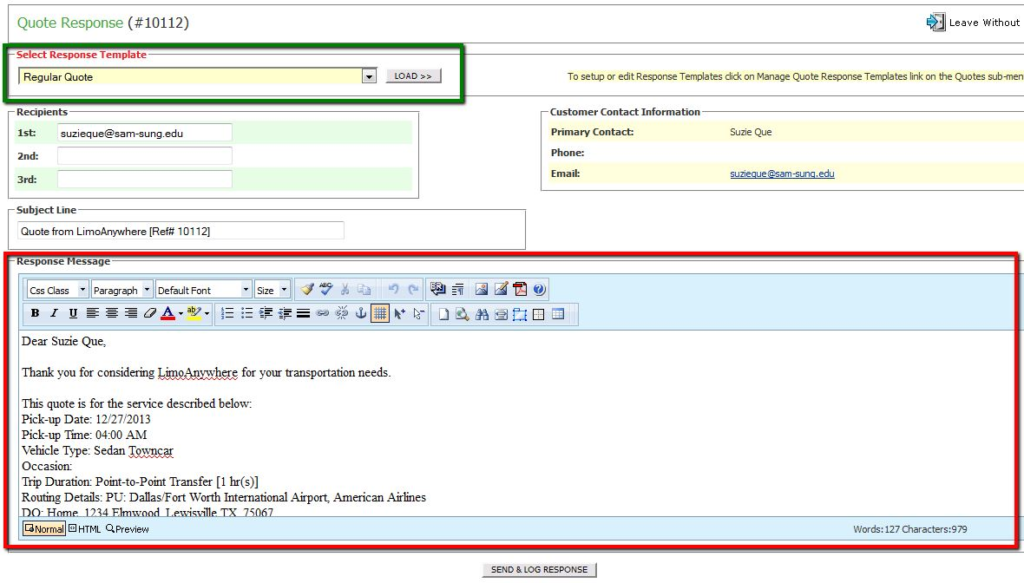 Note: The ‘Response Message’ will be sent to the e-mail listed and it will also be logged in the ‘Response/Change Log’ on the previous page.
