Customizing and Managing Trip Statuses For Your Business
Statuses are primarily used to let employees in your company know what is going on with each reservation. A status lets interested parties know the situation of a reservation at a particular time such as ‘On The Way’, ‘Arrived’, ‘Assigned’, ‘Cancelled’, etc.
You can add, edit, or deactivate statuses under
- My Office
- Company Settings
- System Settings
- System Mapping.
Select one of the following links to be brought to that part of the article:
About Statuses
Adding/Editing Statuses to your status lists allows you the flexibility to create and manage the statuses used in serving your customers so that they reflect the operational needs of your business.
| Fields for Statuses | Definitions |
| Code | This is the code of the status. The code is usually 3-5 letters in length. The code is unique to each status and cannot be changed once it has been set on a reservation. |
| Name | This is the name of the status. This will appear in on most forms and places throughout Limo Anywhere and it’s applications. |
| Color | This is the color of the status that is going to appear on the Dispatch Grid and Calendar. |
Adding a New Status
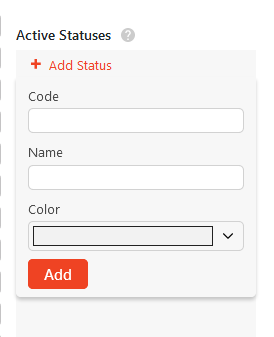
- Click the ‘+ Add Status‘ link at the top left of the ‘System Mapping‘ section.
- Enter a unique status ‘Code’ and ‘Name’.
- Select the ‘Color’ you would like this status to display on the ‘Calendar’ and ‘Dispatch’ screen.
- Click the ‘Add‘ button.
Click here to return to the top of the page.
How to Edit a Status
Note: It is recommend that you DO NOT change or edit the ‘Online and eFarm in’, ‘Dispatched’, ‘Cancelled by Affiliate’ statuses as these statuses have special functionality in Limo Anywhere and could cause issues if changed.
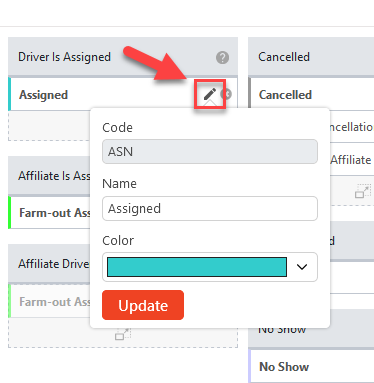
- Hover over an already created status and click the pencil icon.
- The ‘Edit‘ section for that status will appear.
- Edit the ‘Name’ and/or ‘Color’.
Note: You will not be able to edit the ‘Code’ after it has been created. - Click the ‘Update‘ button.
Click here to return to the top of the page.
How to Deactivate a Status
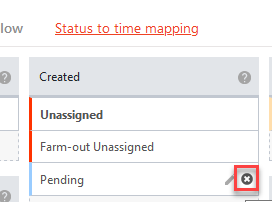
There are 2 ways to deactivate a status. You can drag a drop the status under ‘Inactive Statuses’ section or follow the steps below.
- Hover over an already created status and click the ‘X‘ icon.
- The status will move to.
- Edit the ‘Name’ and/or ‘Color’.
Note: You will not be able to edit the ‘Code’ after it has been created. - Click the ‘Update‘ button.
Click here to return to the top of the page.
Status to Time Mapping
Status to Time Mapping can be used to determine when a driver is to be paid the variable rates based on Travel Time (to the client) or Passenger time (client in car time) AND/OR when you would like a time stamp to be placed on the settlement window for each reservation.
Setting Up Status to Time Mapping
- Select the ‘Status to Time Mapping‘ link at the top of ‘System Mapping‘ section.
- Select the appropriate status from the drop down list that corresponds to the time field. Example: ‘On The Way’ status would be selected for ‘Garage-Out Time’
- Set the ‘Overwrite Already Saved Time Values’ to ‘Yes’ or ‘No’.
- Click the ‘Update‘ button.
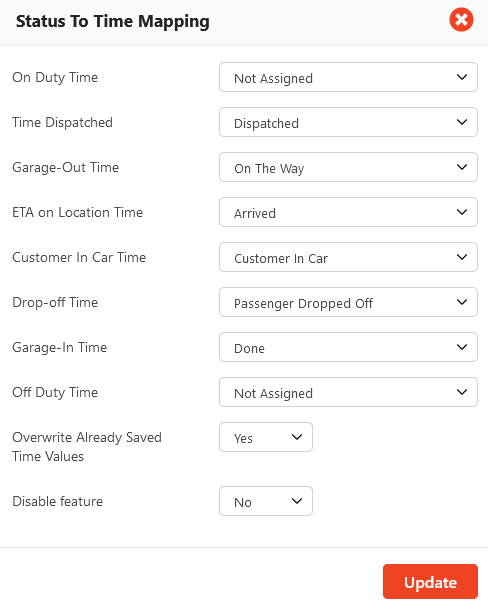
Note: Selecting “Yes” on the option labeled “Overwrite Already Saved Time Values” applies a time stamp to the selected field. If there is already a time in the field it will be overwritten. Example: Customer states the drop off time would be 3:00pm, but the driver really dropped the customer off at 3:20pm. If the driver is using DriverAnywhere and sets the reservations status to Dropped the system would overwrite the 3:00pm drop off to reflect 3:20pm.
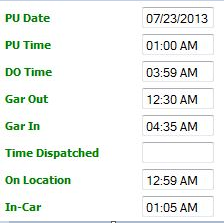
By setting up the above fields a time stamp will be placed on the reservation’s settlement window when a status is changed as illustrated below.
