Setting Up Driver Payroll – Hourly Pay Schedule
Limo Anywhere offers you the option to pay your drivers a basic hourly rate for every vehicle, a variable rate based on travel time and customer in car time, and different hourly rates based on the type of vehicle the driver is using.
To pay your drivers a percentage of the charges plus an hourly rate please see the Knowledge Base article ‘Setting Up Driver Payroll – Percentage Pay Schedules‘.
IMPORTANT ADVISORY: The method by which you establish pay rates for your drivers may be governed by federal, state or local labor laws. Limo Anywhere does not advise a given method and asks you to consult a professional such as a CPA or Attorney for advice on the laws and regulations that affect your business.
Select one of the following links to be brought to that part of the article:
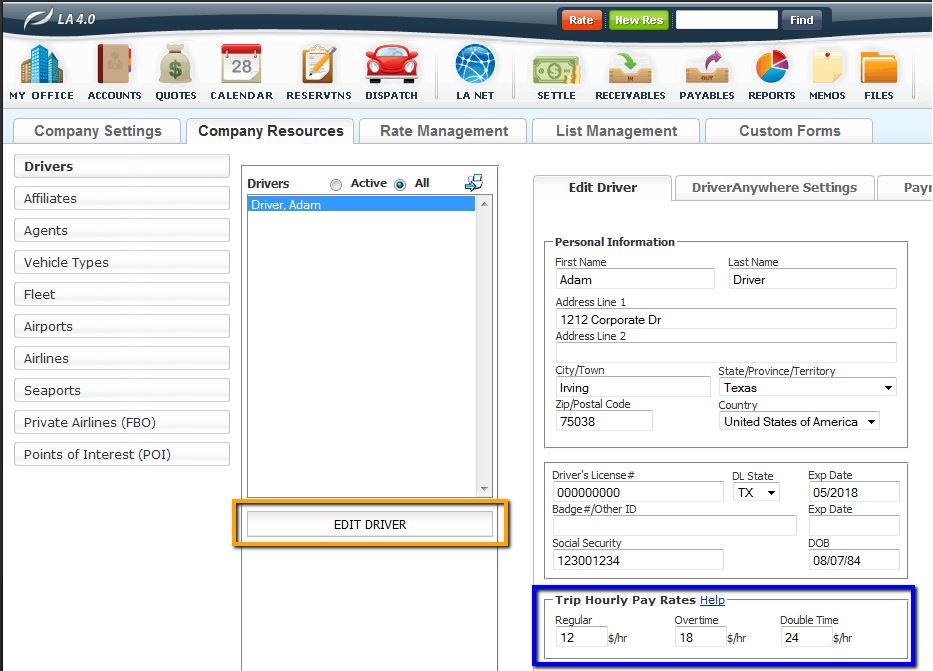
Basic Hourly Pay
Note: Basic Hourly Pay is for companies that pay their driver the same hourly rate for every vehicle they drive.
The Regular rate is adjusted based on the an Overtime and Double Time schedule as follows:
- 0-8 hrs per day – Regular Rate
- 8-12 hrs per day – Overtime Rate
- Over 12 hrs per day – Double Time Rate
- Click the ‘My Office‘ icon on the toolbar.
- Open the ‘Company Resources‘ tab.
- Select the driver you wish to add or edit pay information for.
- Click the ‘Edit Driver‘ button (highlighted yellow).
- In the Trip Hourly Pay Rate box enter the ‘Regular‘, ‘Overtime‘, and ‘Double Time‘ rates (highlighted blue).
- Click the ‘Update Driver‘ button.
- Repeat this process for each Driver.
Variable Pay Rates Set Up
There are some settings that need to be established and/or adjusted before a limousine company utilizes this method.
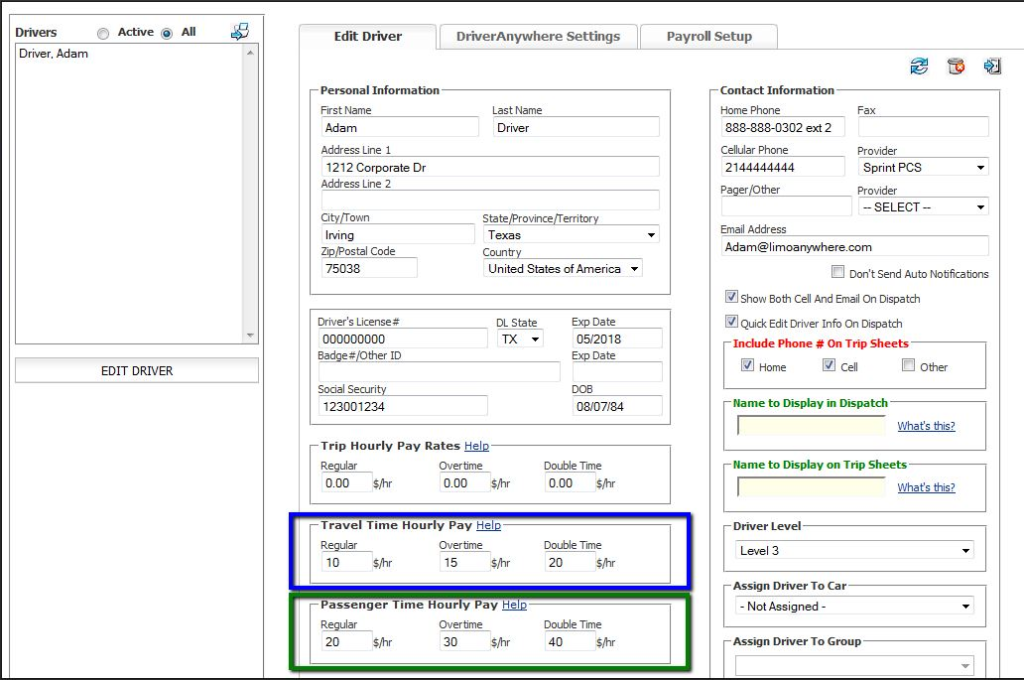
Note: Variable Pay Rates is for companies that pay their driver based off of set per hour rates that differ when the client is in the car versus when the driver in route to the client or back to the garage (Travel Time). For example a driver might make $10 a hour when in route to the client or back to the garage, but when the client is in the car the driver might make $15 a hour.
Setting to Calculate Hourly Pay Based on Logged Trip Times
- Click the ‘My Office‘ icon on the toolbar.
- Select the ‘Company Settings‘ tab.
- Click on the ‘Company Preferences‘ button.
- Select the check box labeled.
- Select the option ‘Logged Trip Times‘ from the ‘Calculate Driver hourly Pay Based On:‘ drop down list.
- Click the ‘Update My Company Preferences‘ button.

Establishing Status to Time Mapping
This function enables when a reservation status is changed (whether through the Limo Anywhere Core System, or through Driver Anywhere); Limo Anywhere will know how to begin paying the drivers established either ‘Travel Time Pay’ or the ‘Passenger Time Pay’.
- Select the ‘Dispatch‘ icon on the toolbar.
- Click ‘Manage Statues‘ hyper link at the top of the Dispatch Grid.
- Select the ‘Status to Time Mapping‘ Tab.
- Select the appropriate status from the drop down list.
- Set the ‘Overwrite Already Saved Time Values‘ to ‘Yes‘ or ‘No‘.
- Click the ‘Update Mapping‘ button.
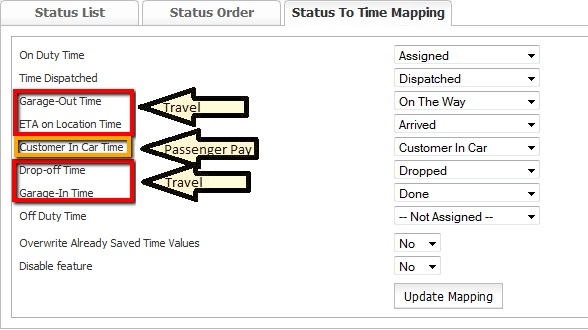
Note: In the screen shot above the black arrows are for illustrative purposes only. They indicate when Travel time will be paid and when Passenger Time will be paid. The Time Label titles can be changed to reflect the unique language customary to each company.
Setting Up A Driver’s Variable Pay Rates
- Click the ‘My Office‘ icon on the toolbar.
- Open the ‘Company Resources‘ tab.
- Select the driver you wish to add or edit pay information for.
- Click the ‘Edit Driver‘ button.
- In the Trip Hourly Pay Rate box enter the ‘Regular‘, ‘Overtime‘, and ‘Double Time‘ rates (highlighted blue).
- In the Passenger Hourly Pay Rate box enter the ‘Regular‘, ‘Overtime‘, and ‘Double Time‘ rates (highlighted green).
- Click the ‘Update Driver‘ button.
- Repeat this process for each Driver.
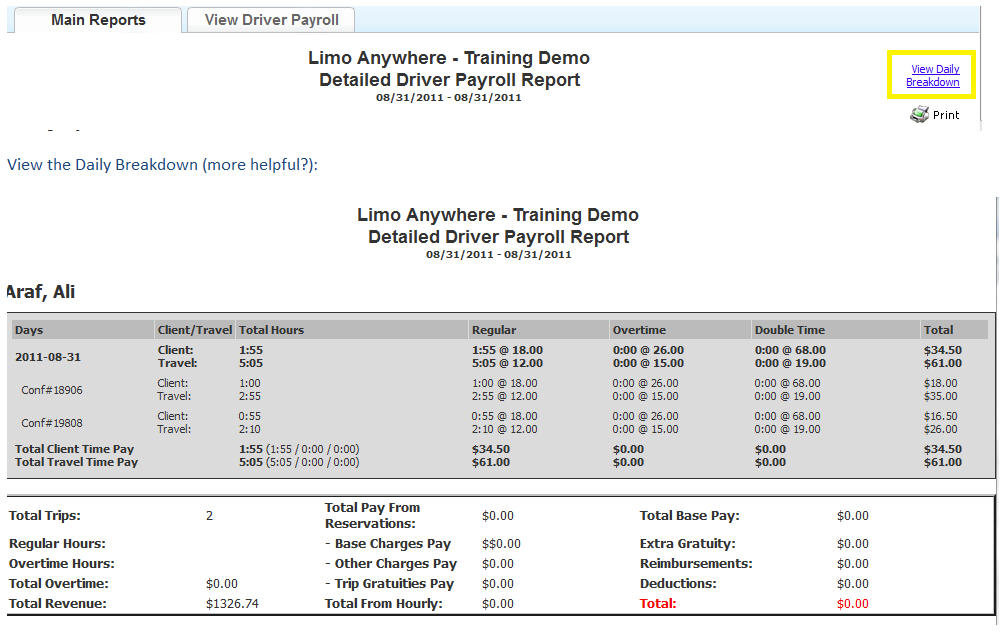
This feature is currently only for calculating the dollar (or other currency) in the ‘REPORTS’ section by using the ‘Driver Payroll Report’.
- Click the ‘Reports icon‘ on the toolbar.
- Select the ‘Driver Payroll Report‘ option.
- Select the date range in the ‘Date From‘ and ‘Date to‘ boxes.
- Select a driver from the drop down list, or leave it set to ‘All‘.
- Select the option to ‘Calculate Hourly Pay Daily‘.
- Click the ‘Generate Report‘ button.

The resulting report when Variable Pay Rates are utilized will appear as follows:
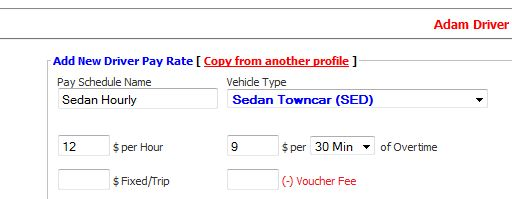
Hourly Pay by Vehicle Type
Note: Creating one pay schedule per vehicle type will allow the system to auto populate this information in to the driver payroll fields in the settlement screen, by creating more then one schedule per vehicle type the system will not know which stored scheduled to use.
- Click the ‘My Office‘ icon on the toolbar.
- Open the ‘Company Resources‘ tab.
- Select the driver you wish to add or edit pay information for.
- Click the ‘Edit Driver‘ button.
- Click the ‘Payroll Setup‘ tab.
- In the ‘Driver Pay Schedule‘ pop up window.
- Enter a ‘Pay Schedule Name‘.
- Select a Vehicle Type from the drop down list.
- Enter the Regular hourly rate of pay for this Driver and for this Vehicle Type.
- Enter the Overtime Rate of pay for this Driver, and for this Vehicle Type.
- Select either 15 minutes (15 Min), 30 Minutes (30 Min), or 1hour (1 Hr) to determine the time interval for which the overtime rates will calculate.
Note: The rate overtime rate needs to be adjusted to the time interval accordingly. In this example 11/2 times the regular rate is $18.00. Because 30 minute intervals are selected the rate is $9.00 per 30 minutes. - Click the ‘Save‘ button.
- Repeat this process as necessary for each Vehicle Type and Driver.
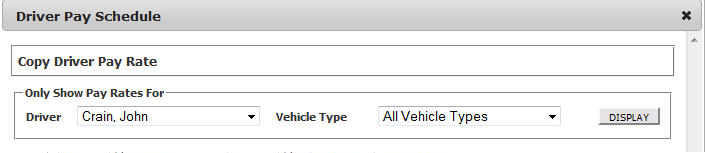
Copying a Driver’s Pay Schedule to another driver
You can quickly set up all of the drivers Pay Schedules that make the same amount by copying from another driver’s profile that has been set up completely.
- Click the ‘My Office‘ icon on the toolbar.
- Open the ‘Company Resources‘ tab.
- Select the driver you wish to add or edit pay information for.
- Click the ‘Edit Driver‘ button.
- Click the ‘Payroll Setup‘ tab.
- In the ‘Driver Pay Schedule‘ pop up window.
- Select the ‘Driver‘ whose profile you want to copy.
- Select the ‘Vehicle Type‘ profile you want to copy or leave it set to ‘All Vehicle Type‘.
- Click the ‘DISPLAY‘ button.
- From the rates listed check the boxes applicable to the rates you want to copy, or click the box at the top to select all the rates rates.
- Click the ‘COPY SELECTED RATES‘ button (Circled above in red).
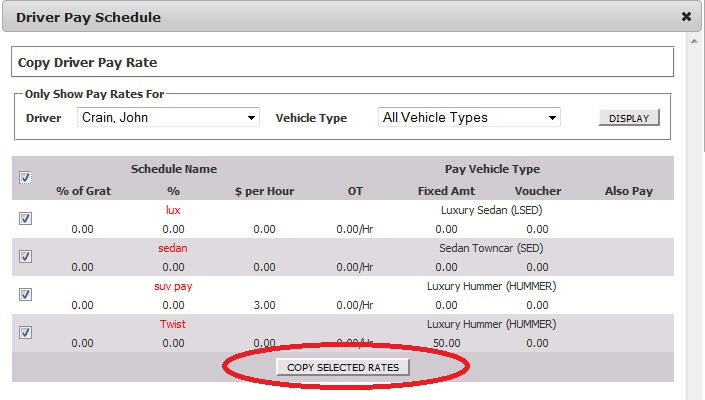
- The copied rates will appear in the ‘Stored Schedules‘ box

ALL reservation must be ‘Settled‘ in order for driver payroll data to be placed in the ‘Payables‘ section.
For step by step instructions on settling a reservation please see the Knowledge Base article ‘How to Settle a Reservation‘.