Fixed Rates & Zones Set Up
Effectively managing the rate structure of the company is an essential part of ensuring competitive and consistent pricing for your customers, and gaining efficiency in the process of pricing a reservation.
Using Rate Management is optional. If the company wants they can build each rate for each trip on an ad hoc basis. However if the company has an On Line Reservation system or Instant Rate Look-up feature it is necessary to utilize Rate Management to facilitate booking of reservations by your customers.
A Rate in Limo Anywhere is any component of the total price and includes:
- Base Rates
- Gratuities
- Surcharges
- Taxes
- Miscellaneous Fees
- Discounts
Rates can be one of three types:
- Fixed Rates are those that are set for a given service such as service from point to point, or for a package that includes service for a given number of hours.
- Percentage Rates are those that are applied as a portion of other rates in Limo Anywhere. For example a 20% Gratuity would be a Percentage Rate.
- Multiplier Rates are those that are applied on a per “unit” basis such as “per hour”, “per passenger” or “per mile”.
For more information on Rate Management in Limo Anywhere see the Knowledge Base article Rate Management Overview.
This article covers the Fixed Rates & Zones Setup portion of Rate Management in Limo Anywhere.
Fixed Rates & Zones Setup provides a method to establish set rates for a reservation that go from one point to another in a specific Vehicle Type. These are also commonly referred to as ‘Flat‘ rates. A good example of this is a trip that goes from a given point in a city to the airport. In Limo Anywhere the Pick up and drop off ‘points’ at either end of the Fixed Rate are defined by creating Zones.
A Few Best Practices
There is no one structure for Fixed Rates & Zones that will work for every company. There are a number of variables interluding the geographic area, airports served, the type of trips, the customers needs and many more that go into building a Fixed Rate & Zone structure. However before beginning there are a couple of ‘Best Practices’ to keep in mind when designing a Fixed Rate & Zone structure.
- Keep in mind the future of the company and how it may grow. While a really simple Fixed Rate &Zone structure may suffice when the company is young as the company grows and becomes more diverse (more Vehicle Types, expanded service area) a more detailed structure may be required.
- Remember that customers want to know NOW! Customers have increasingly booked their trips on line and that trend is not likely to slow down. Having a comprehensive rate structure can help enable that activity, and turn the company’s website from a marketing tool to a sales agent.
- Zones First, Then Rates. Defining the Zones is the first step and is required before Fixed Rates are entered in Limo Anywhere.
Note:In the examples below the Dallas/Fort Worth market is used, but the principles apply to any market.
Zones
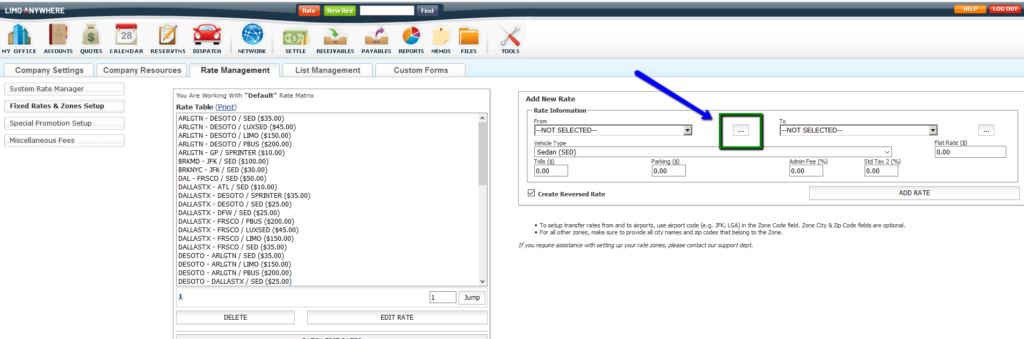
- To begin login to Limo Anywhere and click on the ‘My Office‘ icon on the tool bar.
- Open the Rate Management tab and select the ‘Fixed Rates & Zones Setup button‘.
- Click the “ellipsis” (circled in green) to the right of the From and To fields in the Add New Rate box.
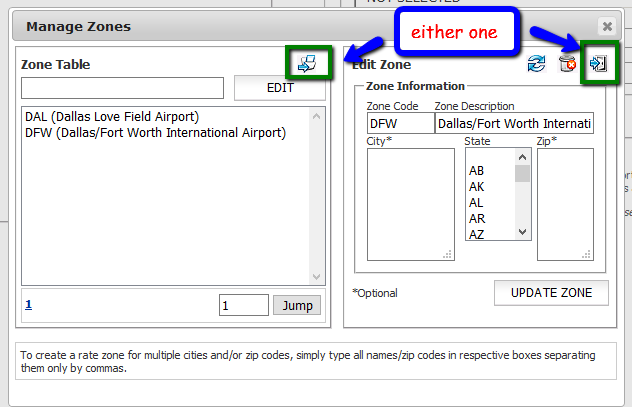
The Manage Zones pop up window will display. The first zones that need to be added are for all commercial airports that will be in the company’s Fixed Rate & Zones structure thus establishing those airports as Zones.
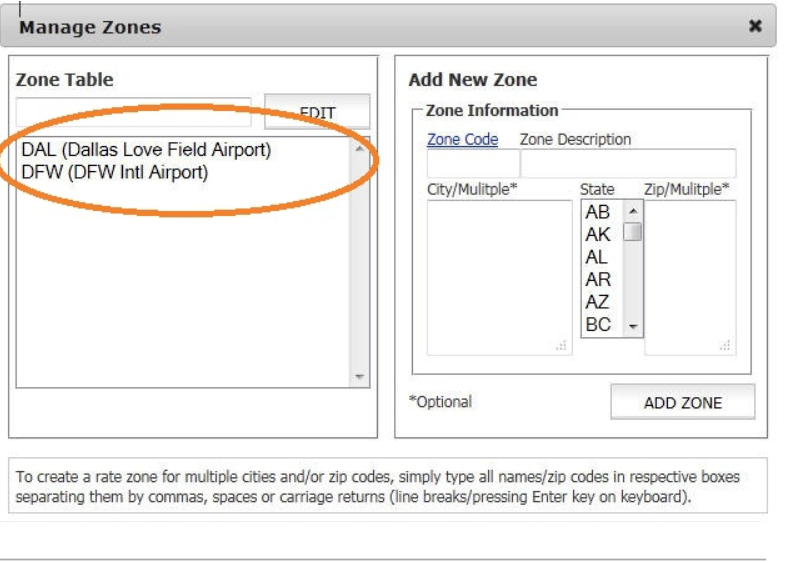
- In the Add New Zone section enter the FAA Airport Code as the Zone Code. It is important that the FAA Airport Code be used because those are built into Limo Anywhere. Do not enter a Zone City or Zip Code for an airport.
- Enter the name of the airport in the field Zone Description.
- Click ‘Add Zone‘ to retain the Zone information entered.
- Click on the icon with a Blue arrow pointing to the right to add another zone.
Repeat the above procedure for all commercial airports in the company’s service area. As Illustrated below DFW International Airport (DFW) and Dallas Love Field Airport (DAL) are now Zones.
The next step is to establish the geographic areas that will define the Zones. Each of these Zones must have a unique Zone Code, and while adding the Cities and Zip Codes to the Zone is optional the Fixed Rates will function much better if that information is included.
Helpful Hint:A Zone in Limo Anywhere can be as small as a single Zip Code or as large as an entire metropolitan area. The smaller the geographic size of the zone the more zones there will be, and hence the more fixed rates there will be. Consider the characteristics of the company’s trips when determining how small or large to make a Zone. A good place to start is to obtain a Zip Code map of the company’s service area so that the Zones can be visualized. There are many free sources for these available on line.
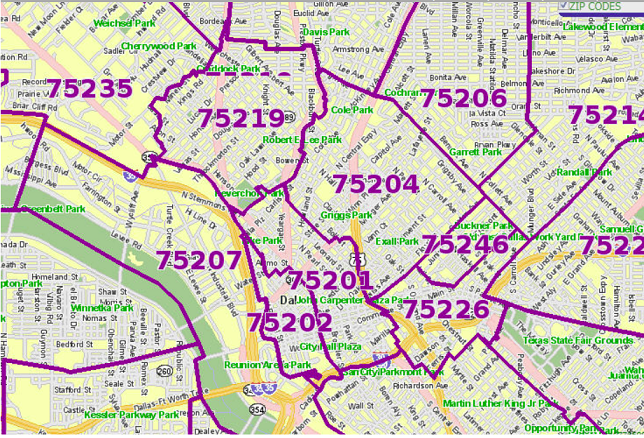
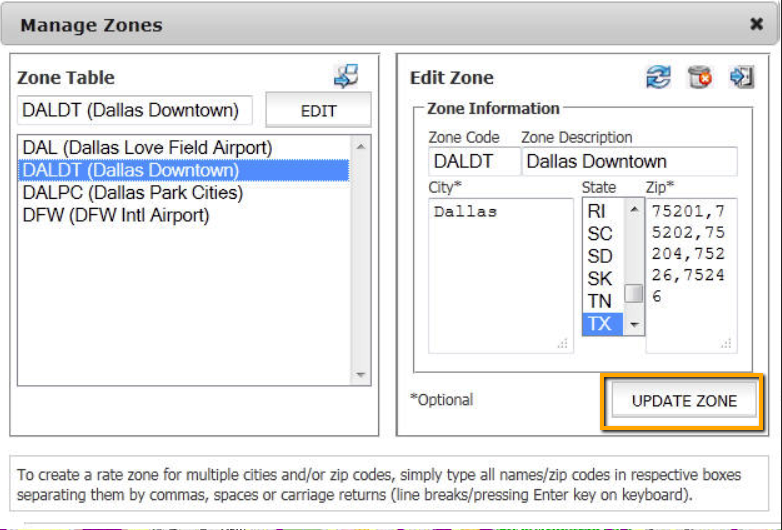
In the example below a Zip Code map of the central portion of Dallas is displayed. A zone is to be established for the ‘down town’ area of Dallas that will include Zip Codes 75201, 75202, 75204, 75226, 75246.
With the Manage Zone pop up open as illustrated below…..
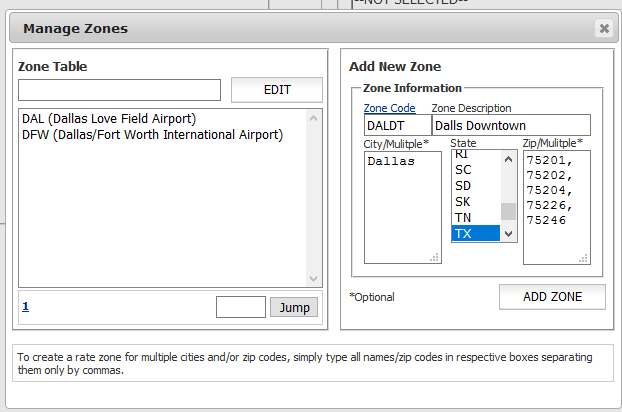
- Enter the Zone Code ‘DALDT‘.
- Enter the Zone Description ‘Dallas Downtown‘.
- Enter the City ‘Dallas‘. In this case there are not multiple cities in this zone, but if there were they would all need to be listed separated by a comma and a space.
- Select the State ‘TX‘ Abbreviations for US States and Canadian provinces are there. If not in US or Canada skip this step.
- Enter the Zip Codes ‘75201, 75202, 75204, 75226, 75246‘ separated by a comma and then a space!
- Click ‘Add Zone‘ to save the values entered.
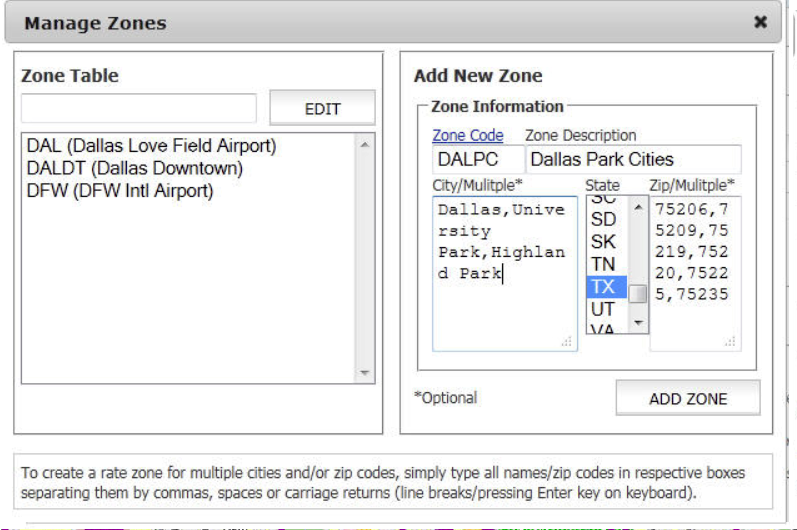
Adding another Dallas Zone with multiple cities is illustrated below.
- Enter the Zone Code ‘DALPC‘.
- Enter the Zone Description ‘Dallas Park Cities‘.
- Enter the City ‘Dallas, University Park, Highland Park‘ as multiple cities are in this Zone (separated by a comma and then a space).
- Select the State ‘TX‘ Abbreviations for US States and Canadian provinces are there. If not in US or Canada skip this step.
- Enter the Zip Codes ‘75206, 75209, 75219, 75220, 75225, 75235‘ separated by a comma and then a space!
- Click ‘Add Zone‘ to save the values entered.
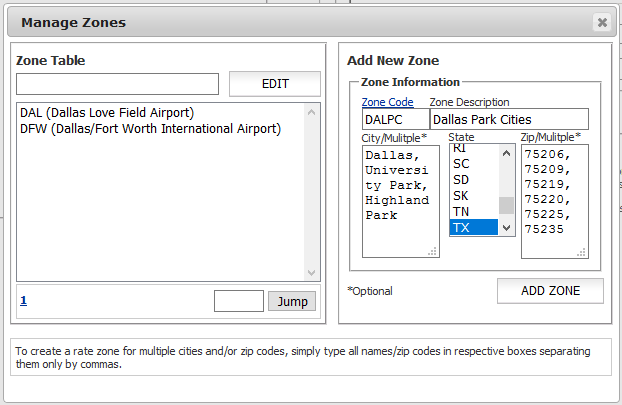
Note: A Zip Code should only appear in one Zone. For example if 75201 appeared in both the Zones above Limo Anywhere would not be able to determine which rate to apply to a routing.
Repeat this process as required until the Zones are built for the company’s market area. Additional Zones can be added at any time as needed.
Editing a Zone
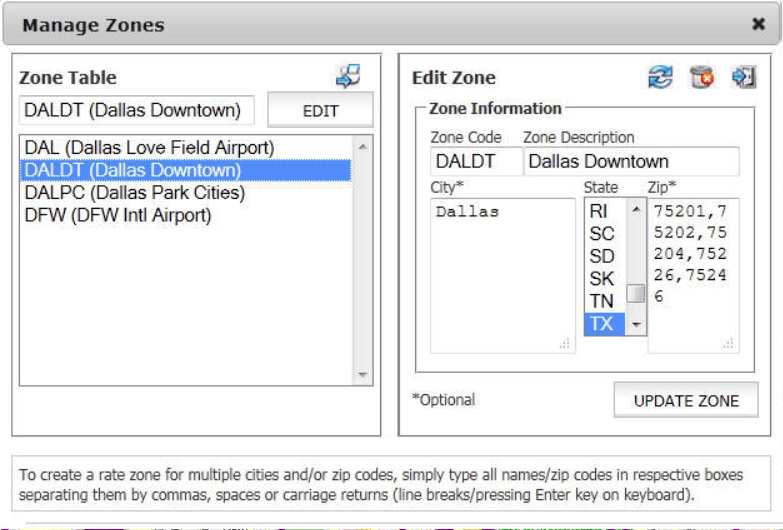
- Open the Manage Zones pop up as instructed above.
- Select the Zone in the Zone Table, and click the ‘EDIT‘ button.
- Make the changes that are necessary to the fields in the Edit Zone box.
- Click ‘UPDATE ZONE‘ to save any changes.
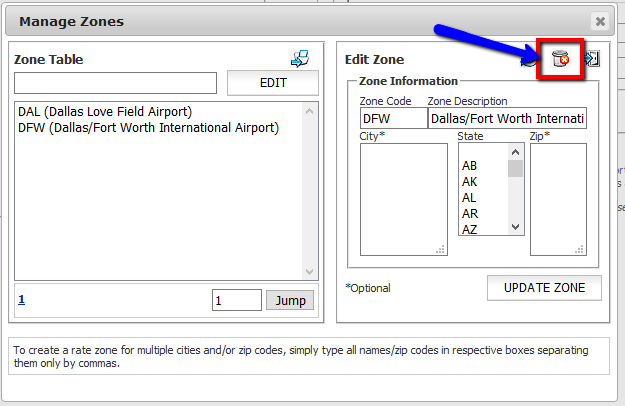
Deleting A Zone
- Open the Manage Zones pop up as instructed above.
- Select the Zone in the Zone Table, and click the ‘EDIT‘ button.
- Click the trash can icon in the Edit Zone box.
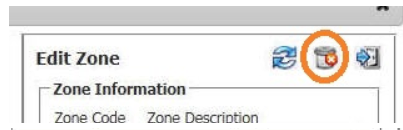
- A prompt will appear ‘Are you sure you want to permanently delete this zone?‘
- Click OK to delete the zone, or Cancel to not delete it.
Fixed Rates
Remember Fixed Rates are those rates that apply for transportation from one Zone to another Zone in a specific Vehicle Type. For complete information on Vehicle Types see the Knowledge Base article Establishing and Managing Vehicle Types in Limo Anywhere.
Adding A Fixed Rate
- To begin login to Limo Anywhere and click on the ‘My Office‘ icon on the tool bar.
- Open the Rate Management tab and select the ‘Fixed Rates & Zones Setup button‘.
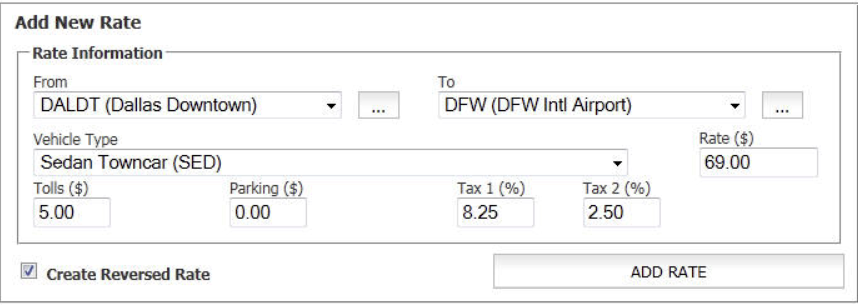
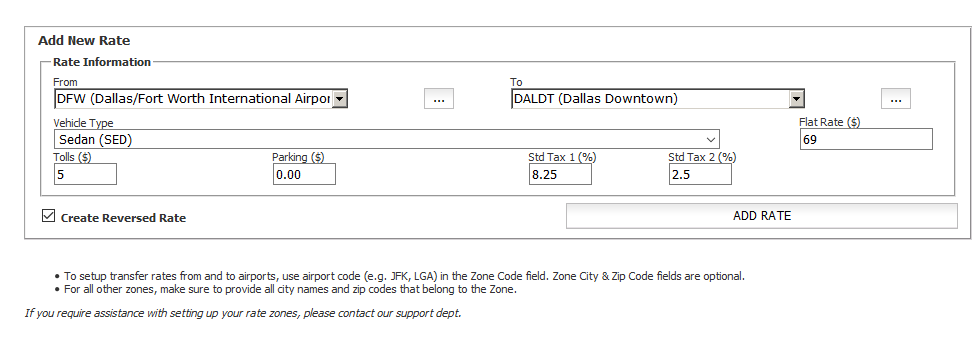
- Select the ‘From‘ zone from the drop down list (DFW Intl Airport).
- Select the ‘To‘ zone from the drop down list (Dallas Downtown).
- Select the ‘Vehicle Type‘ from the drop down list (Sedan Towncar).
- Enter the Rate ($69.00).
- Enter Tolls ($5.00).
- Enter Parking ($0.00).
- Enter Tax 1 (8.25%).
- Enter Tax 2 (2.5%).
- If a reverse rate (Downtown Dallas to DFW) is desired the “Create Reverse Rate” box should be checked. This is checked by default.
- Click ‘ADD RATE‘ to save any the new rate and create the reverse rate.
After clicking ‘Add Rate‘ the two Fixed Rates will appear in the Rate Table as illustrated below.
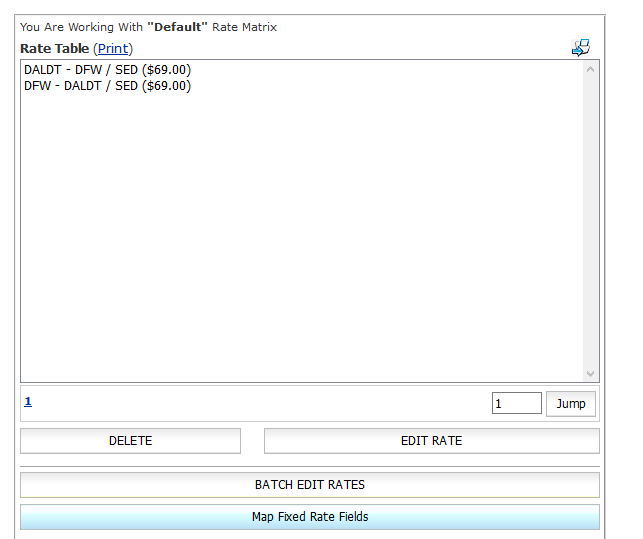
13. Be sure to click this icon to add another Rate:
Repeat the process of adding rates until rates are built for each Zone pair and Vehicle Type.
Map Fixed Rate Fields
Map Fixed Rate Fields links those fields in the Add Fixed Rate / Edit Fixed Rate boxes that are labeled Fixed Rate, Tolls, Parking, Tax 1%, and Tax 2% to rates that have been created in System Rate Manager. For instructions see the Knowledge Base article Using System Rate Manager.
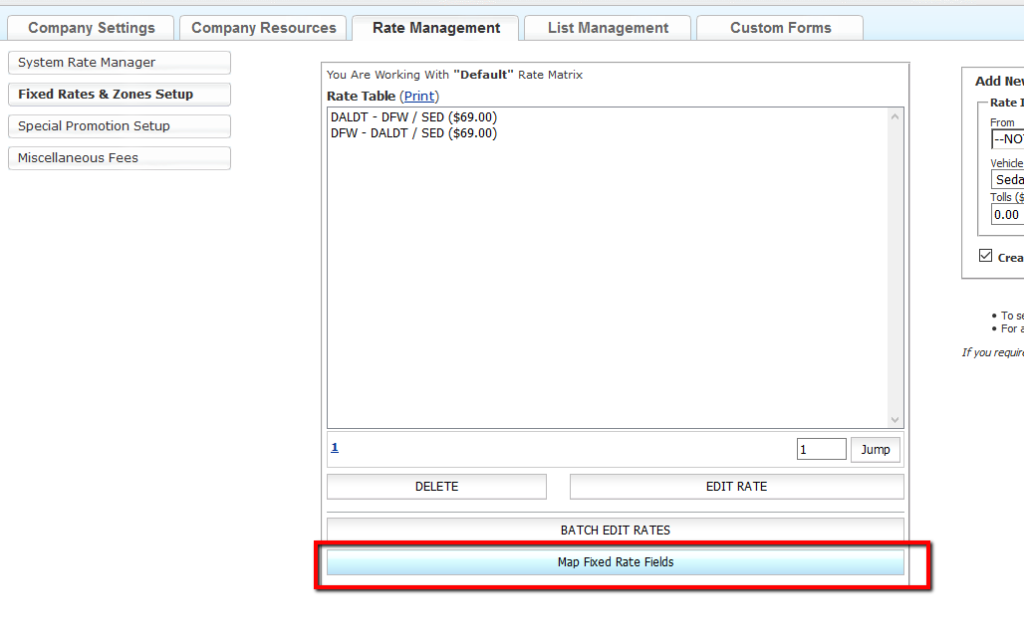
At this point it is a good idea to Map Fixed Rate Fields by clicking on the blue shaded button above.
In the example below….
- The Fixed Rate field is remaining mapped to Fixed Rate which is the default.
- The Tolls field is being mapped the DAL/DFW Airport Fee.
- The Parking field is mapped to Parking.
- The Tax 1% is being mapped to the State Sales Tax.
- The Tax 2% is being mapped to the Fuel Surcharge.
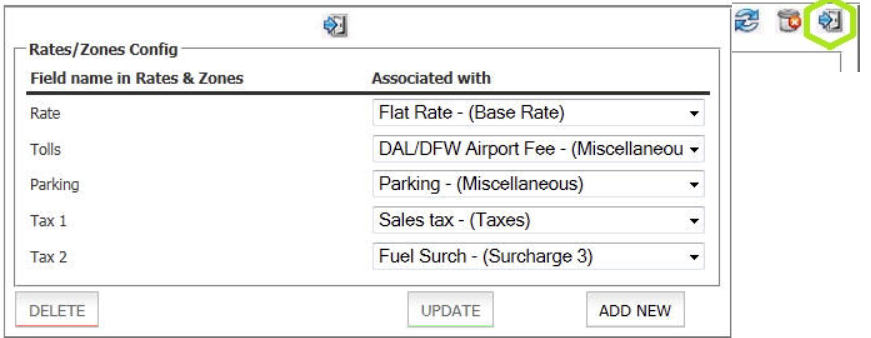
- Click ‘Add New‘ or ‘Update‘ to save the changes. The process of Mapping Rate Fields ties these fields to the Rate Construction areas of Reservation and Settle, and adds the title of the related rates to any of the documents this trip appears on such as an Invoice, Confirmation, or Trip Sheet.
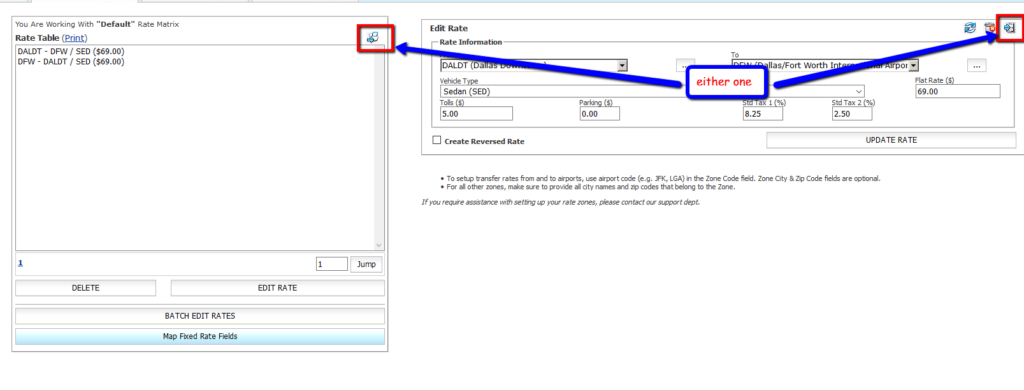
Editing A Fixed Rate
Single Rate Edit: To edit a single rate for the purpose of making a change or a correction select the rate to be edited in the Rate Table. Click the ‘Edit‘ button below the Rate Table. The rate will appear in the ‘Edit Fixed Rate‘ Box. Make any changes and click ‘Update Rate‘ to save the changes.
Batch Edit Fixed Rates: If a change is made to an element of the Fixed Rates that affects many rates, those rates can be Batch Edited to save time.
- Click the ‘Batch Edit Rates‘ button below the Rate Table as illustrated below.
- Change any field for any rate that needs to be changed. In the example below the tolls filed was changed fro all the DAL zone fares because the airport fee went from $3 to $4.
- Click ‘Update Rate Table‘ to save any changes entered.
Deleting a Fixed Rate
A Fixed Rate can be deleted at any time. Deleting a fixed rate will not affect reservations it is already applied to. Select the Rate from the Rate Table and click the ‘Delete‘ button below the Rate Table.