Use the following table to jump to a specific section of the guide:
- Establishing the connection
- Configuring vehicle types
- Configuring rates
- Configuring service types
- Providing Limo Anywhere account info to HQ Travel
- Working with your customer accounts
- Additional items to note
Establish Connection:
The following describes how to enable permission for HQ Travel to connect to your system. You must have an agreement/account with them in place before the integration can be used.
- Click on the ‘My Office’ icon in the top menu.
- Click on the ‘System Settings‘ button.
- Click on the ‘Partner Settings’ button.
- Click on the ‘Partners’ button in the left menu.
- This is your Partners connection page. Click on the ‘Connect’ button for SummitQwest. A handshake icon will appear, confirming SummitQwest now has permission to connect to your system.

Configure Vehicle Types Mapping:
All Partners have a set list of vehicle categories they can work with. You will need to map the Vehicle Types you have defined internally to associate them with a vehicle category for HQ Travel to access.
If you are already working with another Partner, your vehicle mapping might already be setup. If not, here’s how it works:
- Click on the ‘My Office’ icon in the top menu.
- Click on the ‘System Settings‘ button.
- Click on the ‘Partner Settings’ button.
- Click on the ‘Vehicle Types Mapping’ button in the left menu.
By default, your vehicle types will be listed in the ‘Vehicle Types’ column on the left. If you look to the right, you will see lanes for different categories of vehicles. In each lane, there are subcategories such as ‘Economy Sedan’ or ‘Sprinter Van.’
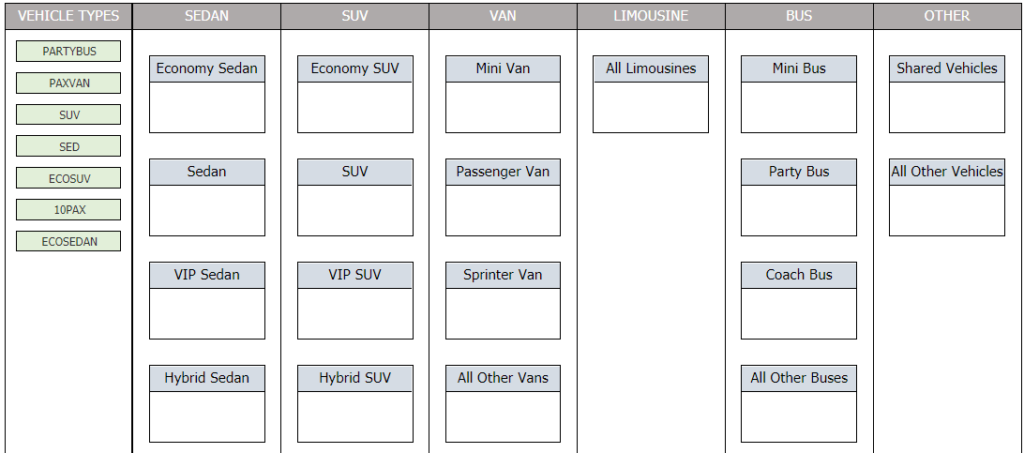
The idea is to move each of your Vehicle Types on the left to a specific subcategory on the right. Click and hold on a vehicle type in the left lane (green background) with your mouse, drag it to the appropriate subcategory on the right, then release the mouse button. The vehicle type should drop into the subcategory. When you are done, it might look something like this:
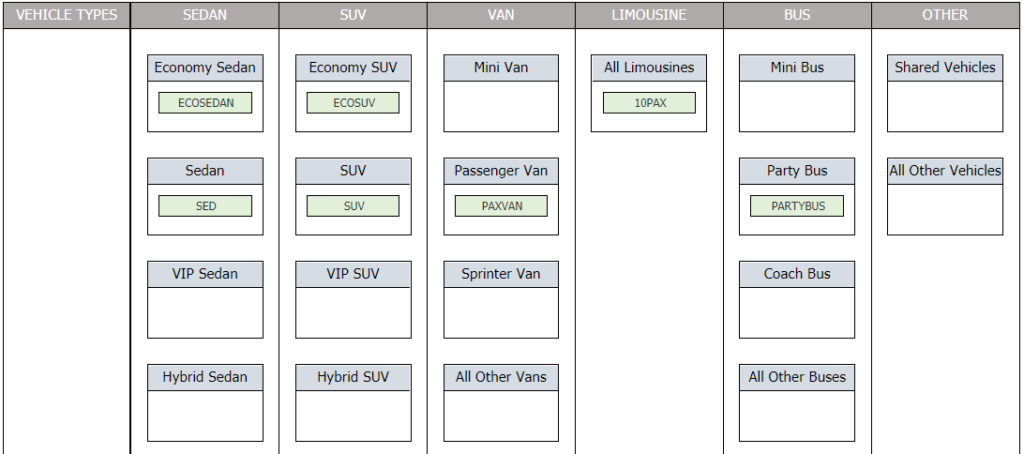
Please note: HQ Travel will not be able to see any vehicles which are not mapped. Additionally, HQ Travel is unable to work with a subcategory if you do not have any vehicles mapped to it. This allows the HQ Travel to accurately understand your inventory and not attempt to work with a Vehicle Type you do not offer.
Configure Rates Mapping:
All Partners have a set list of rate categories they can work with. You will need to map your rate line items to associate them with a rate category for the Partner to access.
If you are already working with another Partner, your rate mapping might already be setup. If not, here’s how it works:
- Click on the ‘My Office’ icon in the top menu.
- Click on the ‘System Settings‘ button.
- Click on the ‘Partner Settings’ button.
- Click on the ‘Rates Mapping’ button in the left menu.
You should now see lanes for each rate category that exists for HQ Travel to access. Properly mapping your rates will allow the HQ Travel to retrieve a proper rate breakdown. Click and hold on one of your rates from the list (green background) with your mouse, drag it to the appropriate rate category on the right, then release the mouse button. The rate should now be associated with the correct category. When completed, your mapping should look similar to the below (will differ for every operator based on actual line items.)

Configure Service Types
To efficiently use the integration, you should configure your Service Types. If you are taking advantage of the Limo Anywhere Online Reservation System, this might already be configured. Here’s what you need to be aware of.
There are 4 service type categories HQ Travel can work with:
- Hourly (used whenever a duration is supplied)
- Airport Arrival (used when PU is at an airport)
- Airport Departure (used when DO is at an airport)
- Point-to-Point (used when trip is not any of the above)
- Click on the ‘My Office’ icon in the top menu.
- Click on the ‘System Settings’ button in the left menu.
You will see a section which shows all of your service types. You can have as many service types as you wish, but you will need to associate a default service type for each of the categories above. Notice the ‘Default’ column and check to make sure all 4 of the above mentioned service type categories are listed. These will be the service types HQ Travel can access.
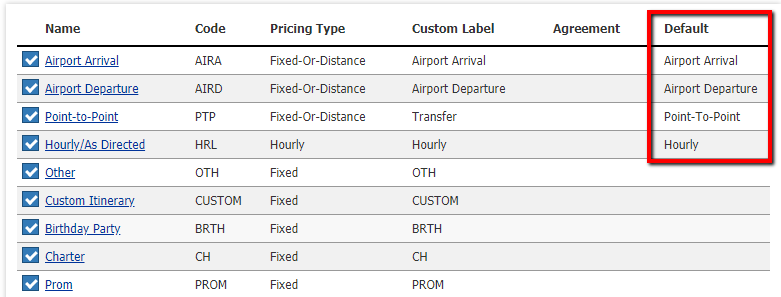
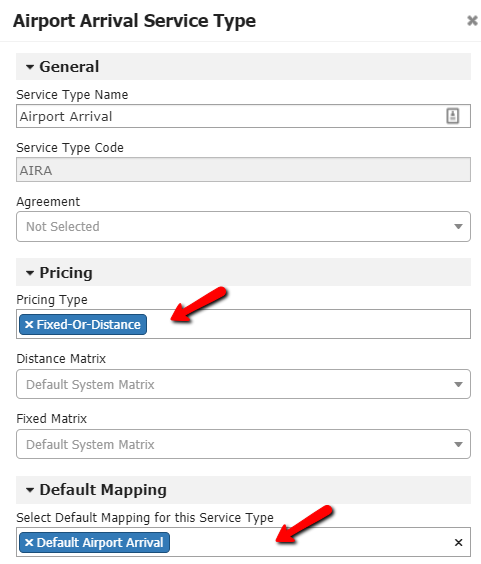
You can click on a service type (left column) to edit its settings. While editing, you can change the default service type category or the pricing type. The pricing type specified will be used to calculate the rate for HQ Travel
(and is also used in the Online Reservations System.)
Provide Your Limo Anywhere Details to HQ Travel:
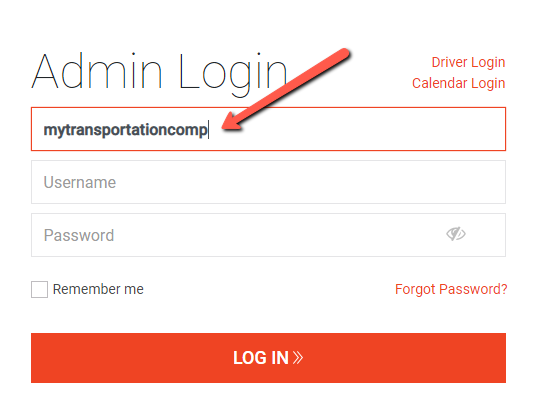
You will need to provide HQ Travel with your company id, otherwise known as a company alias. This is the company id you enter on the login page when accessing your Limo Anywhere system.
Working with Customer Accounts:
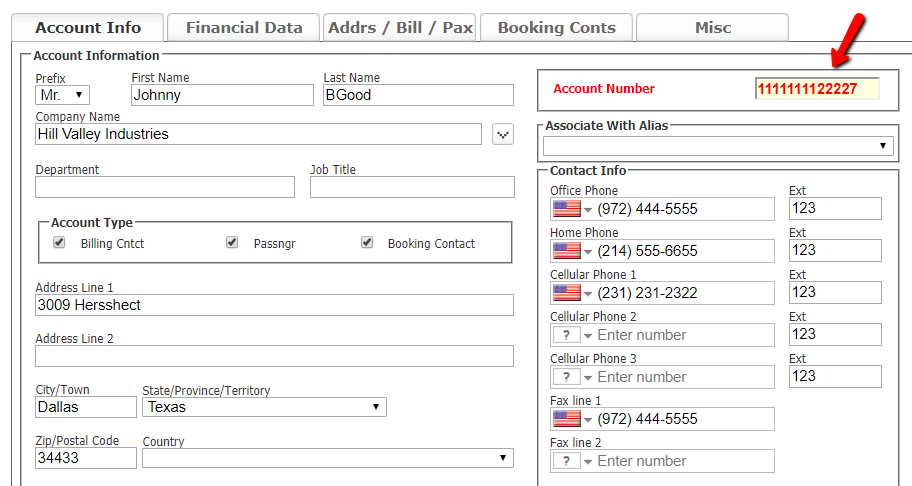
You may have clients with account specific pricing. You should provide HQ Travel with the account number for the client (Billing Contact) so they can retrieve the account level pricing. This account will also be applied as the Billing Contact on trips booked for this client. You can retrieve the account number from the top right of the account profile.
Additional Items to Note:
Item 1: When working with a customer account, the default payment method on the account (specified under the Financial Data tab) will be applied to the incoming trip. A credit card can always be supplied with the trip regardless of the default payment method. There is a setting in your system which will enable the requirement of a billing address when a credit card is supplied. Here’s how to disable the setting:
- Click on the ‘My Office’ icon in the top menu.
- Click on the ‘Online Reservation System‘ button in the left menu.
- You should now be on the ‘Settings‘ tab for ORES 4.
- Scroll down to the ‘Billing Settings‘ section.
- Find the setting ‘ Require Credit Card on All Reservations (Except Direct Bill): ‘ and set this to ‘No‘.
Item 2: There is a setting which is required to be enabled in order for HQ Travel to be able to perform a rate lookup with your system. Here’s how to enable the setting:
- Click on the ‘My Office’ icon in the top menu.
- Click on the ‘Online Reservation System‘ button in the left menu.
- You should now be on the ‘Settings‘ tab for ORES 4.
- Scroll down to the ‘Rates & Display Settings‘ section.
- Find the setting ‘Calculate and Display Pricing to Customers‘ set this to YES.
Settings for Item #1 and Item #2 also apply when trips are booked by your customers through your Limo Anywhere Online Reservations System.
