Scheduled Email Module
The Scheduled Email Module that allows the creation of dynamically formatted Trip and/or Invoice email templates that can be scheduled to be sent to customers, drivers, and/or affiliates.
Scheduled Email for Trips

- Click on ‘My Office‘ icon
- Click on the ‘Company Settings‘ tab.
- Click on ‘Messaging & Templates Settings‘ button.
- Click the ‘Scheduled Messaging‘ Tab.
- In the gray bar click the ‘Configuration Type‘ drop down and select Email.
- Enter a name for the Email Template.
- Select the ‘Email Type‘: Trip.
- Select which ‘Reservation Status‘ is to receive the Email: New/Live, Settled, or both.
- Select the ‘Trip Type‘ that will receive the Email: In- House, Farm-in, Farm-out or Select All.
- Select the ‘Service Type(s)‘: this email template will apply to.
- Select the ‘Email Class‘: Customer, Driver, Affiliate (Email class determines which email address will be selected to send to. For example if Driver is selected here it will select the driver’s email address and not the customer).In the ‘Send To‘ field select which of the contacts will receive the email.
- Customer: Billing Contact, Passenger, Booking Contact or Select All
- Driver: Driver 1, Driver 2, or Select All
- Affiliate: Affiliate Main Email, Affiliate Alt Email, or Select All
Note:Affiliate in Scheduled Messages refers to the Farm-out affiliate only. For Farm-ins, the Affiliate is the Billing Contact on the trip.
- ‘Attach Form‘ allows you to select which Reservation form you would like to attach as PDF to the email.
- ‘Attach Files‘ allows you to select a file that is in your Limo Anywhere’s File Manager under ‘Files‘ section and attach to the email.
- ‘When to Send‘ determines the trigger that send the Email:
- ‘When Status Changed To‘: click the status from the drop down list which will trigger sending of the Email.
- Time Trigger sends an amount of time (minutes, hours, days) before or after PU Time.
- ‘Do Not Send If Status Is‘: Select that status or statuses which will exclude this Email template, this option is to be used in conjunction with the Time Trigger option only.
- ‘Allow Profile Level Setting Override‘: This setting is no longer functional. If a recipient unsubscribes to these scheduled messages, then we will comply to the recipients request.
- ‘Restrict Only To Selected Accounts/Passengers/Affiliates‘: ‘Yes‘ makes the scheduled email only send out to specified accounts when selected under the Misc Tab in the Account profile. ‘No‘ allows the scheduled email to be sent out to everyone specified in the ‘Send To‘ option.
- ‘Is Active‘: ‘Yes‘ allows the system to send out the scheduled email. ‘No‘ makes the scheduled email inactive in your system.
Next is to compose the body of the message.
- Click the Tag icon as shown below to display the menu of tags available for creating Email templates.
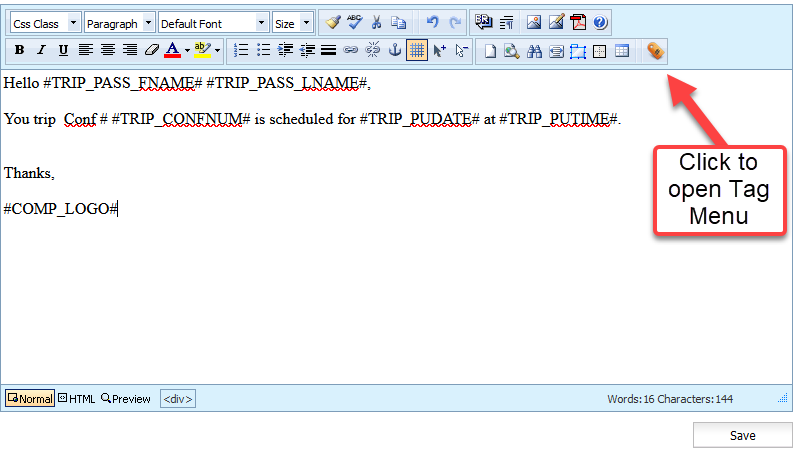
- With your mouse cursor in the message body field click on any tag to insert it into the template, and simply type to complete the message.
- Click ‘Save‘ to retain Template.
Scheduled Email for Invoices
- Click on ‘My Office‘ icon.
- Click on the ‘Company Settings‘ tab.
- Click on ‘Messaging & Templates Settings‘ button.
- Click the ‘Scheduled Messaging‘ Tab.
- In the gray bar click the ‘Configuration Type‘ drop down and select Email.
- Enter a name for the Email Template.
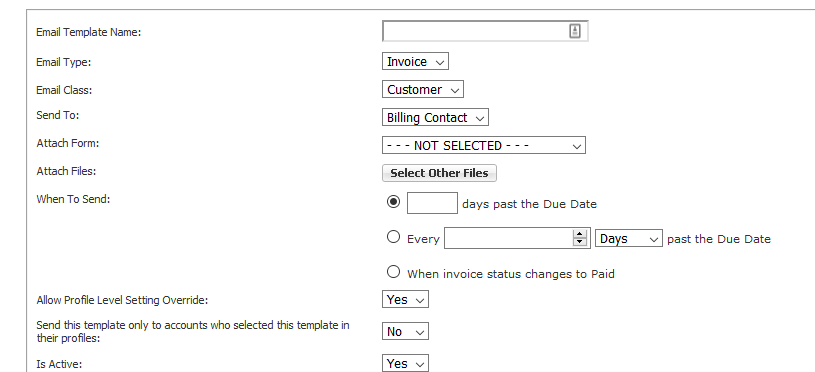
- Select the ‘Email Type‘: Invoice.
- Select the ‘Email Class‘: Customer.
- Select the ‘Send To‘: Billing Contact.
- ‘Attach Form‘: allows you to select which Reservation form you would like to attach as PDF to the email.
- ‘Attach Files‘: allows you to select a file that is in your Limo Anywhere’s File Manager under ‘Files‘ section and attach to the email.
- ‘When to Send‘ determines the trigger that send the Email:
- Time Trigger sends an amount days past the Due Date.
- Time Trigger sends every x amount of days, weeks, or months past the Due Date.
- When invoice status changes to Paid.
- ‘Allow Profile Level Setting Override‘: This setting is no longer functional. If a recipient unsubscribes to these scheduled messages, then we will comply.
- ‘Restrict Only To Selected Accounts/Passengers/Affiliates‘: ‘Yes‘ makes the scheduled email only send out to specified accounts when selected under the Misc Tab in the Account profile. ‘No‘ allows the scheduled email to be sent out to everyone specified in the ‘Send To‘ option.
- ‘Is Active‘: ‘Yes‘ allows the system to send out the scheduled email. ‘No‘ makes the scheduled email inactive in your system.
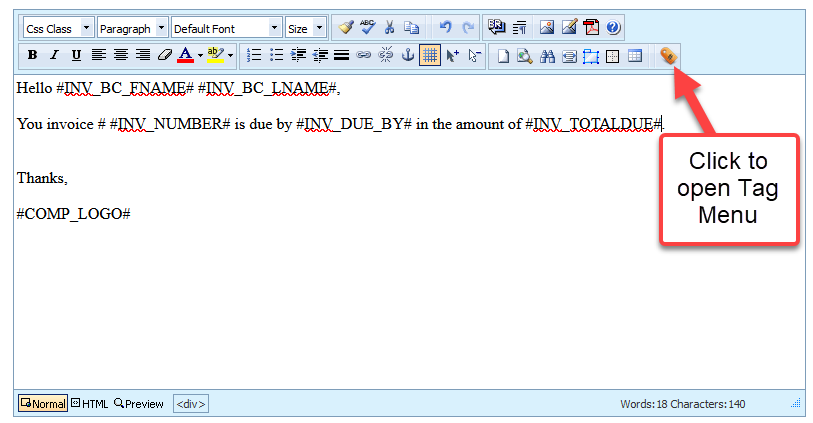
- Next is to compose the body of the message.
- Click the ‘Tag‘ icon as shown below to display the menu of tags available for creating Email templates.
- With your mouse cursor in the message body field click on any tag to insert it into the template, and simply type to complete the message.
- Click ‘Save‘ to retain Template.
For more information and examples on how to set up scheduled emails please see our Knowledge Base article ‘Creating a Scheduled Email Template’.