DriverAnywhere 4.0:
DriverAnywhere allows drivers to receive their assigned trips directly in the app and provides drivers the most up-to-date information about their assigned trips. They can see important details regarding the trip, and can change the status of the trip easily in the app so dispatchers can track their trips live within Limo Anywhere.

To Login to DriverAnywhere 4.0:
- Enter in Company ID
- Enter in Username
- Enter in Password
- (Optional) Check “Remember my log-in details” to remember your Company ID and Username
- Click Log In button to login
If you receive error message “Could not log you in”, please check your Company ID, Username, and Password.
NOTE: “Forgot Password?” reset is still being improved.
The Dashboard screen will show you your assigned trips quickly and easily. There are four sections: In Progress, Pending, Upcoming, and Completed

The In-Progress screen will show the current trip that is this currently in progress, On the Way, On Location, etc.
The In Progress job card will display:
- Confirmation #
- Pickup Date and Time
- Drop-off Time (if applicable)
- Passenger’s Name
- Pick-up and Drop-off Locations
- Flight Info (if applicable)
Tap on the phone icon to call the primary passenger from the app.
Tap on the flight icon to track the flight via FlightAware.
Tap on the direction icon to open up Google Maps.
At the bottom of the In-Progress screen, you will see the status bar. The status bar shows you exactly what status you are on. Tap the status bar to change the status of the trip.
As you go through the trip’s statuses, it will guide you through the workflow below:
- On The Way/En Route
- On Location/Arrived
- Circling (Optional)
- Customer in Car
- Passenger Dropped Off
- Done/Close-out
Tap on the Job Card to take you to the Job Details screen.
Note: You can only have one trip In-Progress at a time. You must close out trip in order to start next trip.

The Pending screen will show trips that have been offered and need to be Accepted/Rejected.
The Pending job card will display:
- Confirmation #
- Pickup Date and Time
- Drop-off Time (if applicable)
- Passenger’s Name
- Pick-up and Drop-off Locations
- Flight Info (if applicable)
Tap on the job card to open up the Job Details screen.

The Upcoming screen will show all jobs that are upcoming.
The Upcoming job card will display:
- Confirmation #
- Pickup Date and Time
- Drop-off Time (if applicable)
- Passenger’s Name
- Pick-up and Drop-off Locations
- Flight Info (if applicable)
Tap on the job card to open up the Job Details screen.

The Completed screen will show all jobs that are completed and closed out.
The Completed job card will display:
- Confirmation #
- Pickup Date and Time
- Drop-off Time (if applicable)
- Passenger’s Name
- Pick-up and Drop-off Locations
Tap on the job card to open up the Job Details screen.


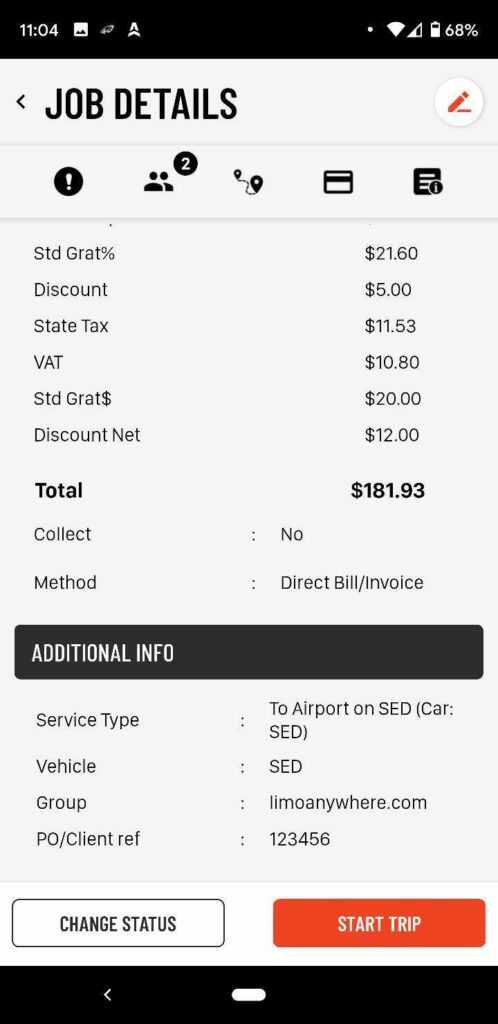
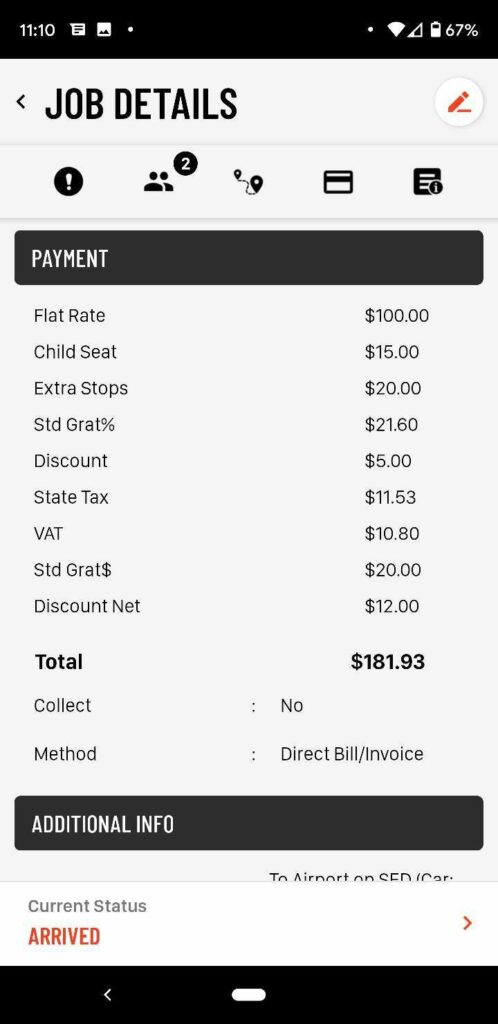
The Job Details screen will show all important information drivers need to perform the job.
Icons:
- Passengers – highlighted and shows # of passengers (primary + additional)
- Handicap – highlighted if Handicap
- Child Seats – highlighted if Child Seats are on trip
- Additional Stops – highlighted if Stops are on trip with # of stops
- Greeting Sign – highlighted if Greeting Sign is required
- Payment Collect – highlighted if Payment Status is set to Collect
- Luggage – highlighted if luggage is on trip and # of luggage
- Additional Notes – highlighted if there are trip, driver, or Bill to/Pax Notes on trip for driver
Details:
- List all passenger’s names (primary and additional) and can click to call
- Group
- PO/Client Ref #
- List number and types of Child Seats (Infant, Booster, toddler)
- List routing in order from reservation (PU, ST, WT, DO)
- Service Type, Vehicle Type, and Car
- Payment Method and Collect if applicable
- Passenger’s Company Name if Applicable
- Occasion
- Trip Notes
- Bill To & Pax Notes
Tap Pencil button to go to Update screen
Tap Flight icon to track flight via FlightAware
Tap the direction icon to open up Google Maps
If it is the next trip will have Slide to Start, to start trip
Update:

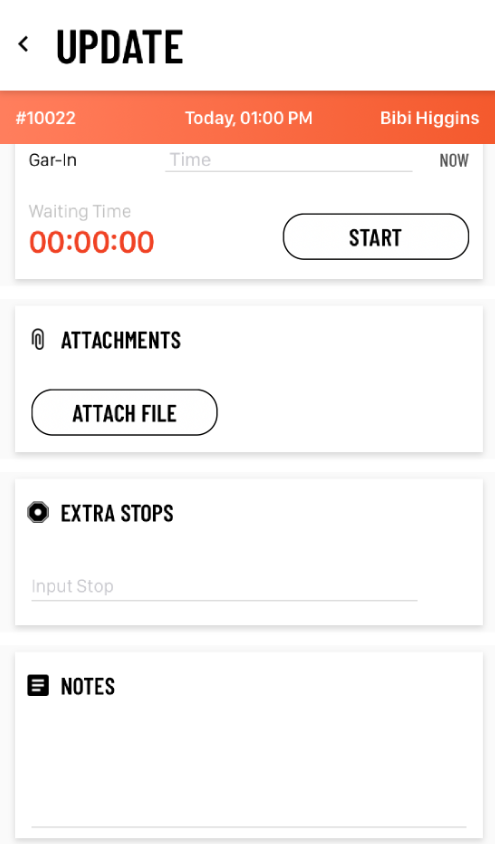
The Update screen is where the driver add/edit/make updates to the trip like times, notes, extra stops, costs, etc.
- Times
- Shows trip times below:
- Gar-out
- ETA
- Spot
- In-Car
- Drop-off
- Gar-in
- Shows trip times below:
- Attachments
- Driver can Attach Files (take picture or from Gallery)
- Stops
- Driver can add stop or Multiple stops with manual entry or Google verified
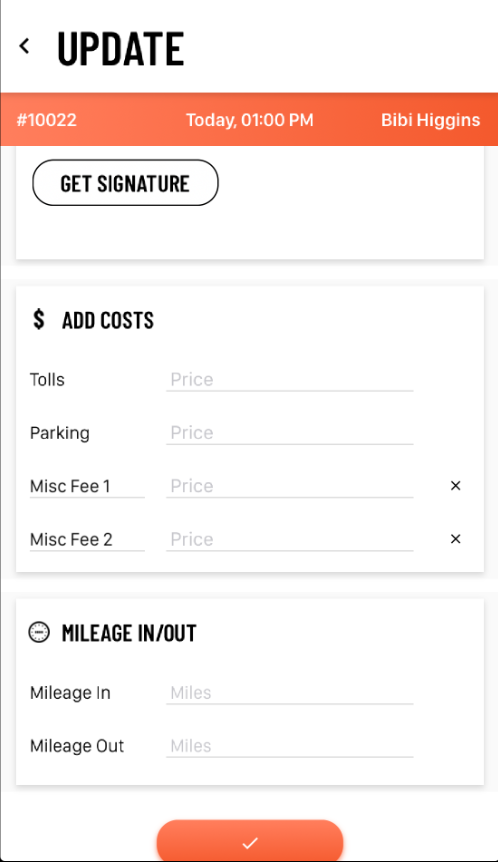
- Signature
- Driver can get Signature for Terms and Conditions
- Driver Notes
- Driver can add notes if needed
- Add Costs
- Driver can see and/or edit Tolls, Parking, or any rates that operator has mapped in DriverAnywhere Preferences
- Tolls
- Parking
- Misc Fee 1
- Misc Fee 2
- Driver can see and/or edit Tolls, Parking, or any rates that operator has mapped in DriverAnywhere Preferences
- Mileage In/Out
- Driver can put in Mileage in and out
Must click checkmark/update for changes to take place and calculate rate

The All Trips screen allows you to see and search for any trip.
Enter in date range to see all trips that are with in that date range.
Use search bar to search for trips by Conf # or Passenger Name.

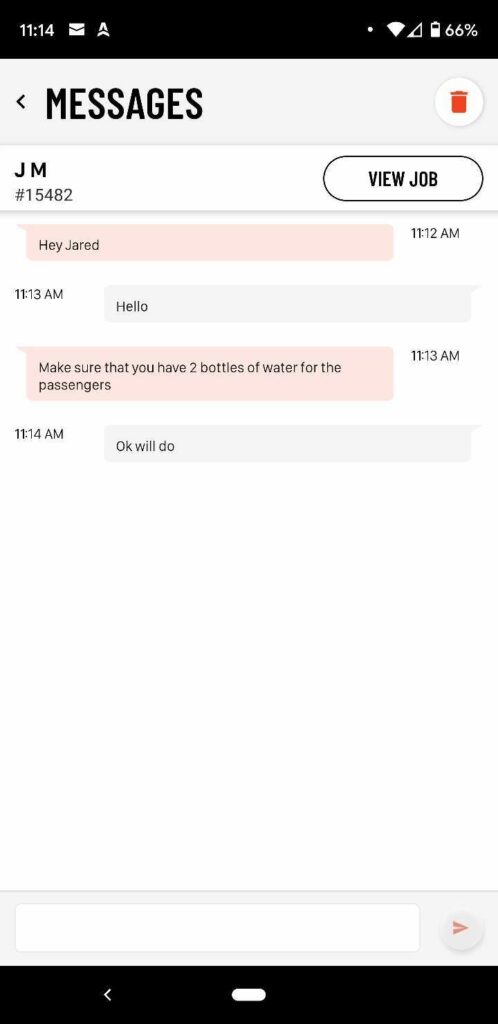
The Messages screen allows Driver and Dispatch to communicate with each other between Limo Anywhere and the DriverAnywhere app.
Any message sent from Dispatch screen in Limo Anywhere will create a message thread in DriverAnywhere. Drivers can reply to those messages. If the message thread is related to a job, you can easily go to the Job Detail screen for that trip. Also drivers can delete the message thread from the application if needed by tapping the trash can icon.
Profile:

The Profile screen will show the driver profile picture and driver and vehicle information.
Note: Vehicle Information will only show once driver is On-Duty and selected a car.


The Greeting Sign screen will show Greeting Sign for the trip In-Progress.
You can choose different styles for the Greeting Sign and click on the full screen icon in the bottom right will make the Greeting Sign full screen in landscape.
Drivers can edit the text of the Greeting Sign if needed by editing the 2 fields above the Greeting Sign for line 1 and line 2.

The More screen will allow you to get to Profile, Greeting Sign or Log Out.
If you log out of DriverAnywhere 4.0 you will be removed from car selected and marked Off-Duty.