Establishing and Managing Seaports/Cruise Ships in Limo Anywhere
For many limousine operators Seaports are frequent Pick-up or Drop-off points for their customers. Limo Anywhere has a specific method for handling Seaports and the Ships that dock there which creates efficiency, and increases the accuracy when adding these points to a reservation.
Adding a Seaport
- Click on the ‘My Office’ icon on the toolbar.
- Open the ‘Company Resources’ tab and select the ‘Seaports’ button as illustrated below (highlighted orange).
- There are two tabs for managing Ports of Call and the Cruise Ships that dock at the ports. Open the ‘Ports of Call’ tab.
- The Seaports existing in the company’s Limo Anywhere will be displayed under the Seaports list (highlighted green).

- Enter a unique code of the company’s choosing for each Seaport in the Code field.
NOTE: Avoid using three letter codes that could be confused with airport codes. In the example above ‘PCANV’ is entered. - Enter the Description as illustrated above ‘Port Canaveral’.
- The State the Seaport is in can be populated from the drop down list.
NOTE: This is optional. Using the State can be helpful especially if the company serves across state lines and tax rates are set up for Pick Up/Drop of locations in that State. - The Seaport can be either LOCAL (default) or NON-LOCAL.
- Select the Status from the drop down list of ACTIVE/INACTIVE.
- Pick-Up Instructions are optional but can be valuable because when they are entered and set as ‘default’; the Pick-UP Instructions will automatically populate in the Notes field in the Reservation routing when the Seaport is selected, and appear on Confirmations and Trip Sheets.
NOTE:It is possible to have multiple pick up instructions for a Seaport to accommodate for example an multiple docks or passenger terminals, or Seaport/road construction detours. If multiple Pick-up Instructions exist the default will display, and the others can be selected for a drop down list as needed. See Seaports in Reservations below. - Adding Pick-up Instructions:
- Enter a Short Title (20 characters maximum).
- Enter the Instructions.
- Select the ‘Dflt’ check box if this is to be the default instructions.
- Select the Status as ACTIVE/INACTIVE as appropriate.
- Click ‘ADD’ to save what was entered.
- Click ‘ADD SEAPORT’ to save any data entered.
Editing A Seaport
Select the Seaport to be edited from the Seaport list.
- Click ‘EDIT SEAPORT’.
- Edit any of the input fields as needed. In this example the Status was changed from ACTIVE to INACTIVE.
- Click ‘UPDATE SEAPORT’ to retain any changes.

The result of the above example is Port Canaveral now shows in RED font in the Seaport list indicating INACTIVE Status.
Deleting A Seaport
WARNING:Deleting a Seaport can have far reaching effects in the database if that Seaport is utilized in any reservations past or future. For that reason it is strongly recommended that Seaports not be deleted. Instead it is best to utilize the Status, and change the Status of an Seaport that is not being used to INACTIVE.
- Select the Seaport that is to be deleted from the Seaport list.
- Click ‘DELETE SEAPORT’.
- The following Deletion Confirmation Message will appear. Click ‘Cancel’ to not delete the Seaport (STRONGLY RECOMMENDED); or ‘OK’ to delete the Seaport.
Cruise Ships & Cruise Lines
- Click on the ‘My Office’ icon on the toolbar.
- Open the ‘Company Resources’ tab and select the ‘Seaports’ button as illustrated below (highlighted orange).
- There are two tabs for managing Ports of Call and the Cruise Ships that dock at the ports. Open the ‘Cruise Ships’ tab.
- The Cruise Ships existing in the company’s Limo Anywhere will be displayed under the Cruise Ships list (highlighted green).
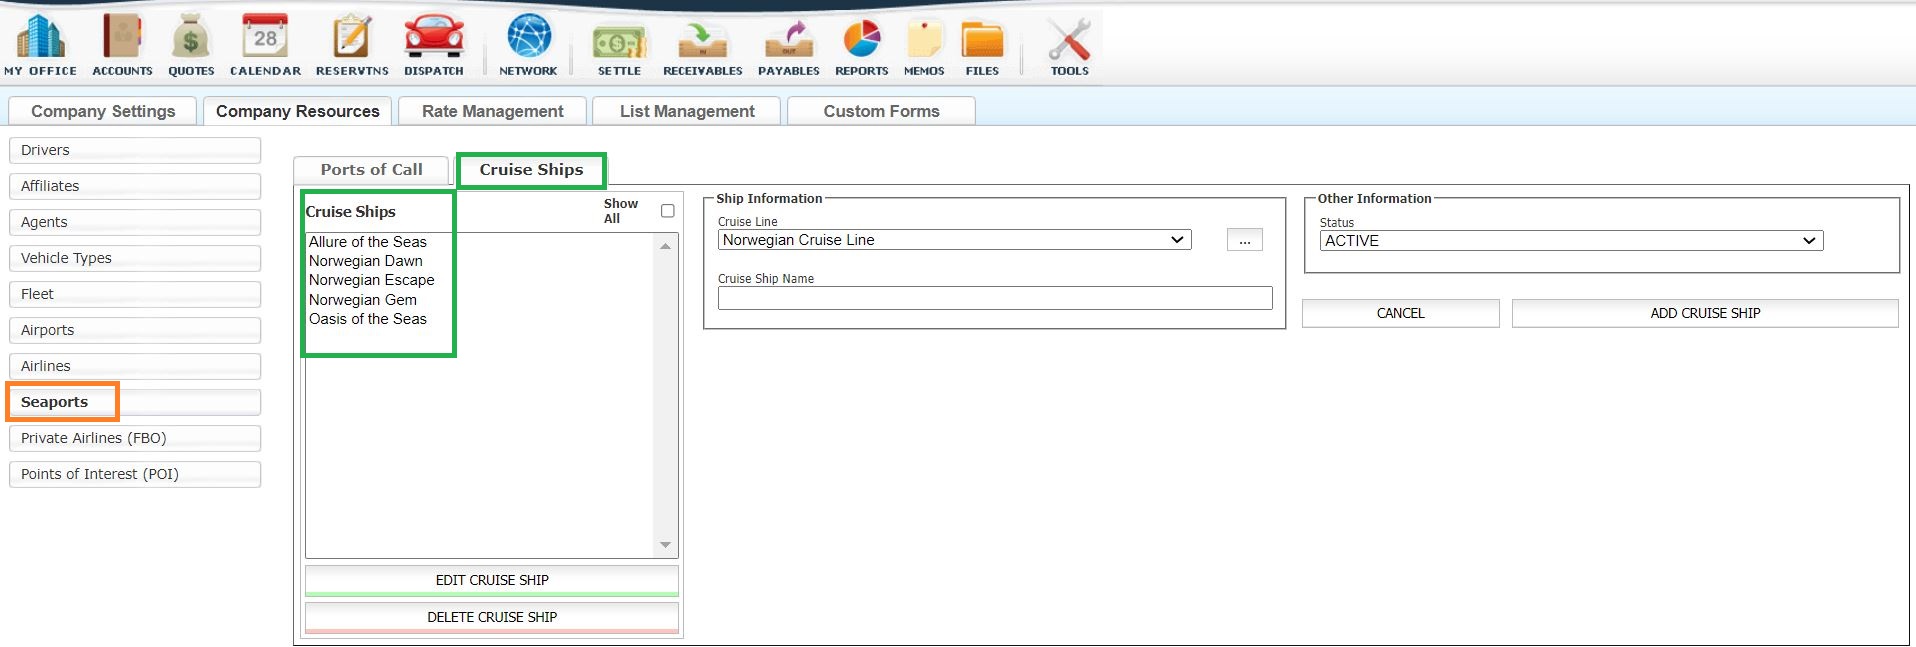
Add, Edit, or Delete the Cruise Lines
Cruise Ships are part of a Cruise Line. Before entering Cruise Ships in Limo Anywhere the Cruise Lines the company will serve first need to be added.
Add a Cruise Line
- Click the ‘ellipsis’ button next the Cruise Line field in the Ship Information box.
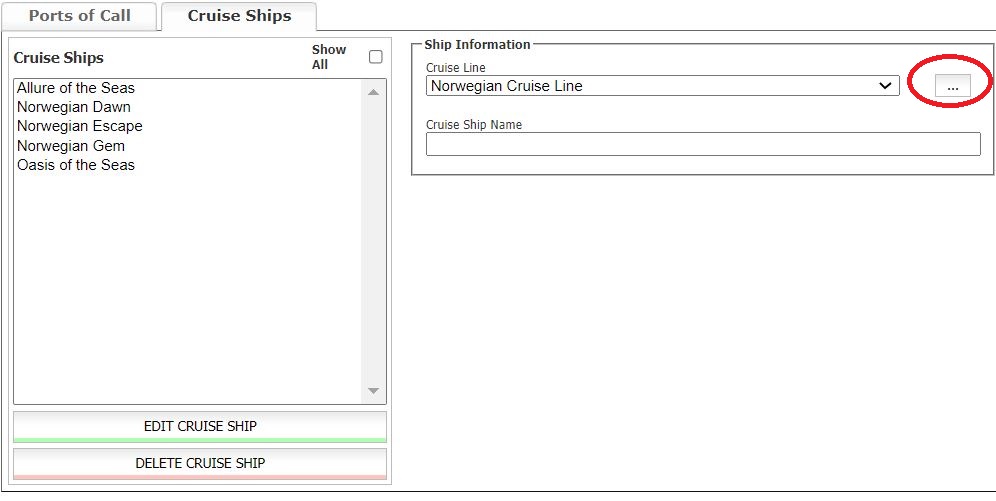
- Cruise Lines existing in the company’s Limo Anywhere will display in the Cruise Line list (highlighted orange).
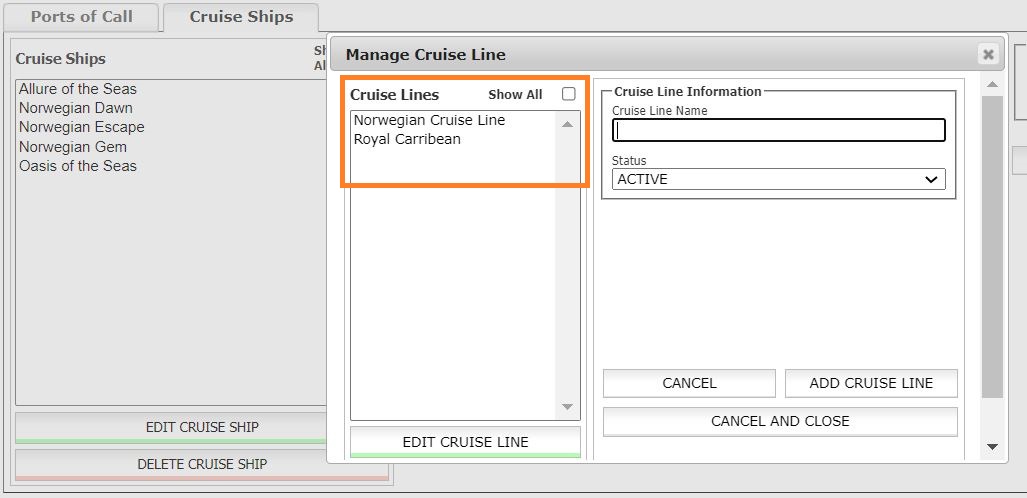
- Enter a Cruise Line Name.
- Select the Status of ACTIVE/INACTIVE.
- Click ‘ADD CRUISE LINE’ to save any data entered.
Edit a Cruise Line
- Click the ‘ellipsis’ button next the Cruise Line field in the Ship Information box.
- Cruise Lines existing in the company’s Limo Anywhere will display in the Cruise Line list (highlighted orange).
- Select the Cruise Line to be edited.
- Click ‘EDIT CRUISE LINE’ (highlighted green).
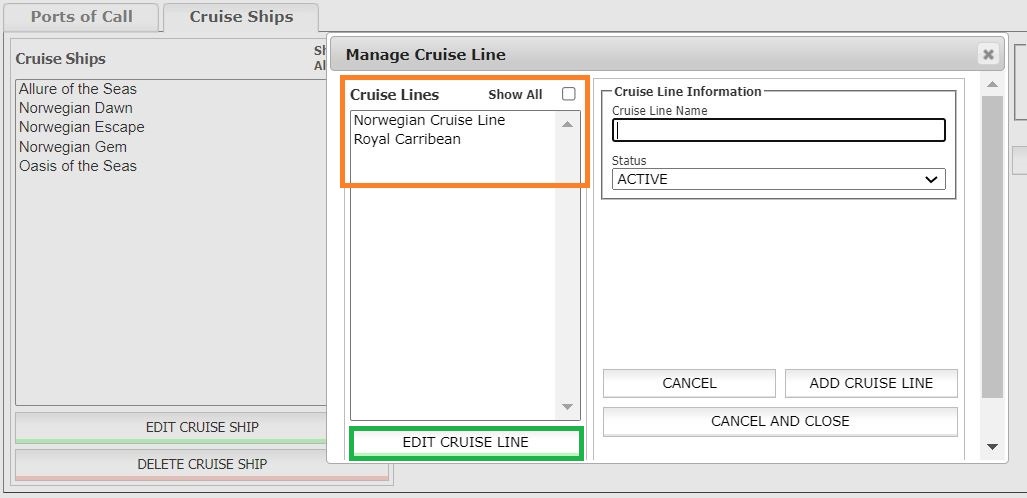
- Edit the Cruise Line Name, or change the Status.
- Click ‘UPDATE CRUISE LINE’ to save any changes.
Delete a Cruise Line
- Click the ‘ellipsis’ button next the Cruise Line field in the Ship Information box.
- Cruise Lines existing in the company’s Limo Anywhere will display in the Cruise Line list (highlighted orange).
- Select the Cruise Line to be deleted.
- Click ‘DELETE CRUISE LINE’.
- A Delete Confirmation pop up will appear. Click ‘Yes’ to Delete.
Adding a Cruise Ship
- Select the Cruise Line from the drop down list.
- Enter the Cruise Ship Name.
- Select the Status of ACTIVE/INACTIVE.
- Click ‘ADD CRUISE SHIP’ to save any data entered.
Editing a Cruise Ship
- Select the Cruise Ship to be edited.
- Click ‘EDIT CRUISE SHIP’ (highlighted green).
- Edit the Cruise Ship Name, or change the Status.
- Click ‘UPDATE CRUISE SHIP’ to save any changes.

Delete a Cruise Ship
- Select the Cruise Line to be deleted
- Click ‘DELETE CRUISE LINE’.
- A Delete Confirmation pop up will appear. Click ‘Yes’ to Delete.
Seaports In Reservations
Seaports that are entered into the company’s Limo Anywhere can be selected in the Reservation process to gain efficiency and accuracy in entering the necessary information.
In an existing or new reservation:
- Select the ‘Seaport’ icon at the top of the routing box.
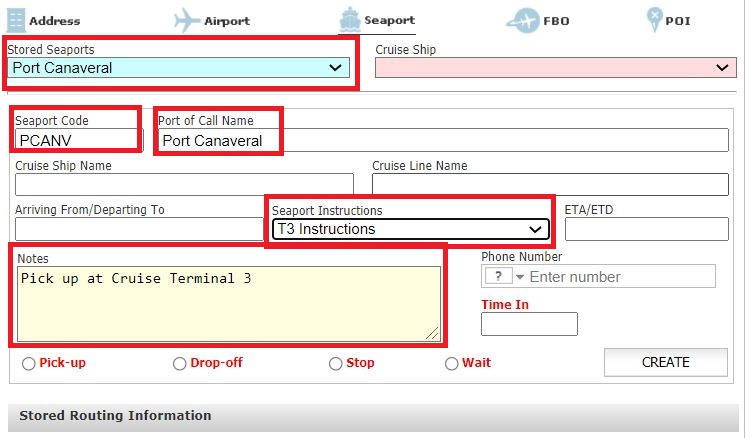
- Select the Seaport from the Stored Seaports drop down list. Seaports that are ‘ACTIVE’ will appear on the the Stored Seaports drop down list in alphabetical order.
- When a Seaport is selected, as illustrated below, Limo Anywhere populates the fields:
Seaport Code
Seaport Name
Seaport Instructions (The default instructions will display. If alternate instructions are present they may be selected from the drop down list.)
In Notes the text entered for the Seaport Instructions selected are displayed
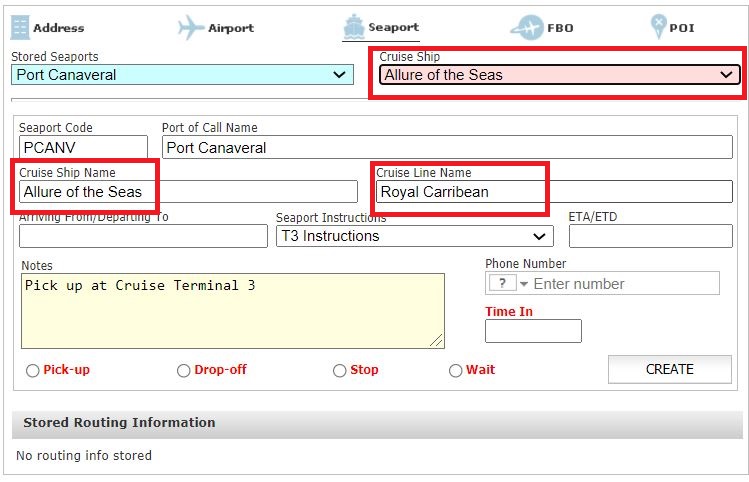
- Select the Cruise Ship from the drop down list. Cruise Ships that are ‘ACTIVE’ will appear on the the Cruise Ship drop down list in alphabetical order and grouped by Cruise Line.
- When a Cruise Ship is selected, as illustrated below, Limo Anywhere populates the fields:
Cruise Ship Name
Cruise Line Name
- Choose the point on one of the routing point labels (Pick-up, Drop-Off, Stop, Wait) to save the entry as a routing point.
