Establishing and Managing Airports in Limo Anywhere
As a vital part of the travel industry Limousine operators frequently provide services for their customers to and from Airports and Airlines. Therefore Limo Anywhere provides a method to easily integrate Airports and Airlines into both the Online Reservation or core system Reservation processes.
Limo Anywhere comes with most United States commercial Airports established in the system. In a new system the pre-populated Airports will all be in RED font indicating their status is ‘INACTIVE‘.
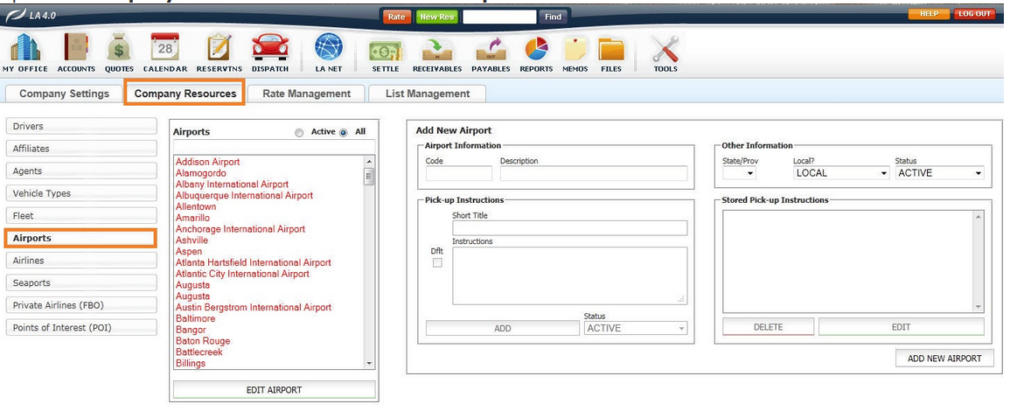
- Click on the ‘My Office‘ icon on the toolbar.
- Open the ‘Company Resources tab‘.
- Select the ‘Airports‘ button as illustrated below.
Activating and Editing an Airport
- As mentioned before, Limo Anywhere comes with most US Airports loaded in an INACTIVE status as indicated by the RED font. In the example below, Boston (Logan International Airport) will be activated.
- To activate an Airport select it from the list, and click ‘EDIT AIRPORT‘.
- The information on this Airport will display in the Edit Airport box.
- The Code is pre-populated as BOS which should never be changed.
NOTE: Airport codes are used throughout the travel industry and are universally accepted. In addition in Limo Anywhere they are used to define Zones for the company’s fixed rate structure. See below Airports And Fixed Rates and Zones. - The Description is pre-populated as Boston, Logan International Airport.
- The State the Airport is in can be populated from the drop down list.
NOTE: This is optional. Using the State can be helpful especially if the company serves across state lines and tax rates are set up for Pick Up/Drop of locations in that State. - The Airport can be either LOCAL (default) or NON-LOCAL.
- If the Airport is to be ACTIVE change the Status on the drop down list from the NON-ACTIVE (default).
- Pick-Up Instructions are optional but can be valuable because when they are entered and set as ‘default’; the Pick-Up Instructions will automatically populate in to the Notes field in the Reservation routing when the Airport is selected, and appear on Confirmations and Trip Sheets.
NOTE: It is possible to have multiple pick-up instructions for an airport to accommodate for example an international arrival terminal, or airport/road construction detours. If multiple Pick-up Instructions exist the default will display, and the others can be selected for a drop down list as needed.

Adding Pick-up Instructions
- Enter a Short Title (20 characters maximum).
- Enter the Instructions.
- Select the ‘Dflt‘ check box if this is to be the default instructions.
- Select the Status as ACTIVE/INACTIVE as appropriate.
- Click ‘ADD‘ to save what was entered.
Changing Pick-up Instructions
- Select the instructions from the Stored Pick-up Instructions list.
- Click ‘EDIT‘.
- Modify the Short Title, Instructions, ‘Dflt‘ or Status fields as needed.
- Click ‘UPDATE‘ to save an changes.
Deleting Pick-up Instructions
- Select the instructions from the Stored Pick-up Instructions list.
- Click ‘DELETE‘.
- Click ‘UPDATE‘ to save any changes made to this Airport.
Non USA Airports
For Airports outside the United States, or any Airport not pre-populated into Limo Anywhere they can be added at the company’s discretion, and as needed.
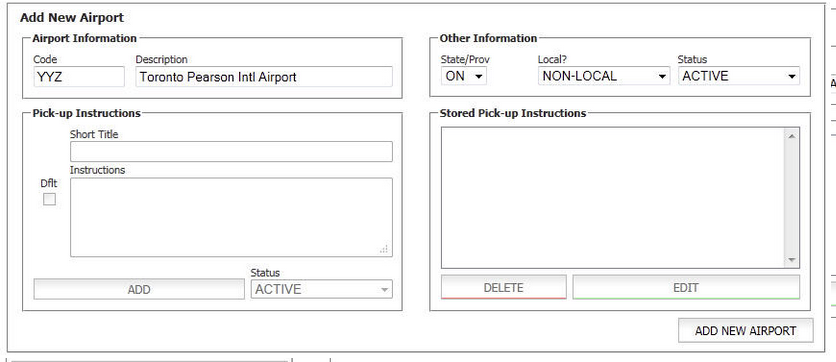
In the example below Pearson International Airport in Toronto Canada is added.
In the ‘Add Airport‘ box.
In the ‘Add Airport‘ box.
- Enter the Code.
- Enter the Description (usually the full name of the Airport).
- Select the State/Province from the drop down list. In this case ‘ON’ for Ontario
- Select LOCAL/NON-LOCAL in Local?
- Select ACTIVE/INACTIVE in Status.
- Enter Pick-up Instructions as appropriate and detailed above.
- Click ‘ADD NEW AIRPORT‘ to save any data entered.
Airports And Fixed Rates and Zones
A significant segment of the Limousine industry involves taking customers to and from Airports. Therefore in setting up Fixed Rates for Airport trips it is necessary to first establish Zones. Airports are set up as Zones in Limo Anywhere, and it is important to use the Airport code as the Zone code for Limo Anywhere to apply pricing correctly. Below are instructions for adding Airports as Zones. For complete instructions on Fixed Rates and Zones Setup see the Knowledge Base article.
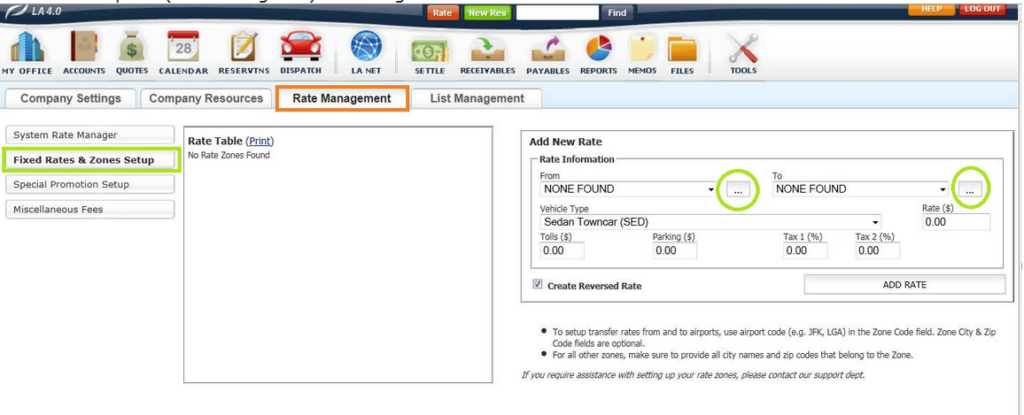
- Click on the ‘My Office‘ icon on the tool bar.
- Open the Rate Management tab and select the ‘Fixed Rates & Zones Setup‘ button.
- Click the ‘ellipsis‘ (circled in green) to the right of the ‘From‘ and ‘To‘ fields in the Add New Rate box.
- The Manage Zones pop up window will display. The first zones that need to be added are for all airports that will be in the company’s Fixed Rate & Zones structure thus establishing those airports as Zones.
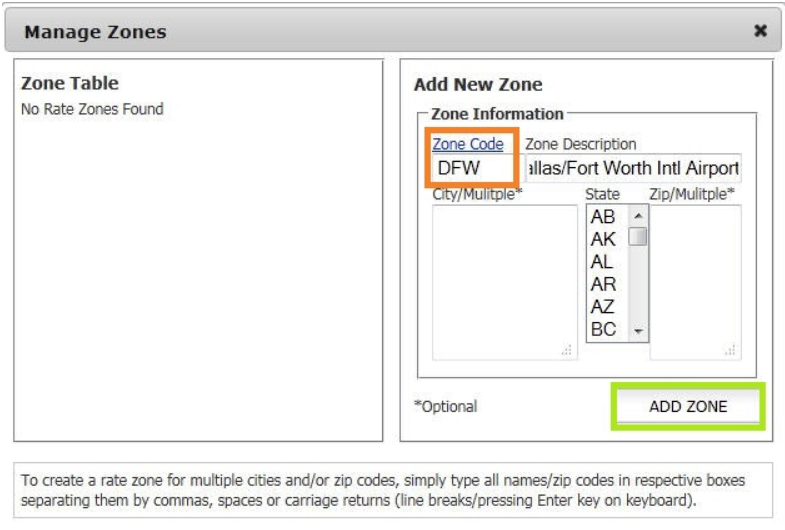
- In the Add New Zone section enter the FAA Airport Code as the Zone Code. It is important that the FAA Airport Code be used because those are built into Limo Anywhere. Do not enter a Zone City or Zip Code for an airport.
- Enter the name of the airport in the field Zone Description.
- Click ‘Add Zone‘ to retain the Zone information entered.
- Repeat the above procedure for all commercial airports in the company’s service area. As Illustrated below DFW International Airport (DFW) and Dallas Love Field Airport (DAL) are now Zones.
Airports in Reservations
Airports that are activated can be selected in the Reservation process to gain efficiency and accuracy in entering the necessary information.
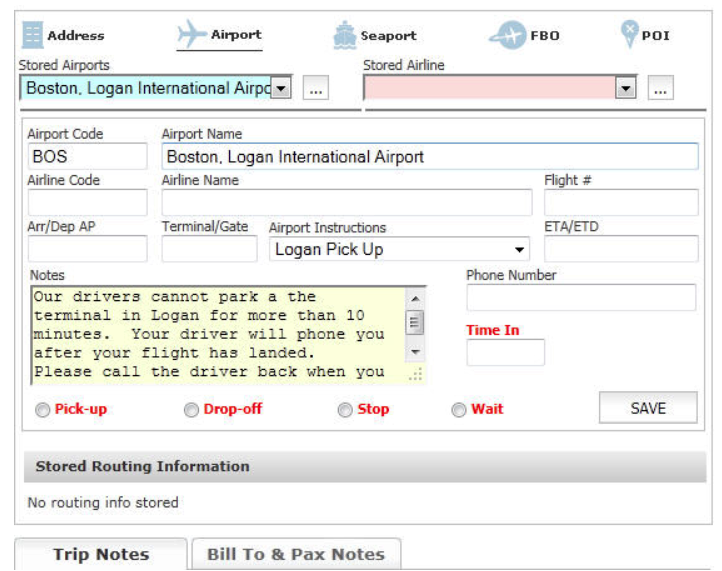
- Select the Airport icon at the top of the routing box.
- Select the Airport for the Stored Airports drop down list. Airports that are ‘ACTIVE‘ will appear on the the Stored Airports drop down list in alphabetical order.
- When an airport is selected as illustrated below Limo Anywhere populates the fields:
- Airport Code
- Airport Name
- Airport Instructions. The default instructions will display. If alternate instructions are present they may be selected from the drop down list.
- In Notes the text entered for the Airport Instructions selected are displayed.