What is a rate matrix?
It’s a set of prices you want to give to specific clients. For example a new or a ‘standard fare’ client can receive a set of prices from a rate matrix called ‘default’ or ‘Regular_Prices’. This means that they are getting your basic pricing that everyone else gets.
Now imagine that you have corporate clients you want to have special pricing or VIP clients you have to give specific rates too. You can have a different matrix set up for each of these clients with their company name as the matrix name and tie them to their account, so that when they log in, they see the special prices you want them to see.
IMPORTANT NOTE: There can only be one Default Rate Matrix, which should be the basic Rates that regular customers (non special pricing customers) would get, you will need to set up ALL of your vehicle types Hourly and Per Passenger rates under the SAME ‘Default Rate Matrix’. If you have special pricing matrices you will need to set up ALL of your vehicle types Hourly and Per Passenger rates under each matrix.
Establishing Hourly Rates
- Click on the ‘My Office‘ icon on the tool bar.
- Select the ‘Company Resources‘ tab.
- Click on the ‘Vehicle Types‘ button.
- In the ‘Vehicle Type Listing‘ chose the Vehicle Type to which the Hourly Matrix is to be added.
- Click the ‘Edit Vehicle Type‘ button.
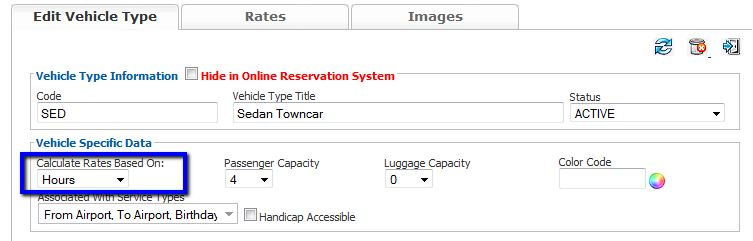
- The Vehicle Type will display in the ‘Edit Vehicle Type‘ section. Ensure that the setting ‘Calculate Rates Based On:‘ is set to Hours as illustrated below.
- Select the ‘Rates‘ tab.
- Select the ‘Per Hour Rates‘ tab.
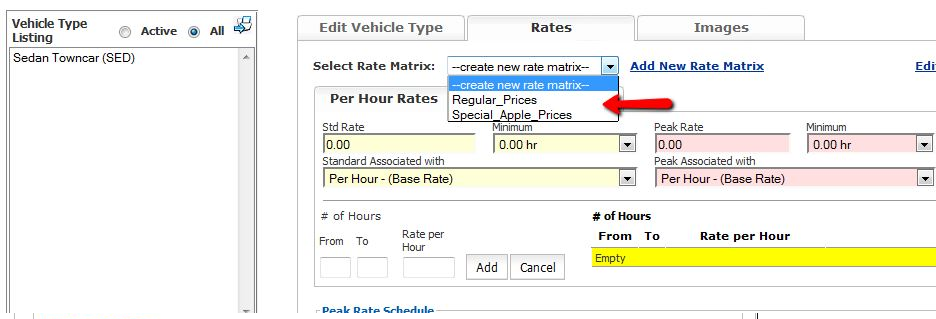
- If you DO NOT have any rate matrices under the ‘Select Rate Matrix:‘ drop down click the ‘Add New Rate Matrix‘ link.
- Enter ‘New Rate Matrix Name‘ such as Default_Pricing, Default, or Regular_Prices. Each Rate Matrix should have a unique name as illustrated below.
- Click the ‘Create Matrix‘ to continue.
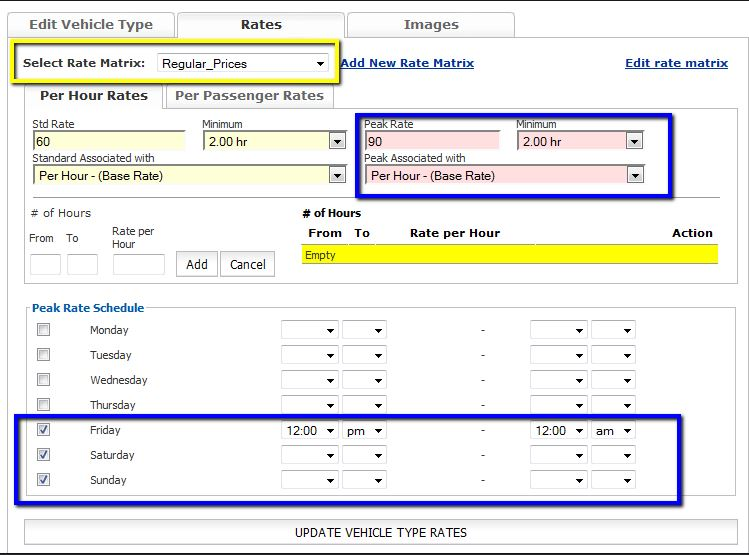
- The Rate Matrix will open so rates can be added as indicated by the title appearing in the Select Rate Matrix field as illustrated below in the yellow box.
- Enter the rate per hour for ‘Std Rate‘, select the ‘Minimum Hours‘, and associate your hourly rate field in the ‘Standard Associated with‘ drop down as illustrated below in the blue box.
- (OPTIONAL) Enter the rate per hour for ‘Peak Rate‘, select the ‘Minimum Hours‘,and associate your hourly rate field in the “Peak Associated with” drop down as illustrated below in the blue box.
- Select the days and enter the hours for which the Peak Rate will apply in Peak Rate Schedule as illustrated below in the blue box.
- Click the ‘Update Vehicle Type Rate‘ button.
# of Hours Method – This method creates an escalating or de-escalating rate based on the Trip Duration
NOTE: Setting up # of Hours Method will take priority over the peak rate pricing.
- Enter a number of hours in the ‘From‘ and ‘To‘ field. For the first time segment the ‘From‘ field will need to start at the minimum number plus .1 of hours allowed as illustrated below in the red boxes.
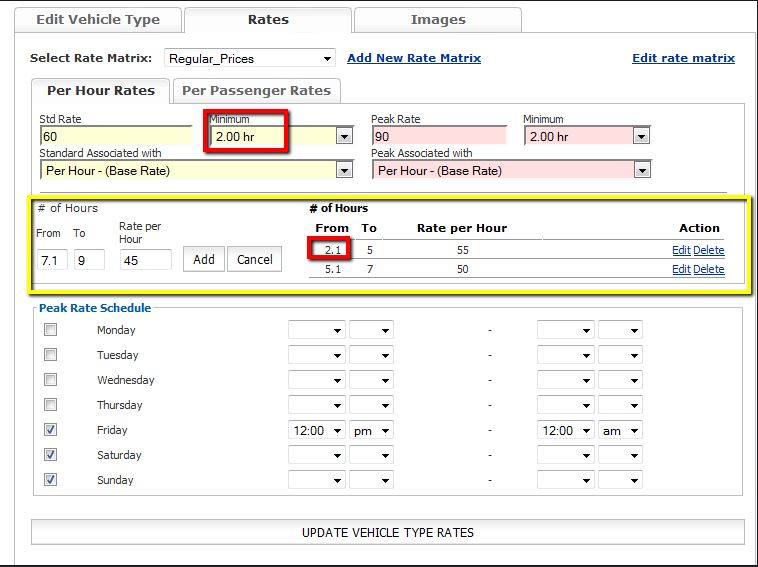
- Enter the ‘Rate per Hour‘ for trips whose duration falls within the From and To fields.
- Click the ‘Add‘ button.
- Click the ‘Update Vehicle Type Rate‘ button.
How to Edit Existing Hourly Rates
- Click on the ‘My Office‘ icon on the tool bar.
- Select the ‘Company Resources‘ tab.
- Click on the ‘Vehicle Types‘ button.
- In the ‘Vehicle Type Listing‘ chose the Vehicle Type to which the Hourly Matrix is to be added.
- Click the ‘Edit Vehicle Type‘ button.
- The Vehicle Type will display in the ‘Edit Vehicle Type‘ section.
- Select the ‘Rates‘ tab.
- Select the rate matrix you would like to changes the hourly prices on from the ‘Select Rate Matrix:‘ drop down box as illustrated below.
- Select the ‘Per Hour Rates‘ tab.
- Change the rates from what you have displayed under the ‘Per Hour Rates‘ tab.
- Click the ‘Update Vehicle Type Rate‘ button.
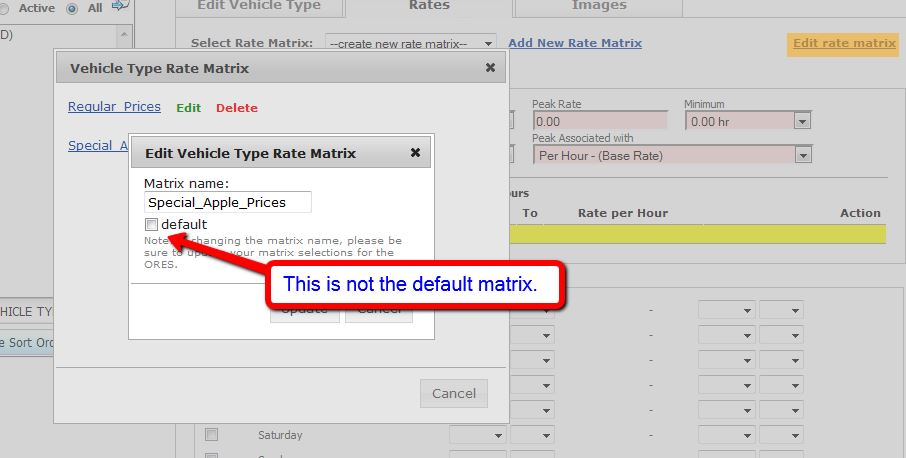
How to tell which matrix is the default matrix
- Click on the ‘My Office‘ icon on the tool bar.
- Select the ‘Company Resources‘ tab.
- Click on the ‘Vehicle Types‘ button.
- Select a ‘Vehicle Type‘.
- Click the ‘Edit Vehicle Type‘ button.
- The Vehicle Type will display in the ‘Edit Vehicle Type‘ section.
- Select the ‘Rates‘ tab.
- Click the ‘Edit rate matrix‘ link.
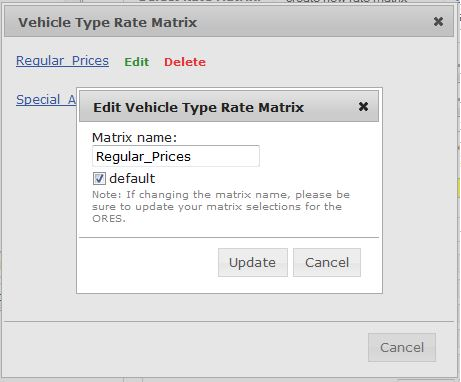
- Click the green word labeled ‘Edit‘ to see if that matrix is checked off as ‘Default‘ as illustrated below.